
Step 1
Intake and document review
Plans, shop drawings, engineering calculations, installation photos, weather history

A room-by-room look at a real SIP house fire in Duluth, Minnesota: what burned, what didn’t, and how 18 core samples decided which panels could stay and which had to go.
Written and Analyzed By Joe Pasma, PE | PGS Consulting LLC, Licensed Professional Engineer | 40+ Years in SIP Engineering, Manufacturing, and Forensic Analysis | Published October 9, 2026
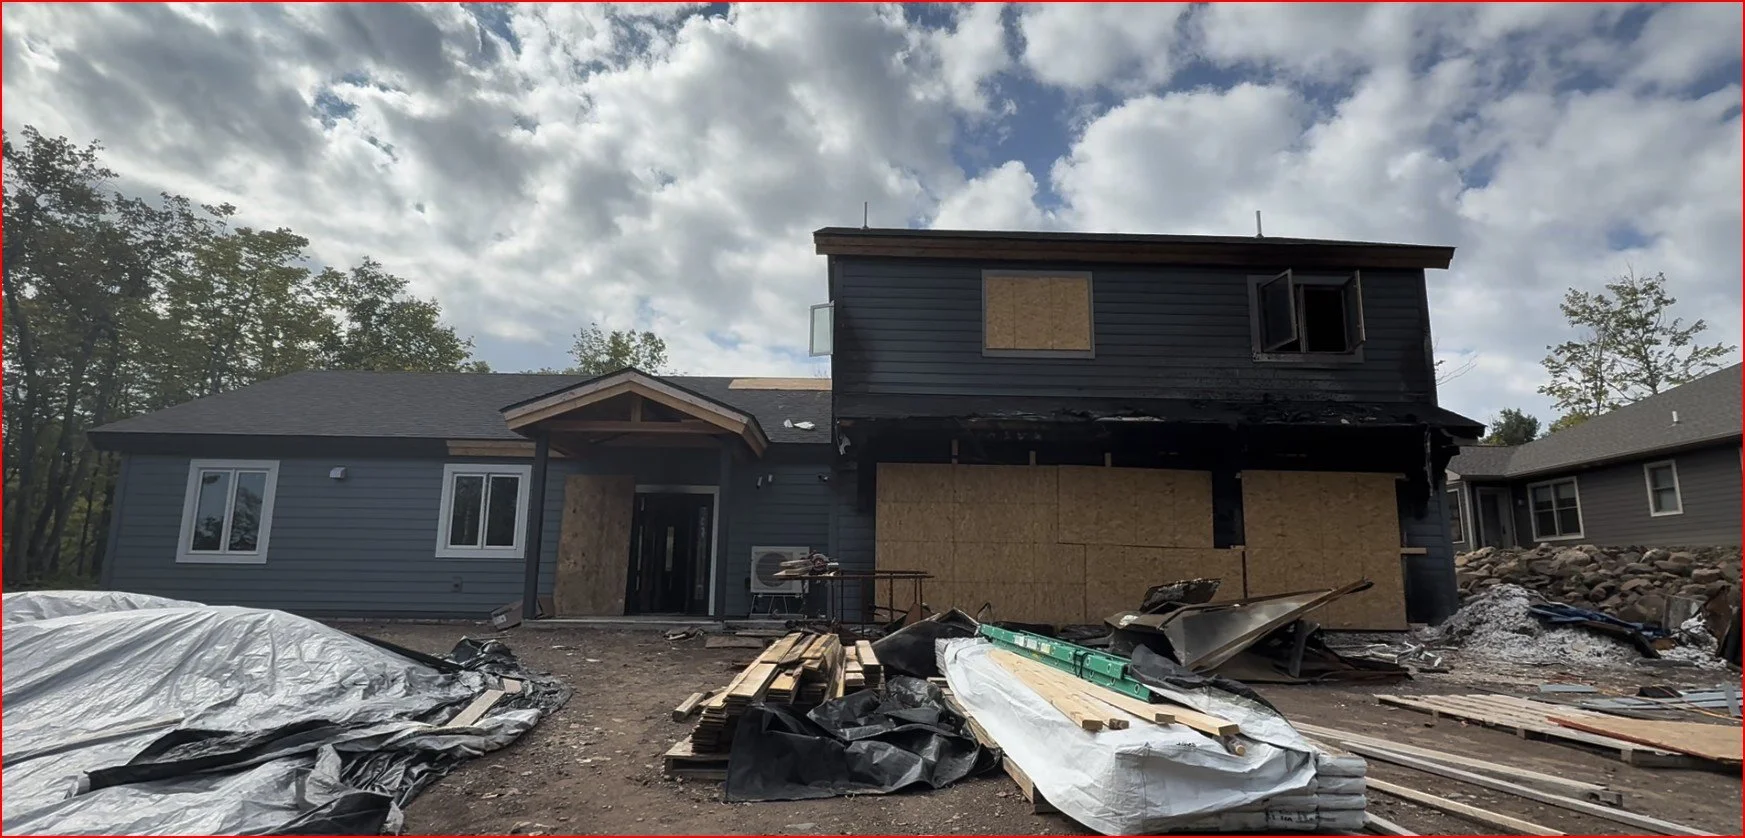
House Fire Involving SIP Roof and Wall Panels
When a house built with structural insulated panels (SIPs) catches fire, everyone asks the same question: does the whole thing have to come down? In this case, the answer was no. Some panels had to be replaced. Many others came through the fire structurally sound, sometimes just a few feet from areas that burned badly.
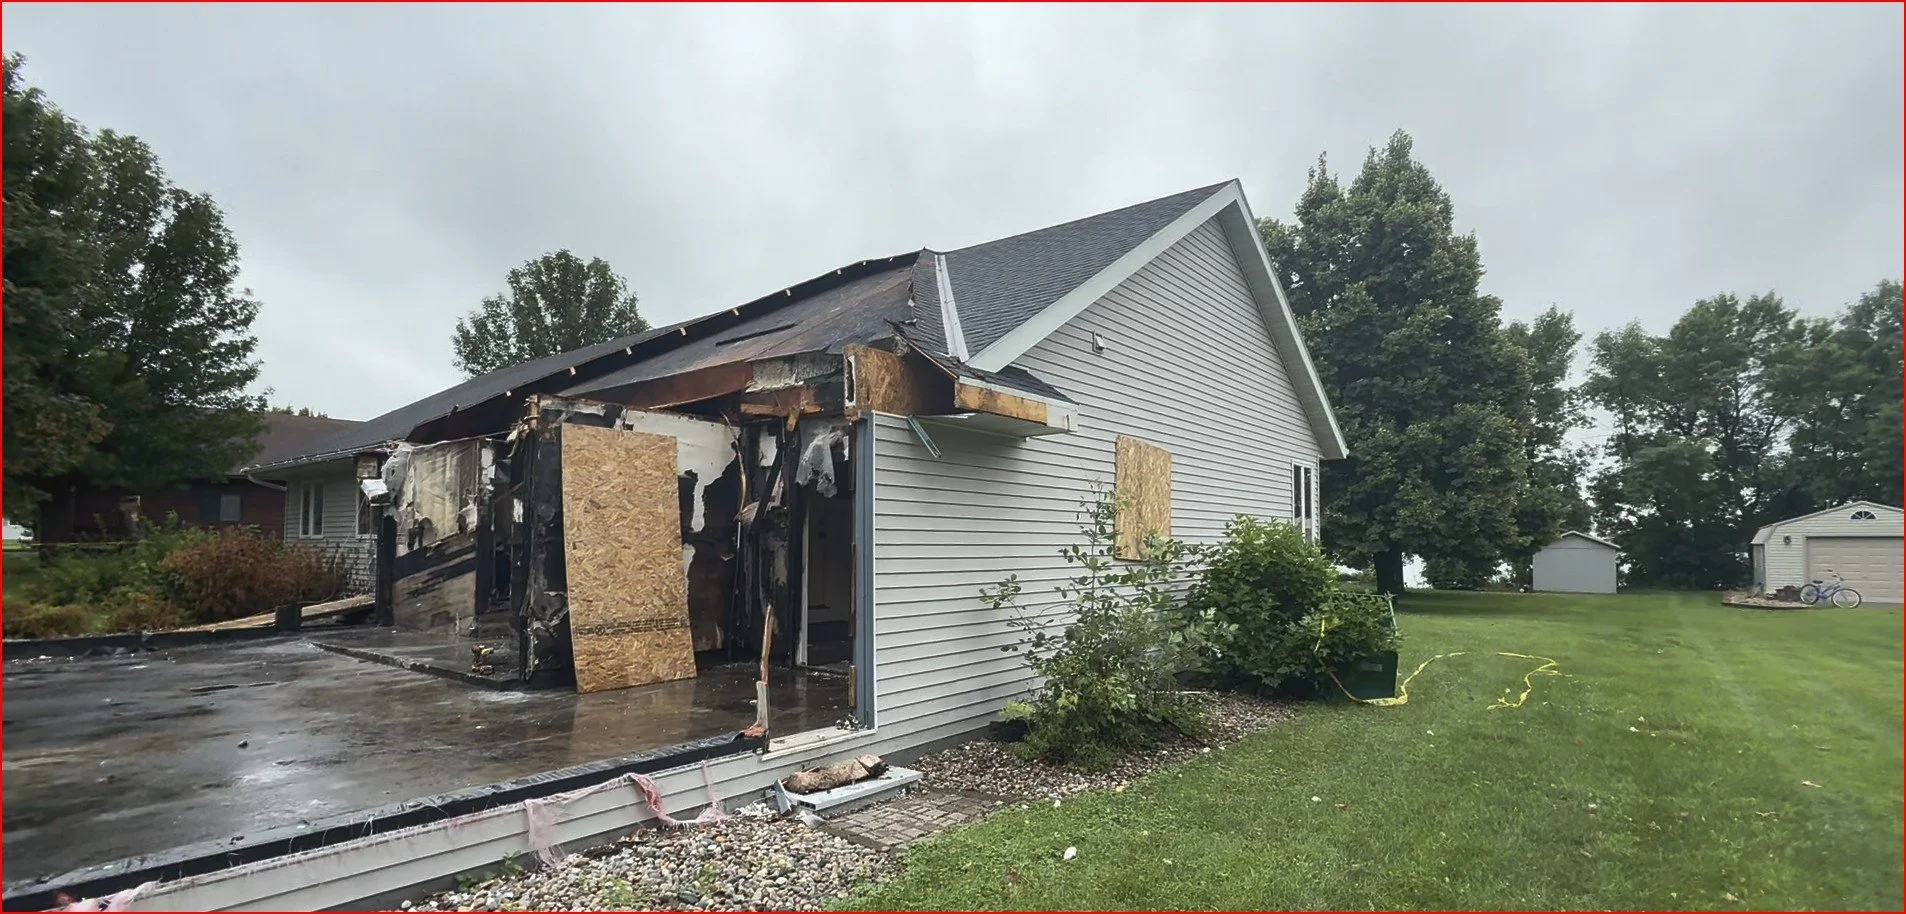
In August 2026, PGS Consulting LLC investigated a residential SIP fire in Duluth, Minnesota. The home was nearing completion but was still under construction. The fire started in the garage and spread into parts of the home and garage's SIP walls and roof. We cut 18 core samples, reviewed 87 videos, and went room by room to sort out what was damaged, what wasn't, and why.
If you read our SIP Fire Myths article, this is the house behind it. Below is the full room-by-room breakdown, so you can see exactly what fire does to a SIP and what it doesn’t.
← Swipe to view full table →
| Detail | Summary |
|---|---|
| Location | Duluth, Minnesota |
| Investigation date | August 2026 |
| Project type | Residential home under construction, SIP exterior walls and roof |
| Fire origin | Attached garage |
| Evidence reviewed | 18 core samples, 87 videos, photo documentation |
| Areas studied | 8 zones, from untouched to total loss |
| Outcome | Panels protected by drywall, siding, plywood, or wood ceilings stayed sound. Some panels hit by direct, sustained flame lost their structural bond and were replaced. |
The fire did not damage the house evenly: some SIPs were a total loss, while others a few feet away had no structural damage at all.
Coverings made the biggest difference: drywall, siding, plywood, and wood ceilings shielded the panels behind them, even when those coverings were badly charred.
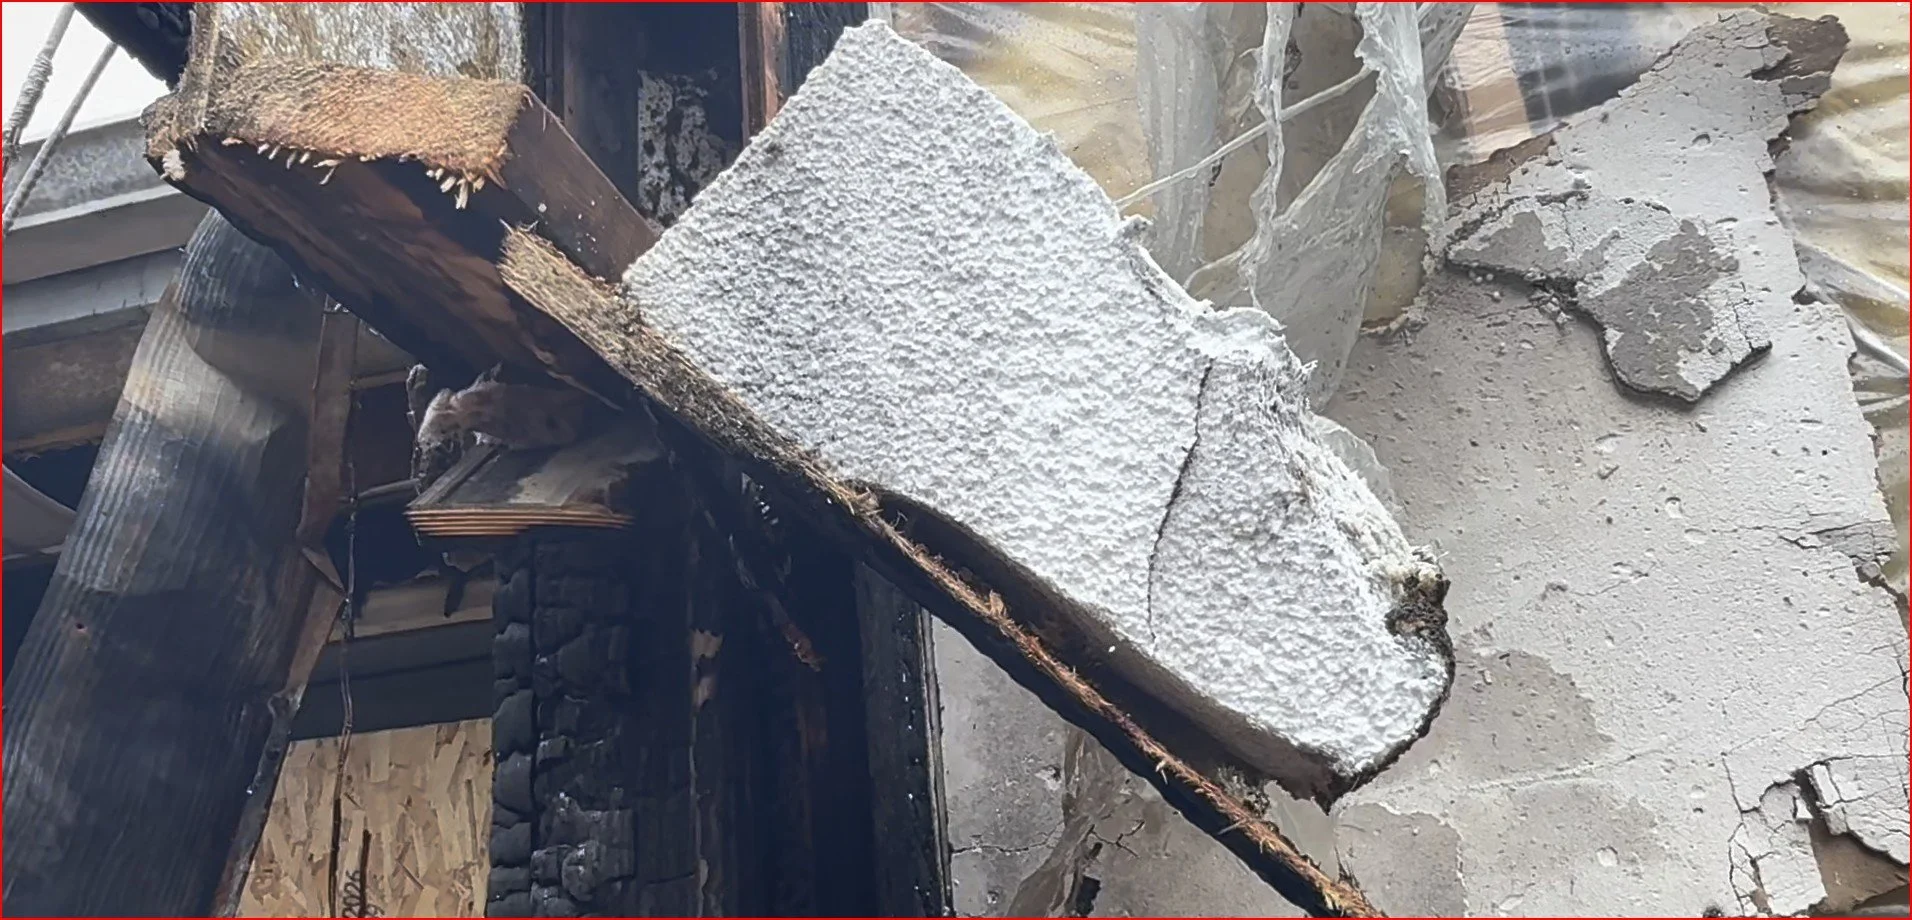
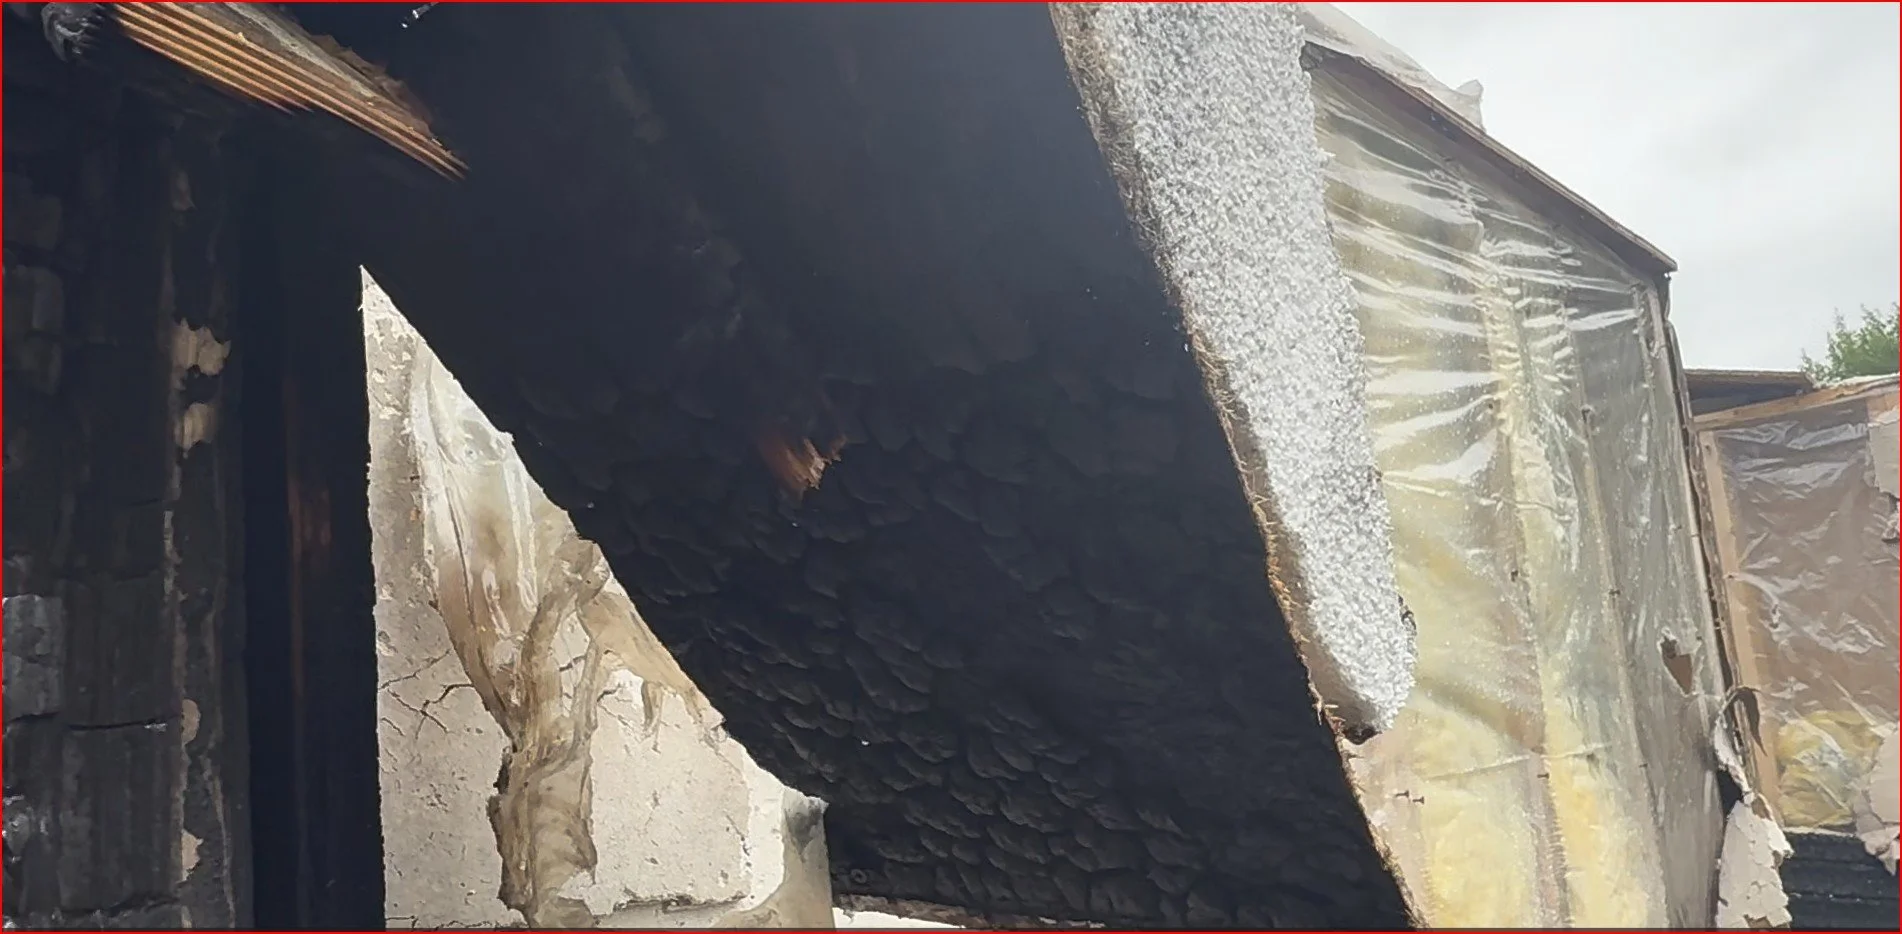
Burnt wood on the surface is not the red flag: the real warning sign is foam that has melted away from the wood skin, called EPS melt-back.
Core samples settle the question: of 18 samples, 8 showed a solid bond and 10 showed a failed bond. Every failed sample came from an area the fire hit hard and directly.
Structural framing held up differently: the garage door headers came through undamaged, even though SIP material right around them had to be replaced.
Repair vs. replace is a panel-by-panel call: this home needed targeted replacement, not a teardown.
A SIP is a sandwich, like an Oreo cookie with vanilla wafers. In the middle is a thick layer of rigid foam called EPS (expanded polystyrene). On each side is a wood panel called OSB (oriented strand board), which we'll call the "skin." The foam and the skins are glued together.
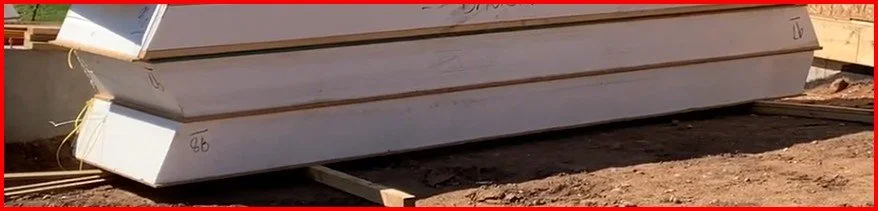

That glue bond is the secret to a SIP's strength. On their own, foam and OSB aren't very strong. Bonded together, they work as one stiff, strong panel, the same way an I-beam is stronger than its separate parts. Engineers call this "composite action."
So when we investigate a fire, we're not just asking "did it burn?" We're asking one specific question: is the glue bond between the foam and the skin still holding? If yes, the panel is usually still doing its job. If no, that part of the panel has lost its strength.
New to SIPs? Start with What Are SIPs? or our guide to SIP core types and materials.
EPS foam starts to soften once it gets hot, and it begins losing its structural integrity at roughly 180°F. That's well below the temperature it takes to burn wood. OSB reacts differently: when heated, its surface chars first, and that char layer acts like a heat shield that slows heat from reaching the foam underneath. That's why a panel can look scorched on the outside and still have a perfectly good bond inside. You can't tell which is which by looking. You have to cut a sample.
The fire started in the attached garage and spread into parts of the home. The house was still under construction, with SIPs used for the exterior walls and roof. That detail matters, because it meant the home was a mix of finished and unfinished areas:
Some SIPs were already covered with drywall, siding, plywood, or a tongue-and-groove wood ceiling.
Other SIPs had no covering at all, with the bare OSB skin exposed to the room.
Firefighters cut openings in some walls and roof sections to check for hidden fire.
The mechanical room between the house and the garage was a total loss.
That mix of covered and uncovered panels turned the house into a natural side-by-side test. We could compare protected and unprotected SIPs that went through the same fire.
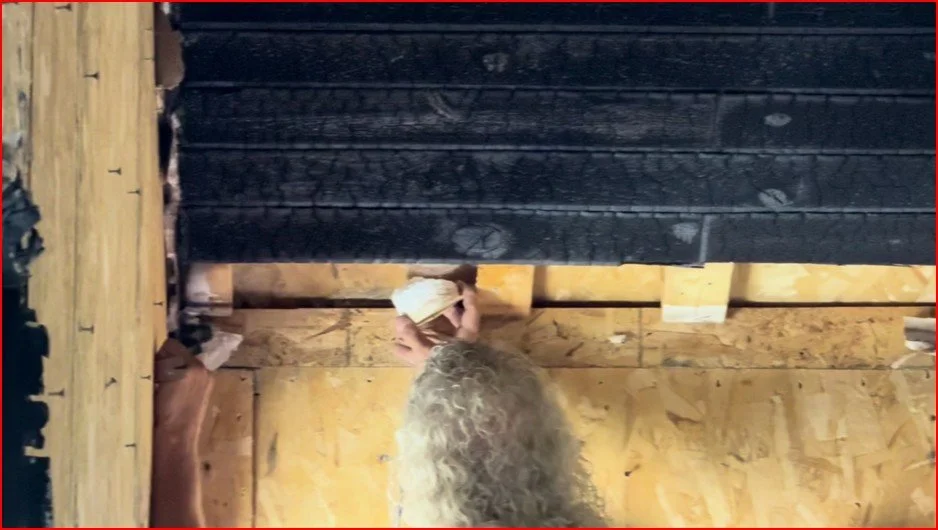
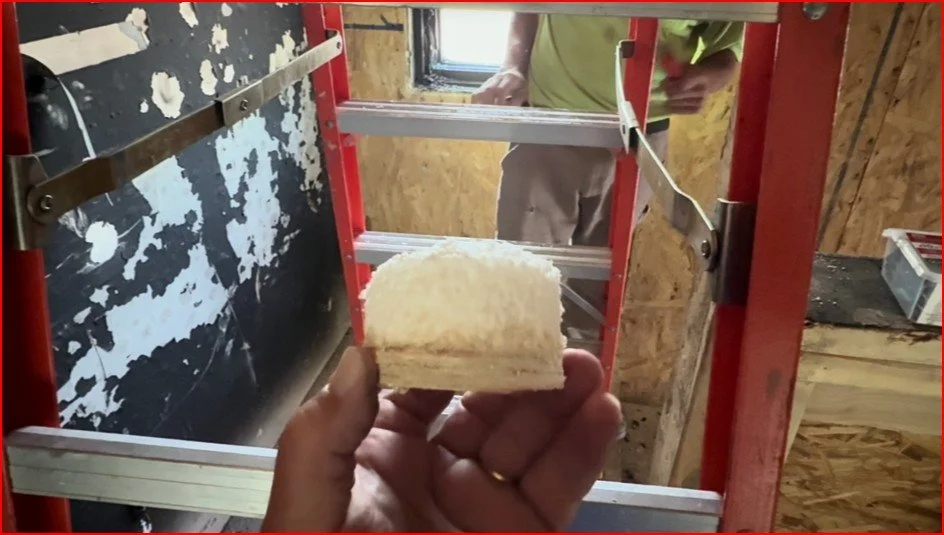
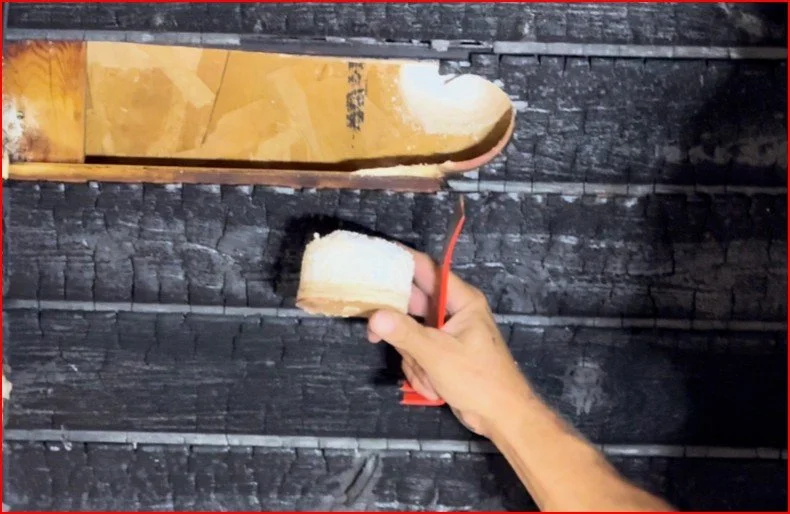
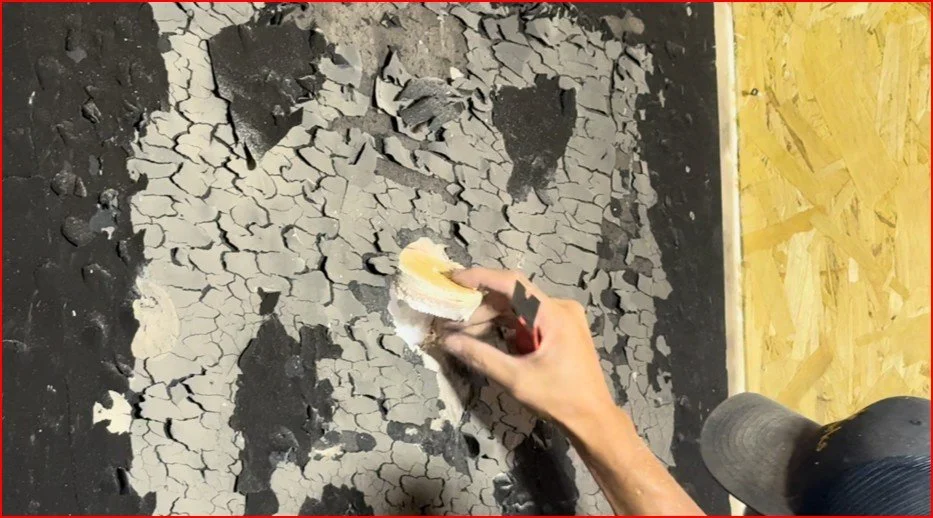
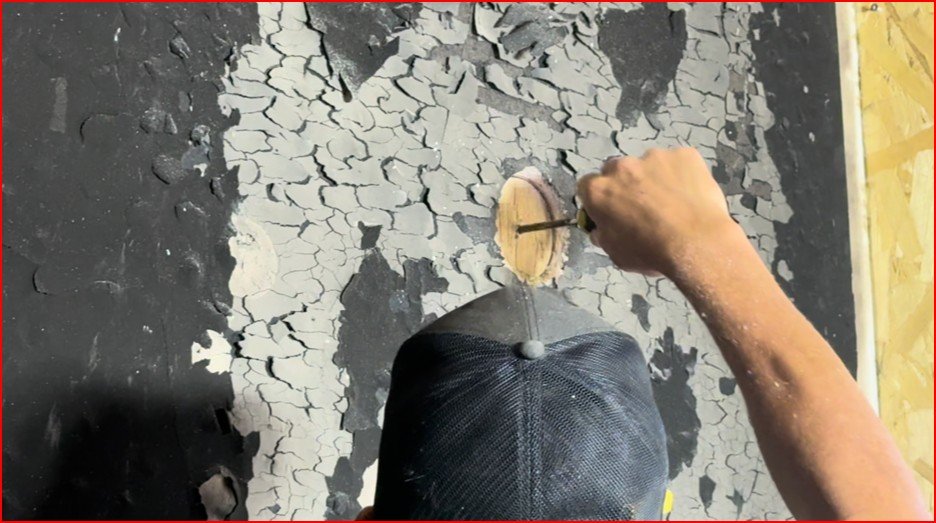
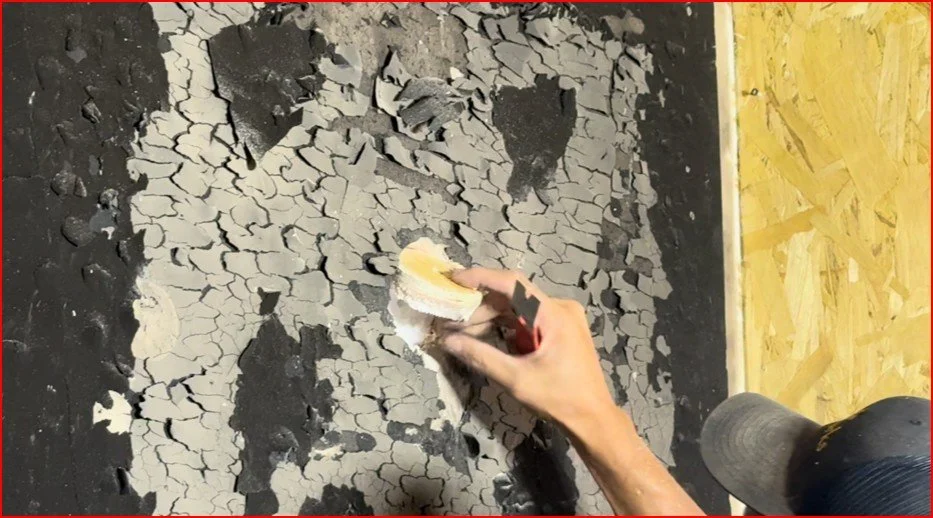
A core sample is a round plug cut through the panel skin with a hole saw. It shows you all three layers (skin, adhesive, foam) exactly as they are inside the wall or roof. panel Think of it like cutting a slice out of a layered cake to see whether the frosting is still holding the layers together.
Here's what we look for:
A good bond: when you pull the skin away, chunks of foam stay stuck to the wood. This is called "foam tear-out," and it means the glue is stronger than the foam itself. That's a healthy panel.
A failed bond: the foam has melted back and pulled away from the skin, leaving a clean gap where the glue line used to be. That section has lost its strength.
Looking at the surface can't tell you this. A badly charred skin can sit on top of a perfectly healthy panel, and that's exactly what we found in several rooms.
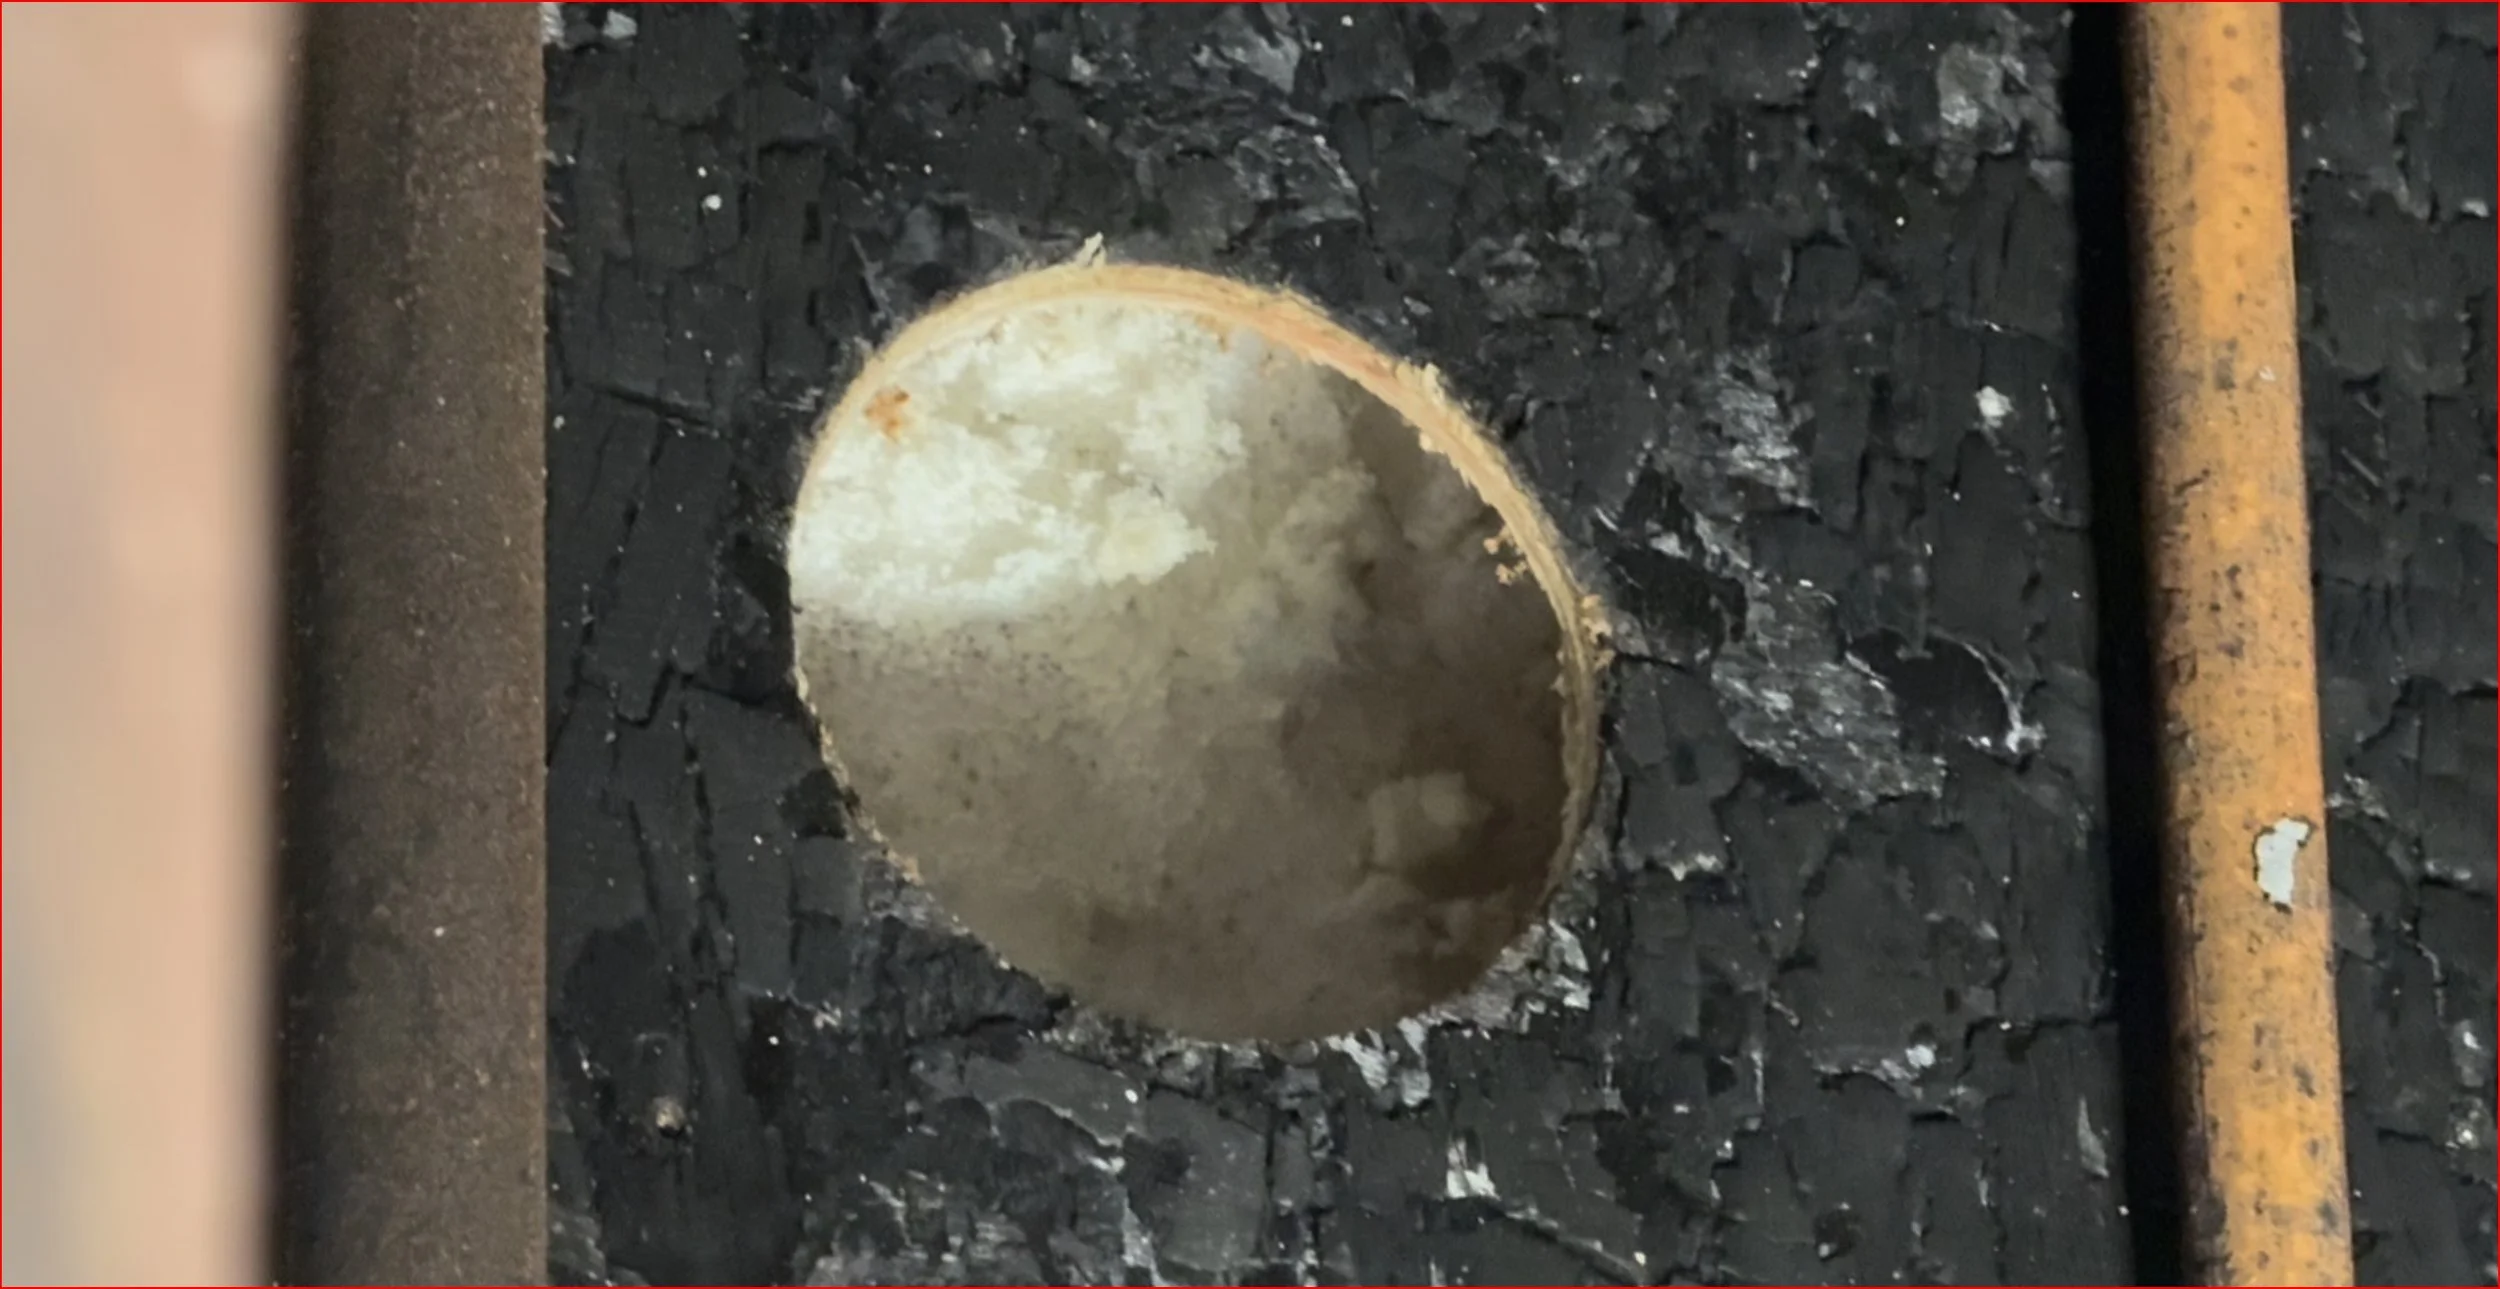
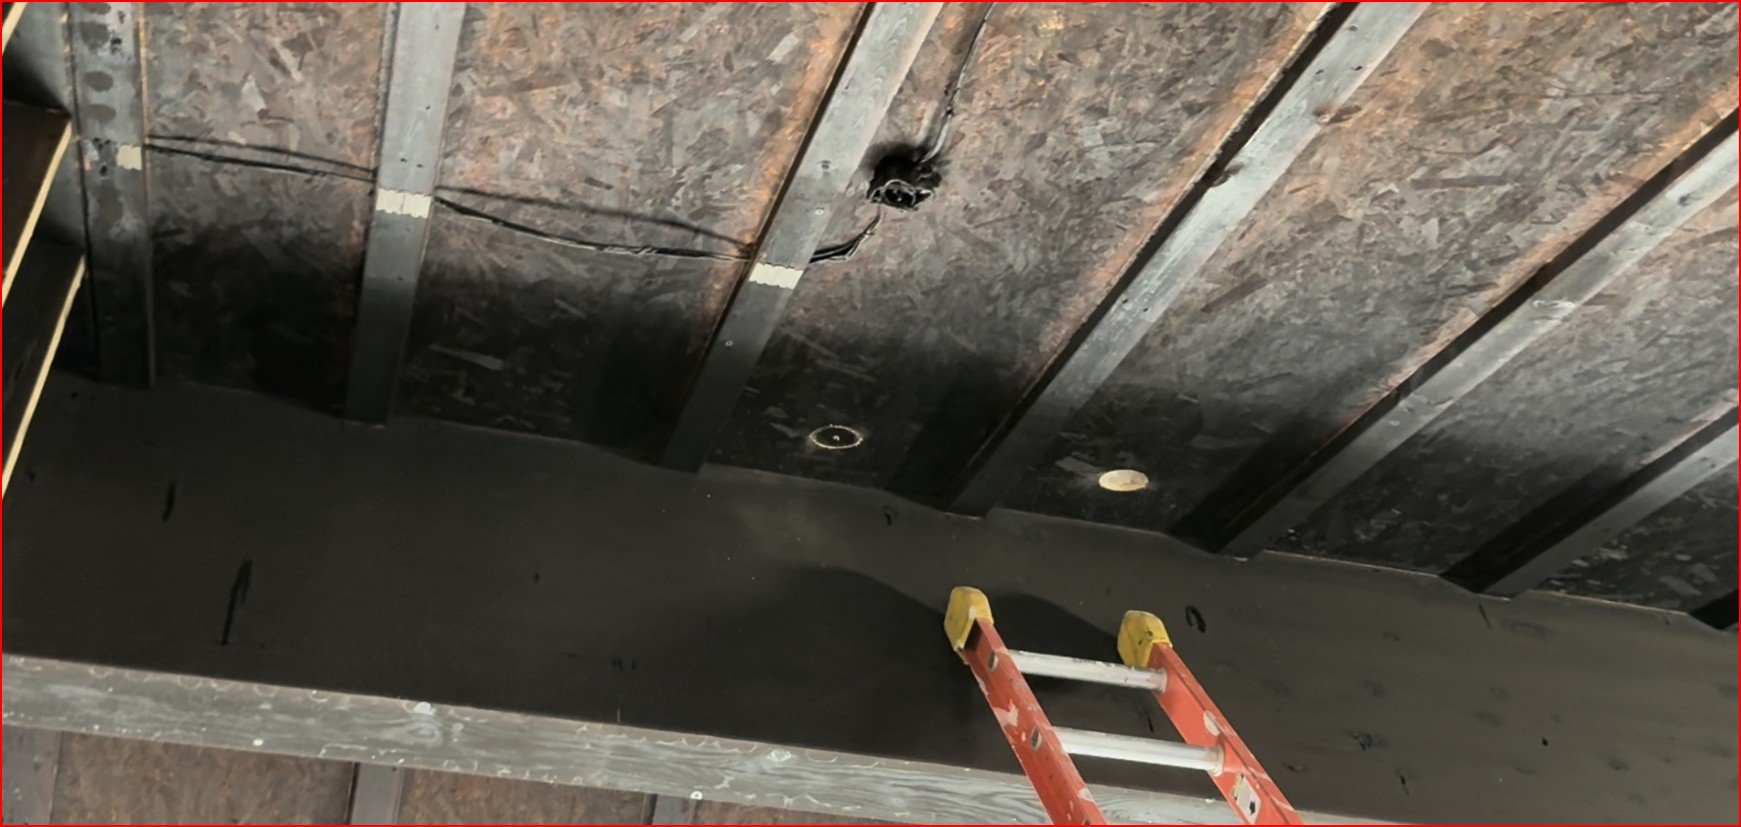
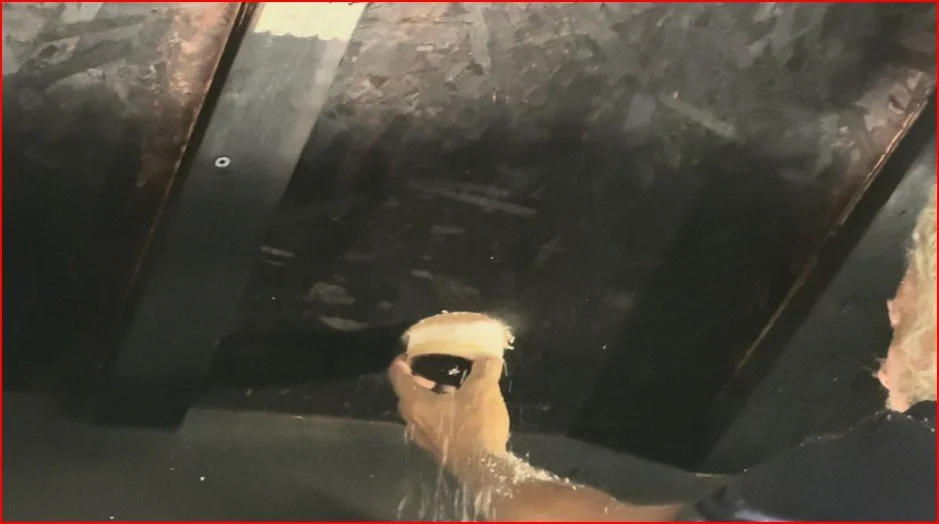
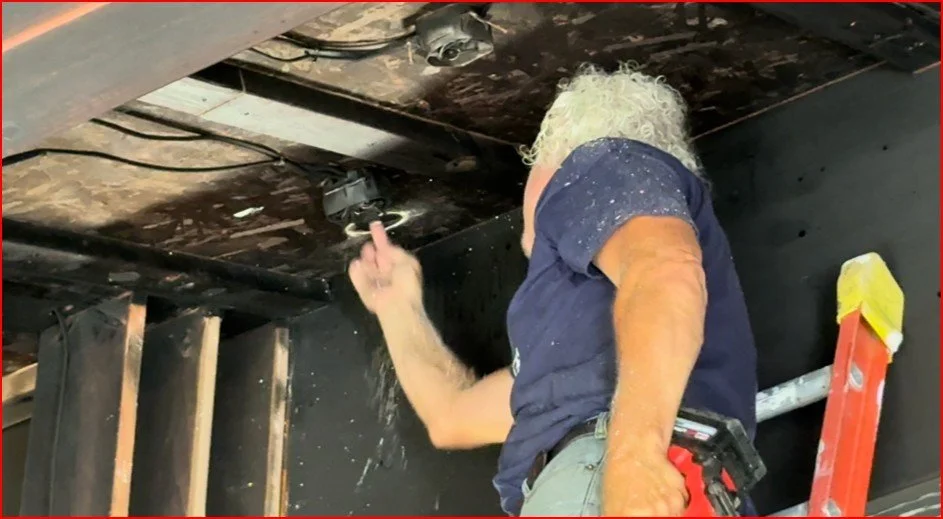
← Swipe to view full table →
| What You See | Bond Held | Bond Failed |
|---|---|---|
| Foam on the skin | Foam chunks stuck to the OSB (tear-out) | Clean separation, no foam attached |
| Foam core | Full thickness, no melting | Melted back away from the skin |
| OSB skin | Clean, or charred on the surface only | Often charred deep into the wood |
| Panel strength | Still working as one panel | Lost in that area |
| Typical next step | Keep, clean, or repair | Engineer decides repair or replacement |
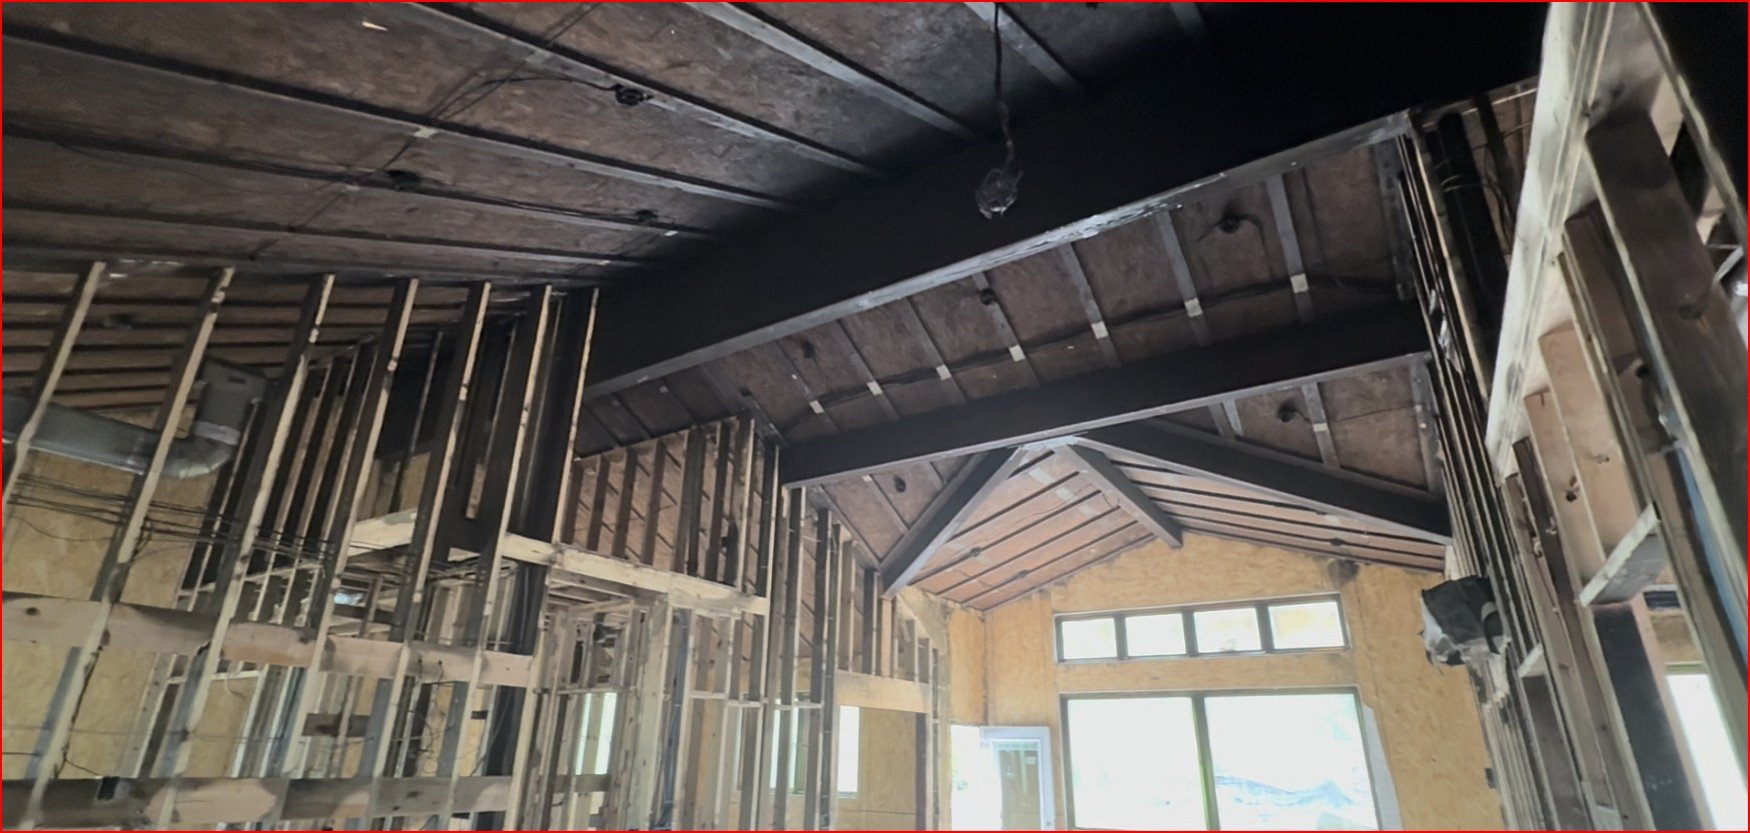
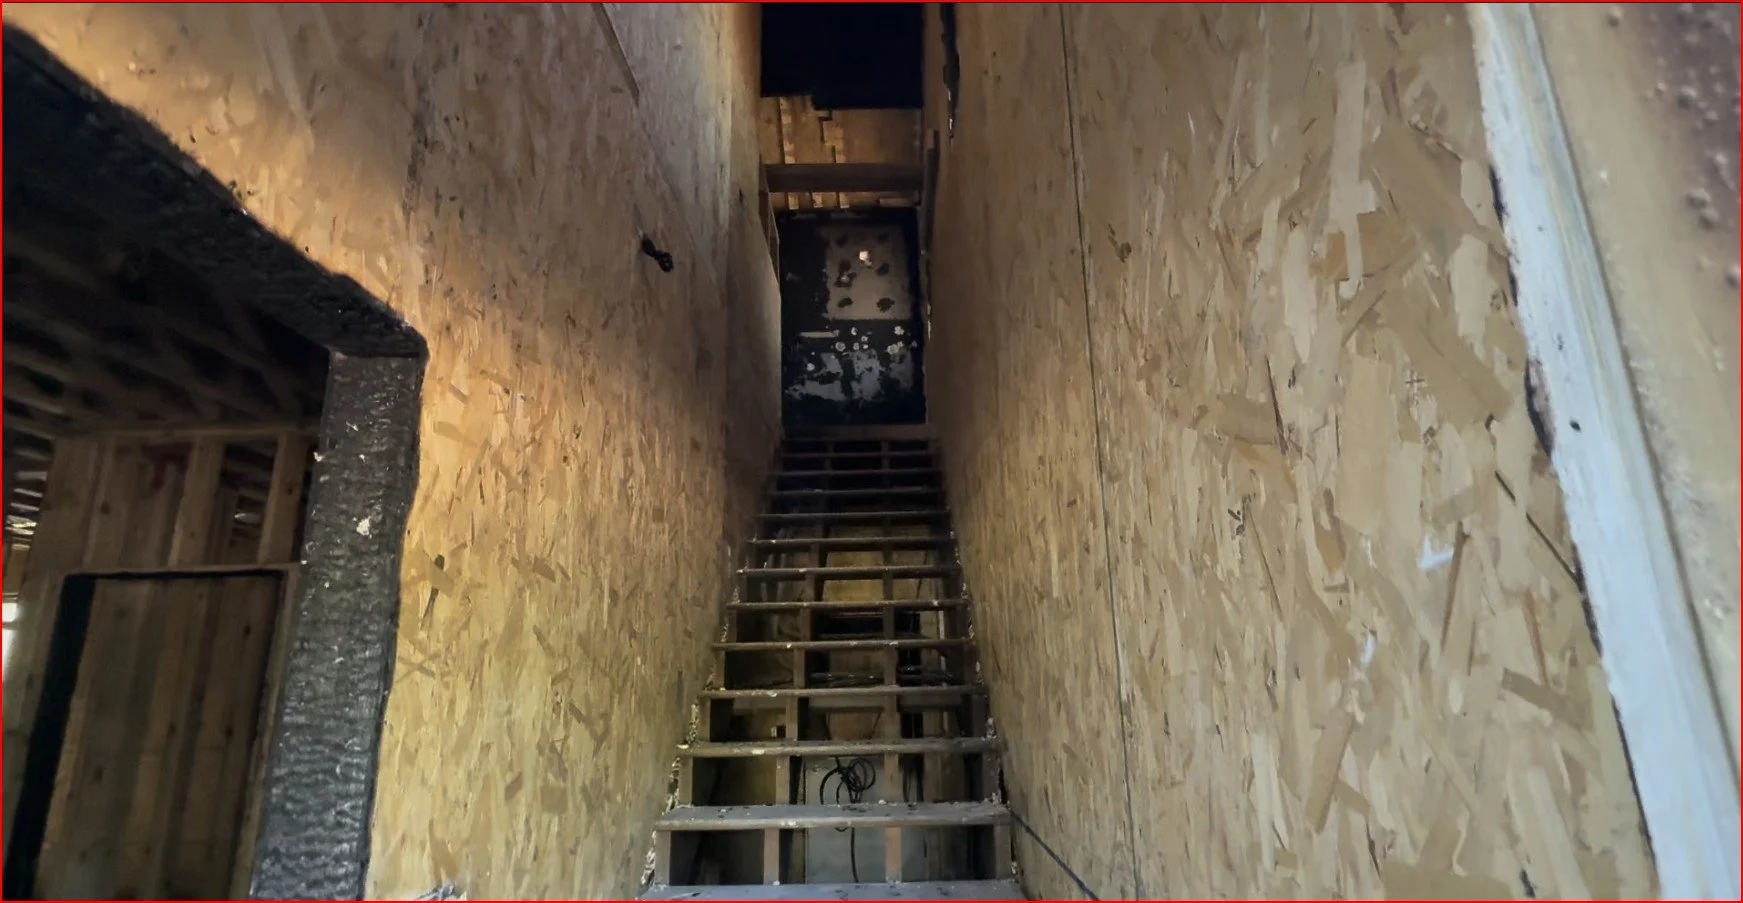
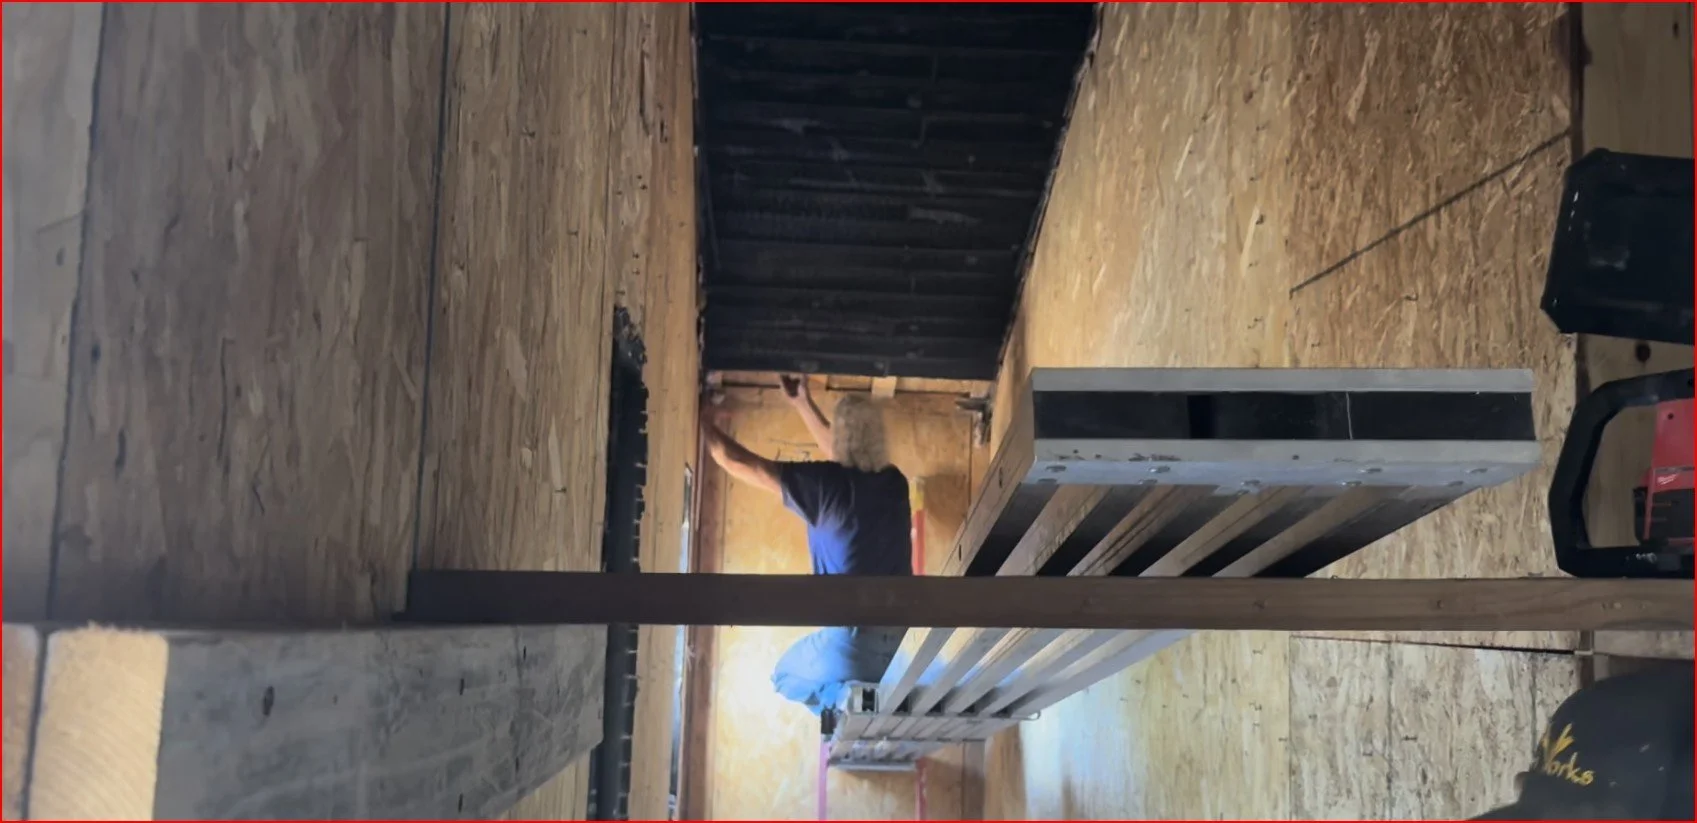
The drywall here was removed after the fire so we could see behind it. The SIP skins underneath had no fire damage. Above the stairs, the wood ceiling was charred, but the SIP roof panels behind it were fine. Core samples 1, 2, and 3 from the roof panels showed no foam melt-back.
Verdict: Panels were protected and structurally sound.
Core samples 4 and 5 showed no fire damage. The skins were still firmly bonded, with foam tear-out visible.
Verdict: Panels remained structurally sound.
Firefighters cut rectangular openings here to check for hidden fire inside the wall. There wasn't any. The heat never made it into the panel.
Verdict: No fire damage inside the panels.
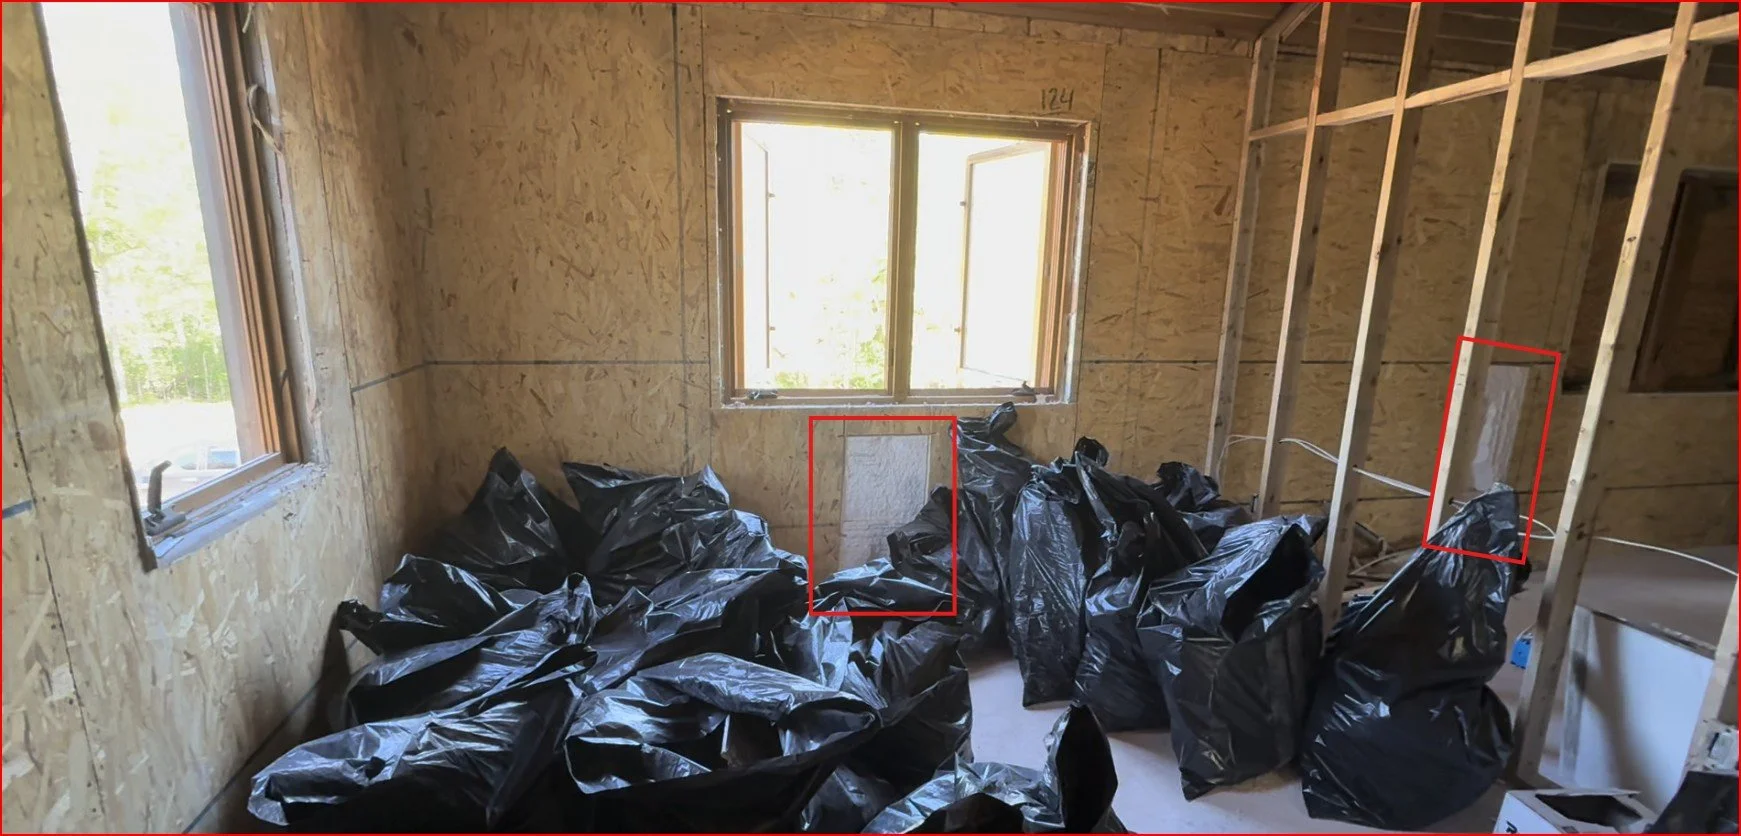
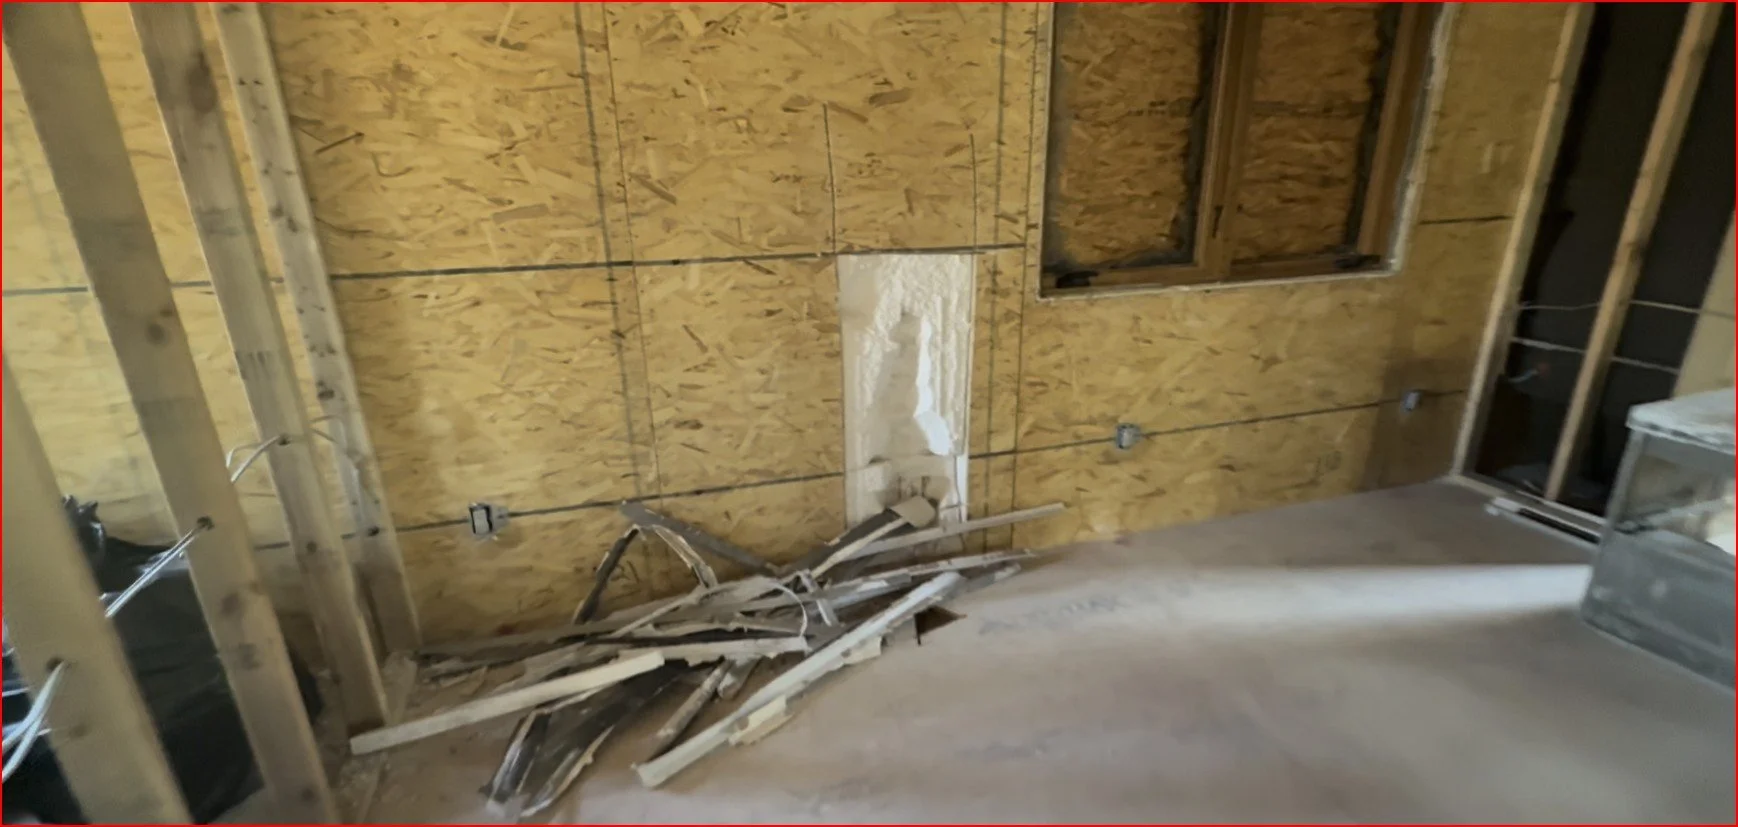
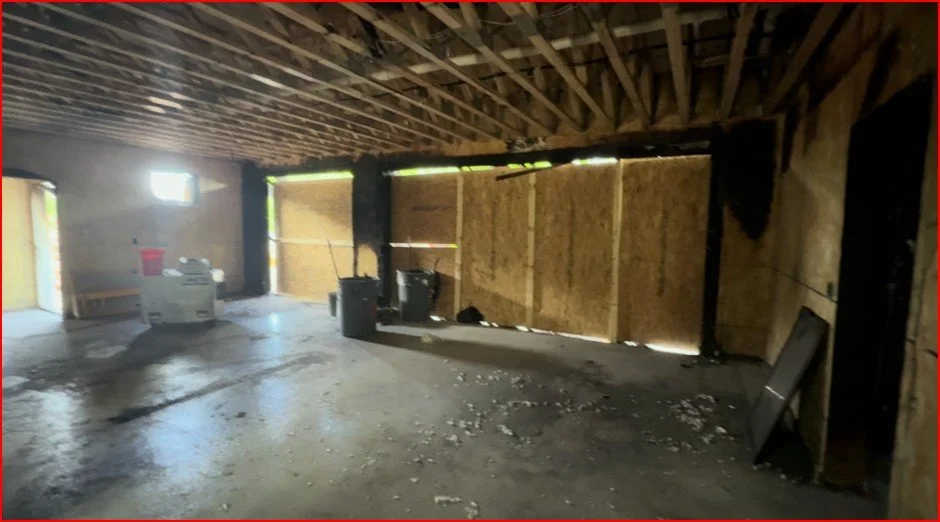
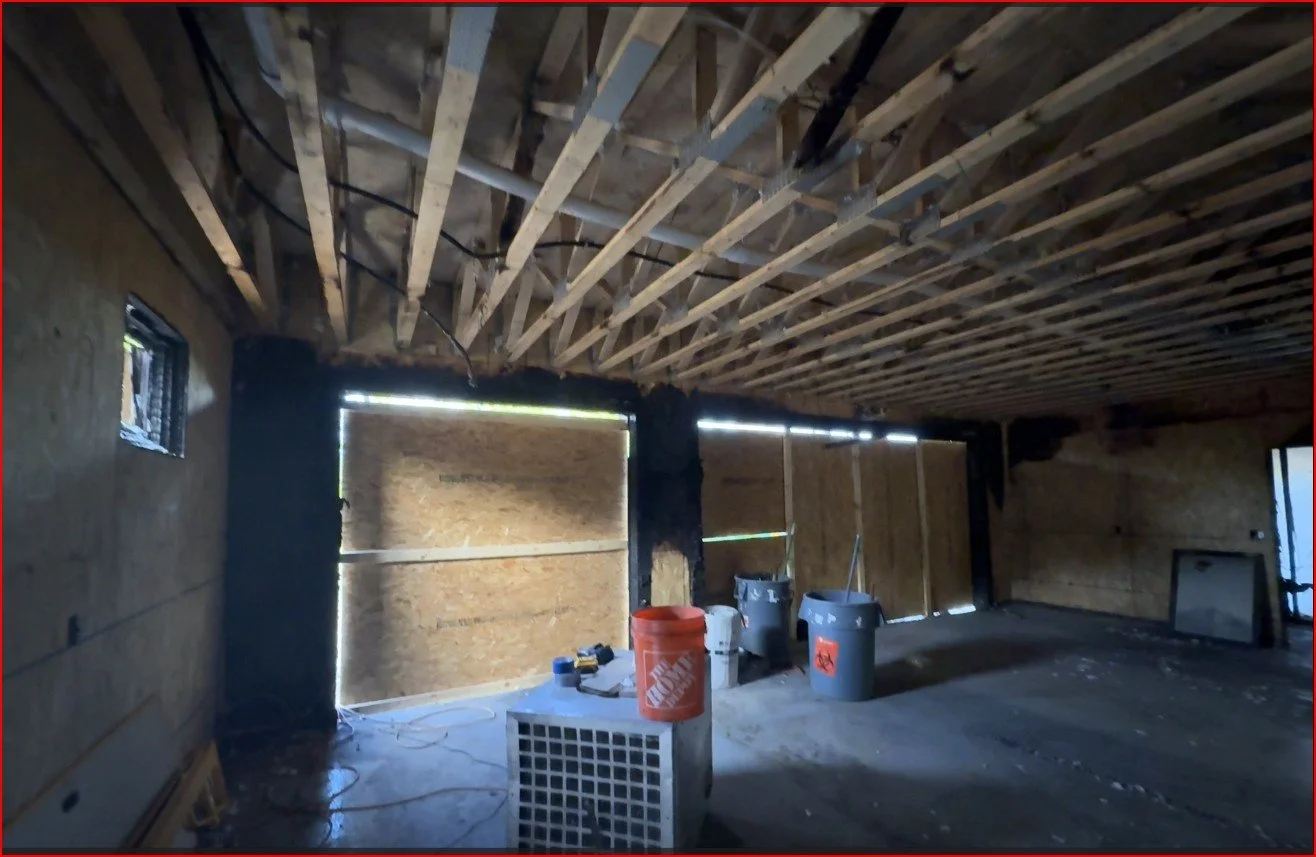
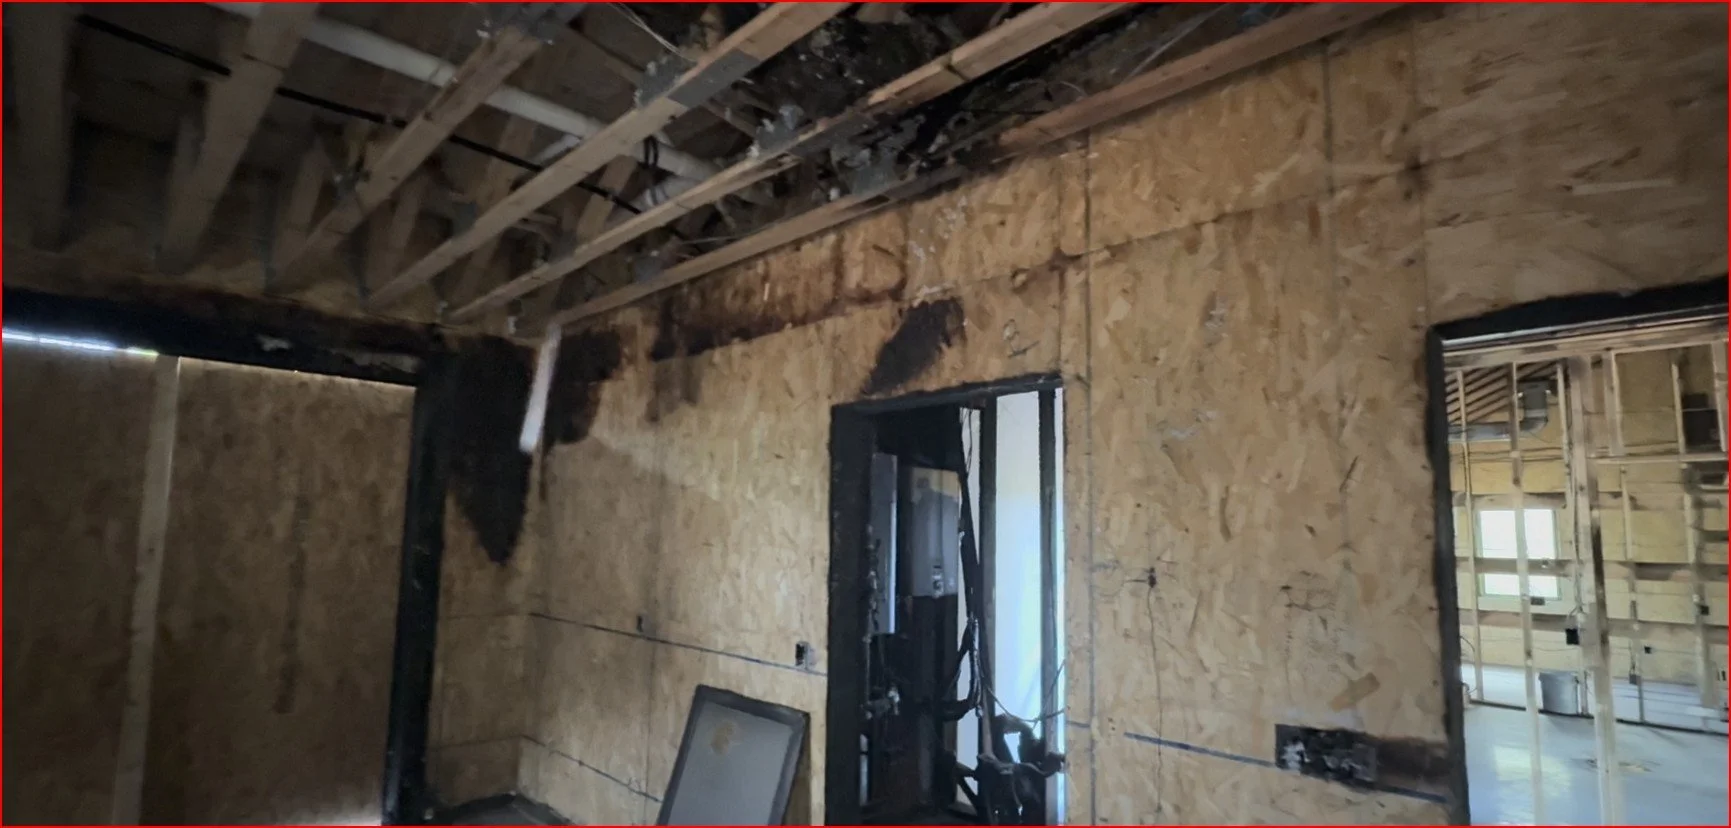
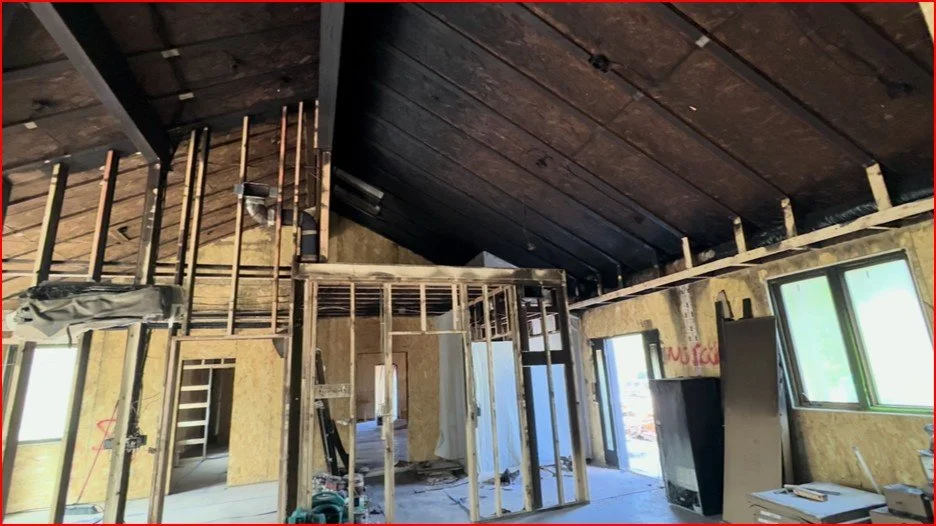
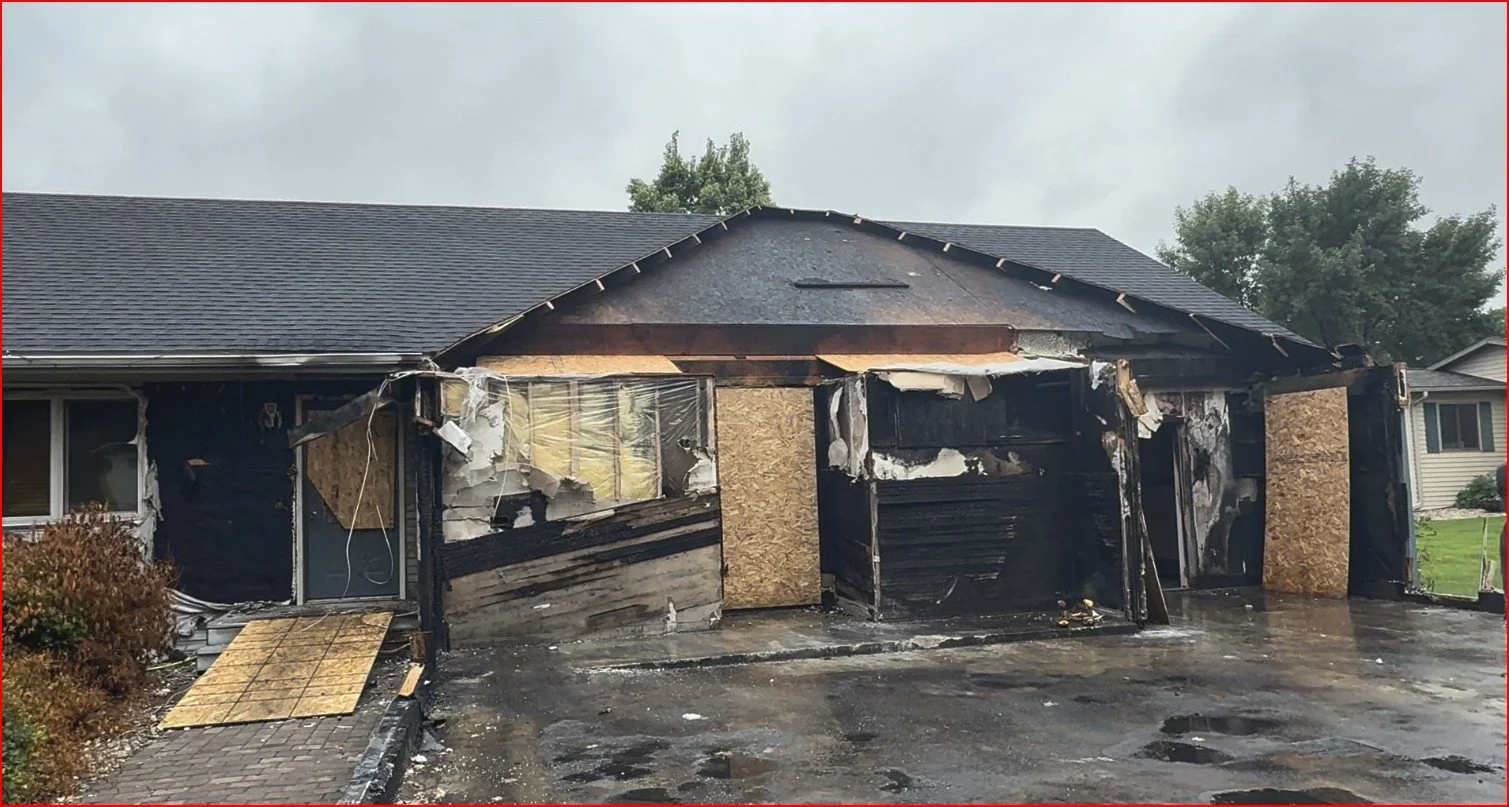
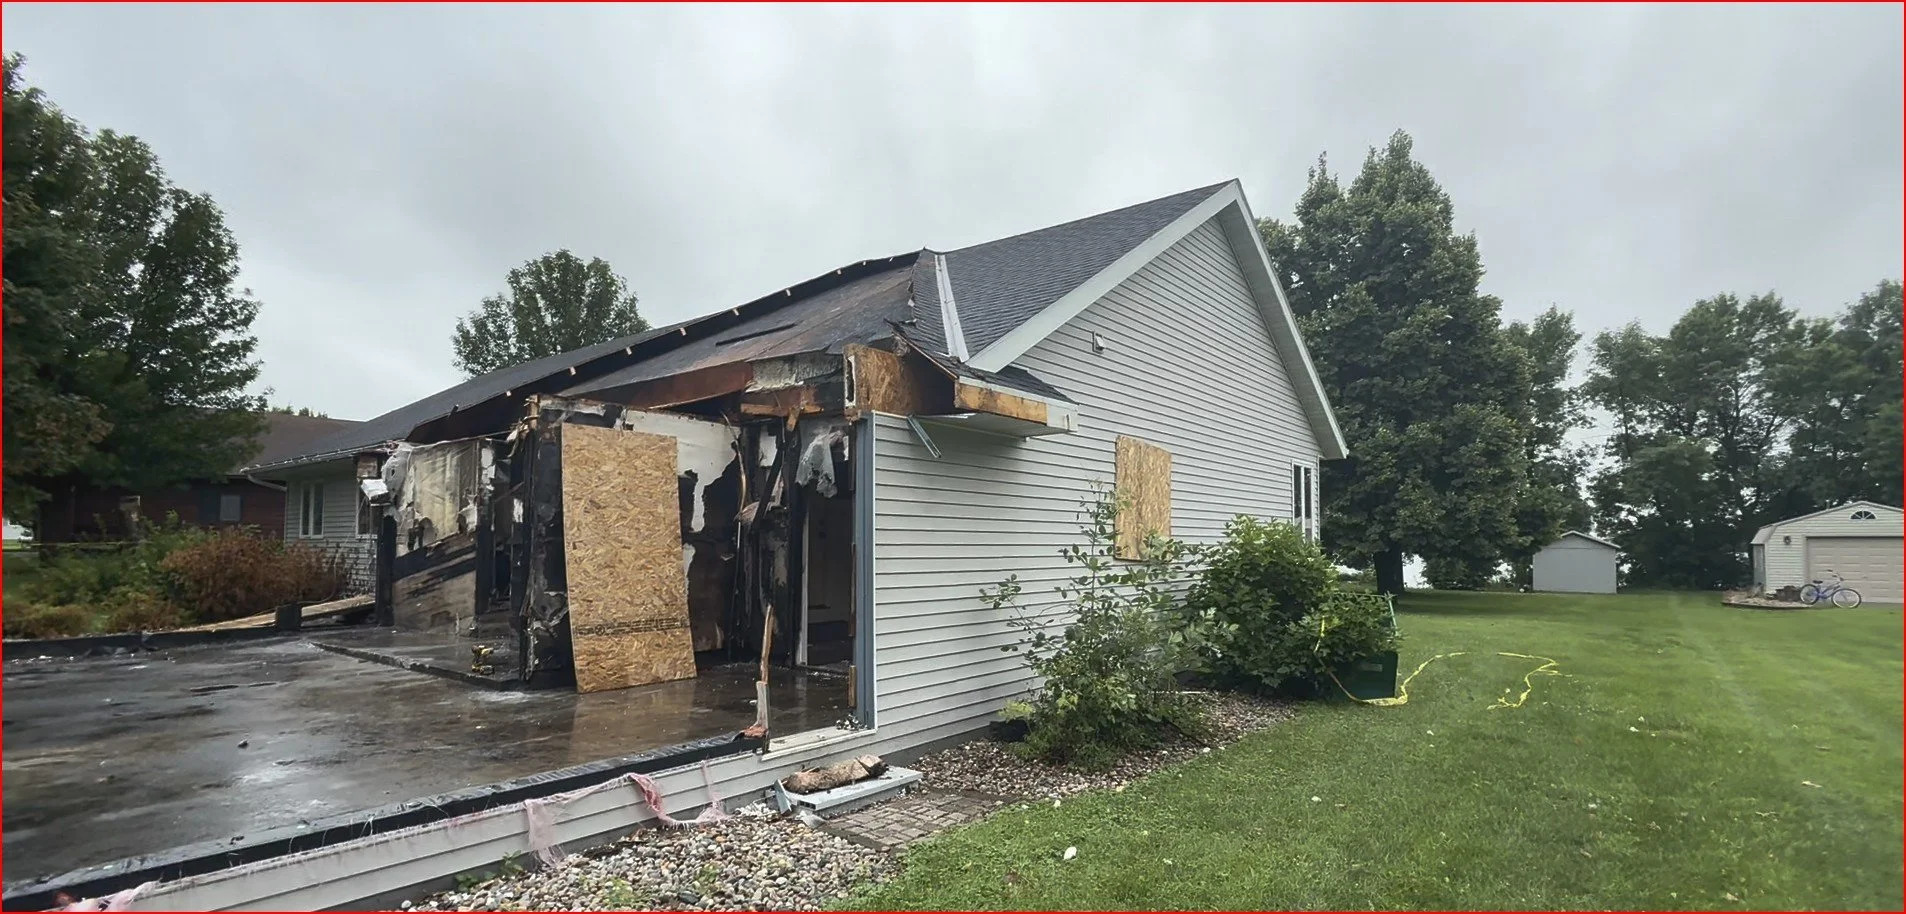
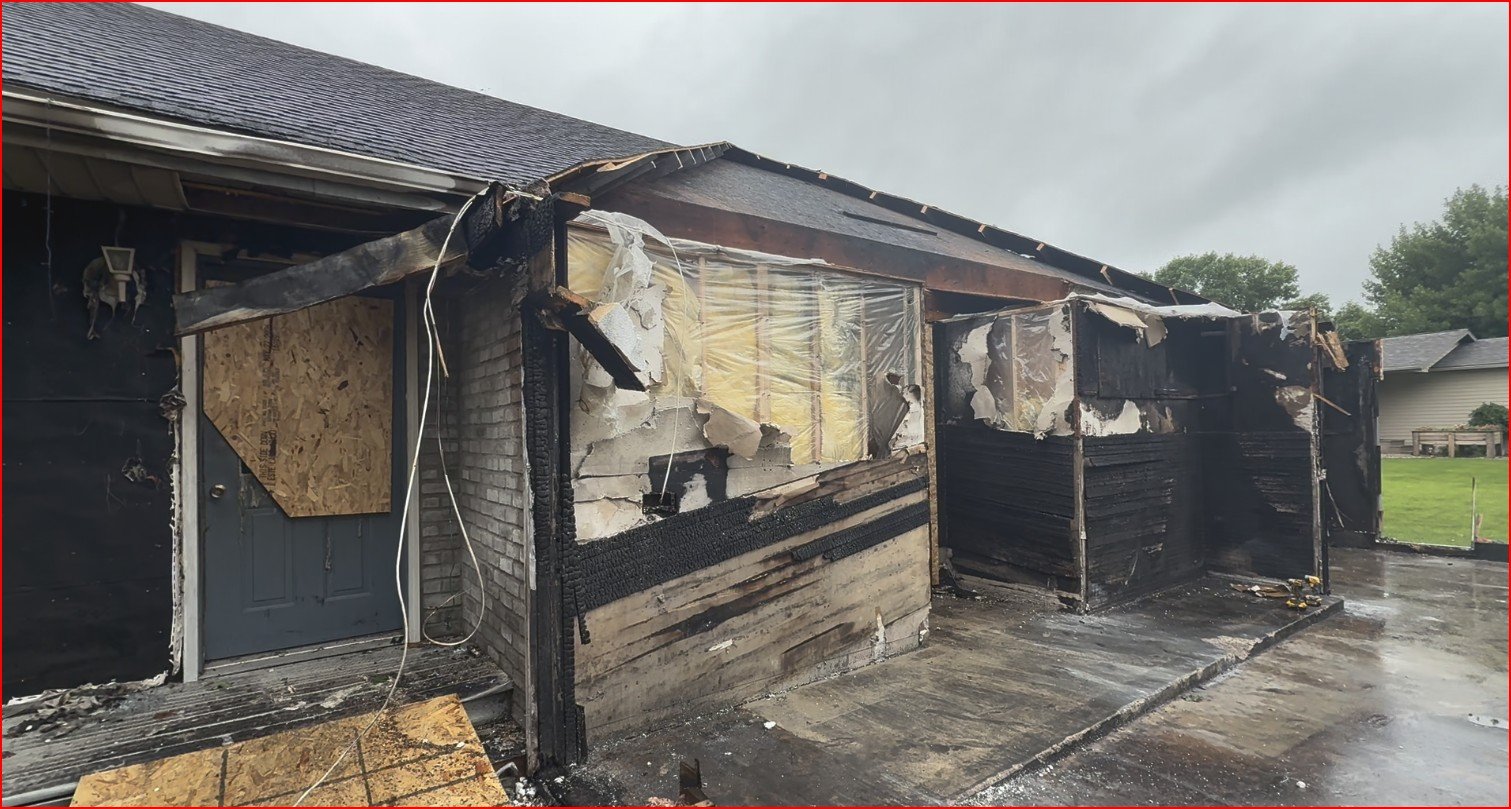
This was some of the worst SIP damage in the house. The OSB skins were heavily charred, and core samples 6 through 10 all showed foam melt-back with a clean split at the glue line. The melting reached well behind the skins, which tells us the heat here was intense enough to destroy the bond.
Verdict: Panels lost their strength and were repaired because structural elements in the panels were undamaged and carried the structural loads.
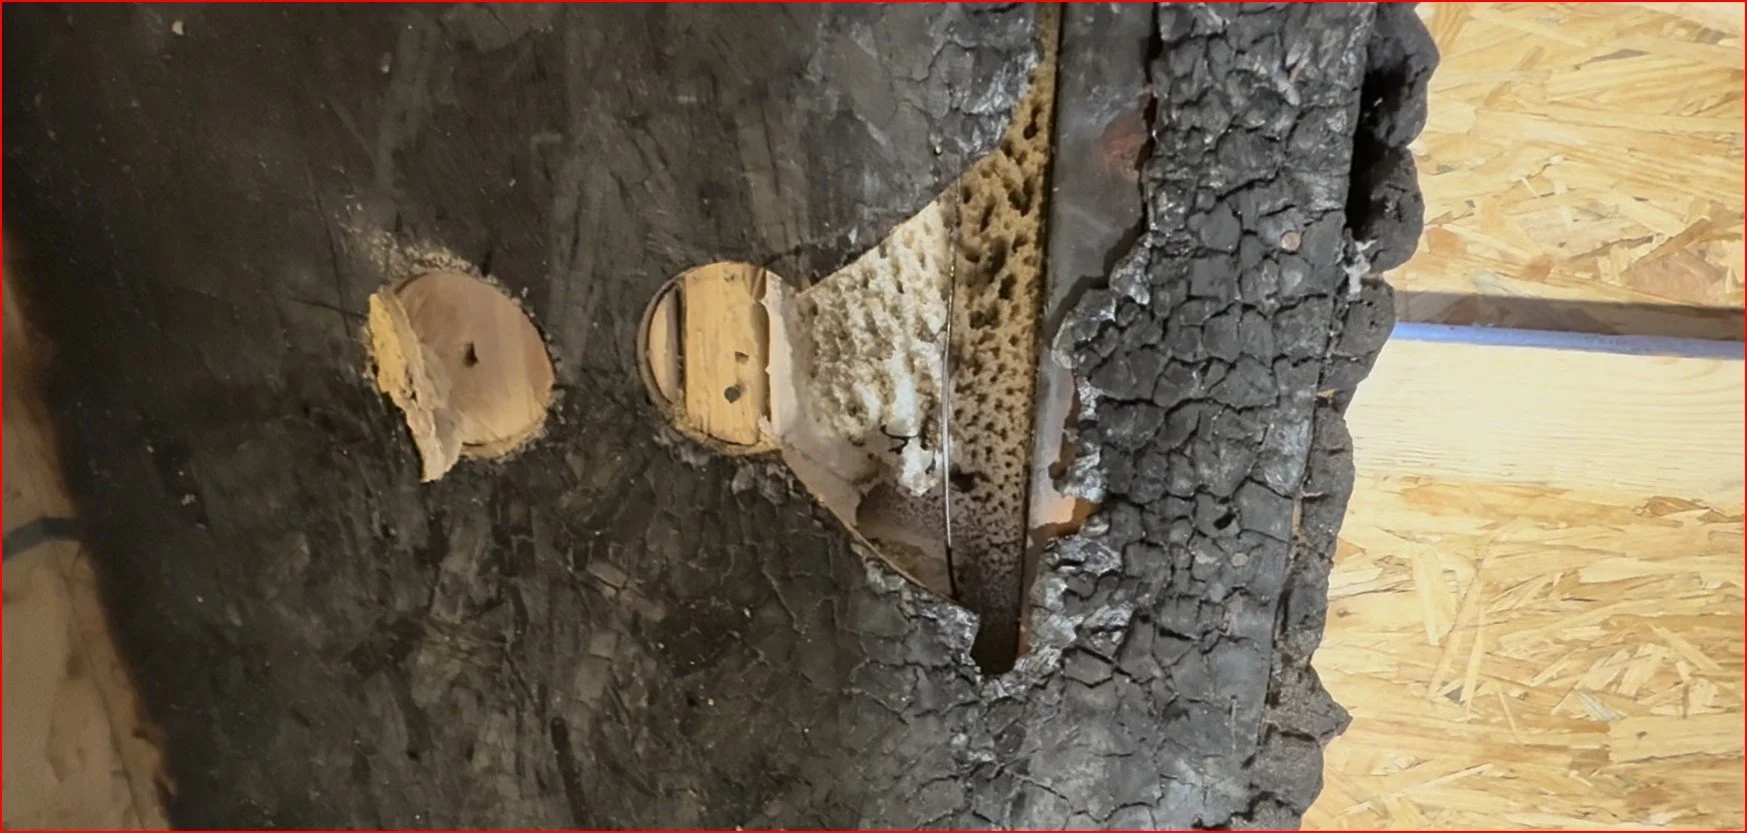
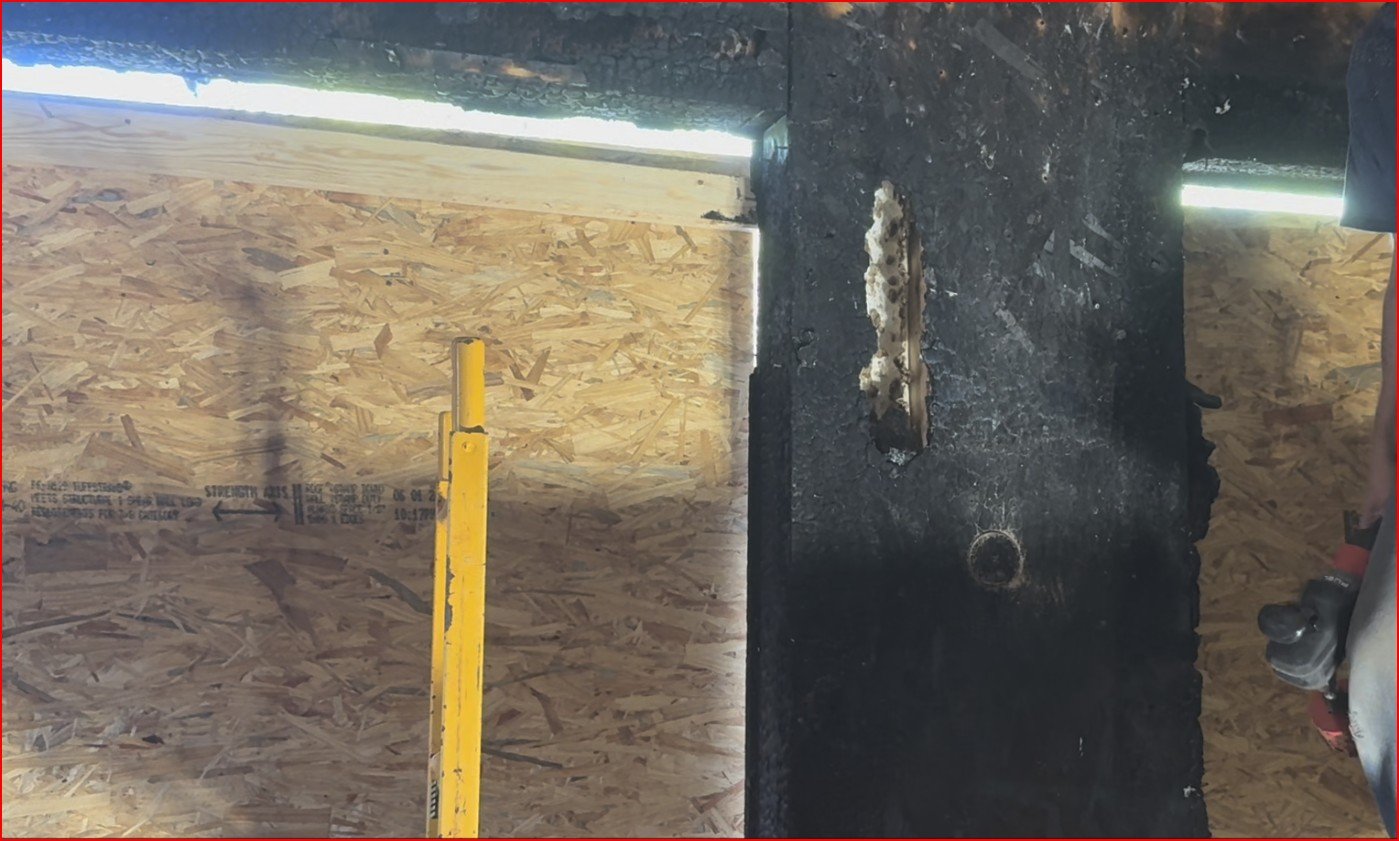
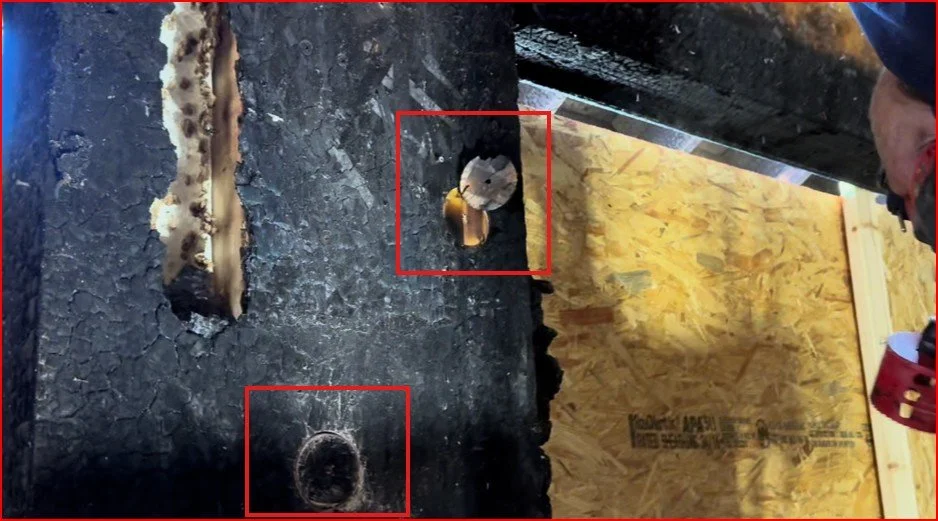
This area holds the most useful lesson in the whole investigation. A header is the beam over the garage door that carries weight down around the opening. The SIP material below the headers was badly damaged. But the OSB skin directly over the engineered headers had no fire damage, because a drywall ceiling attached to the floor trusses shielded that zone.
Verdict: The headers held. The damaged SIP material around them was replaced.
The point: the parts of a SIP wall that carry load through framing don't fail in the same way as foam-only areas. That's why repair decisions have to be made by someone who knows where the load actually travels. (We saw the same thing in Myth 6 of our SIP Fire Myths article.)
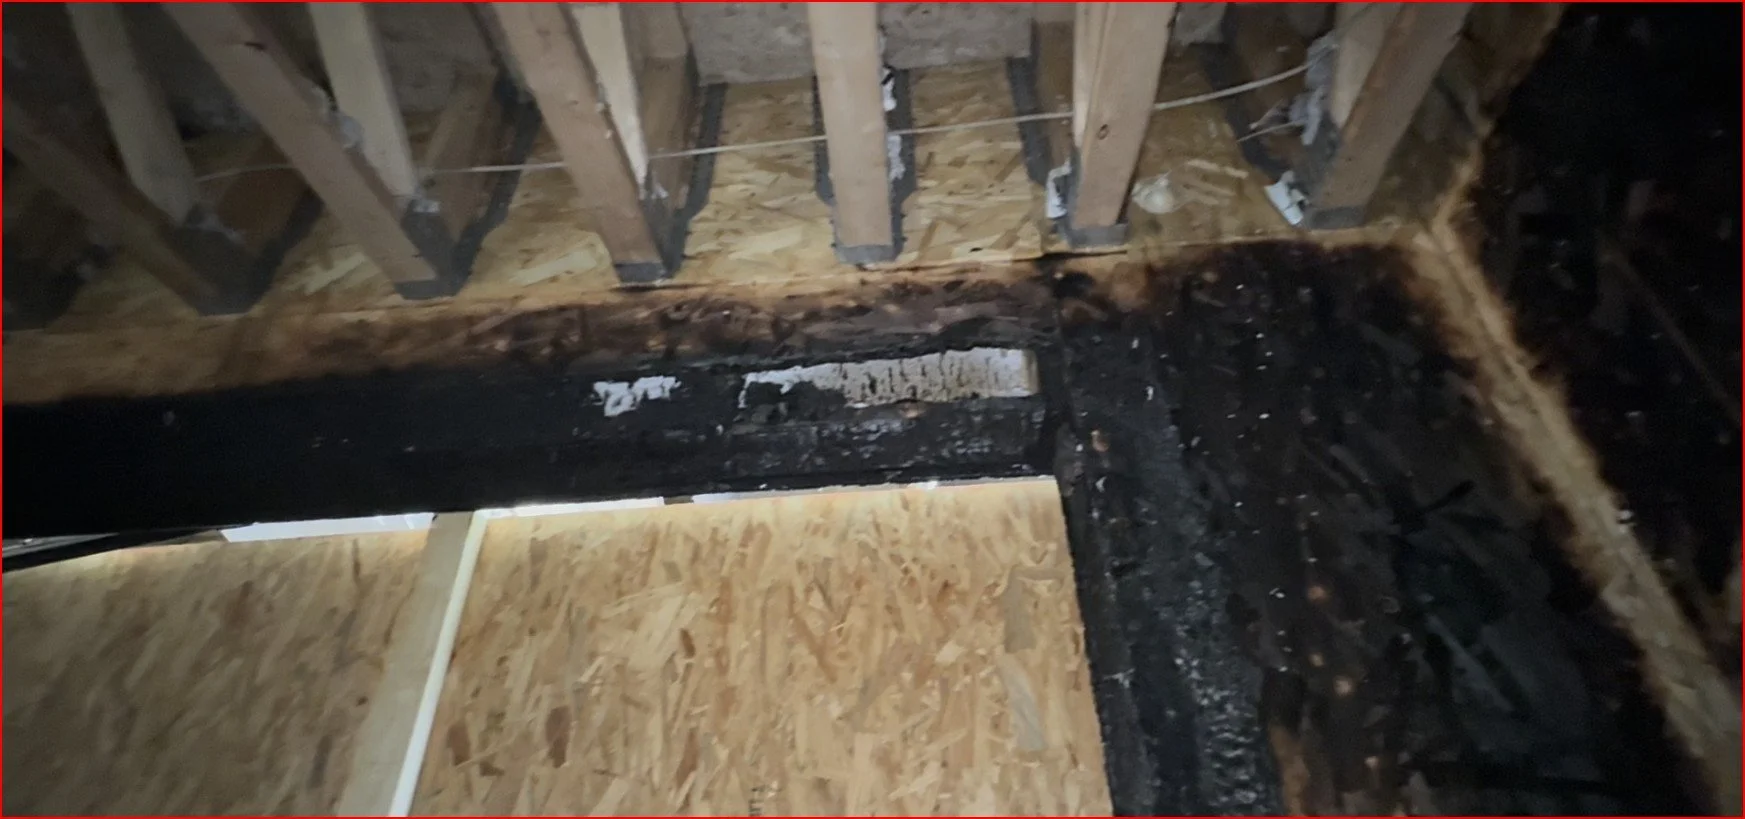
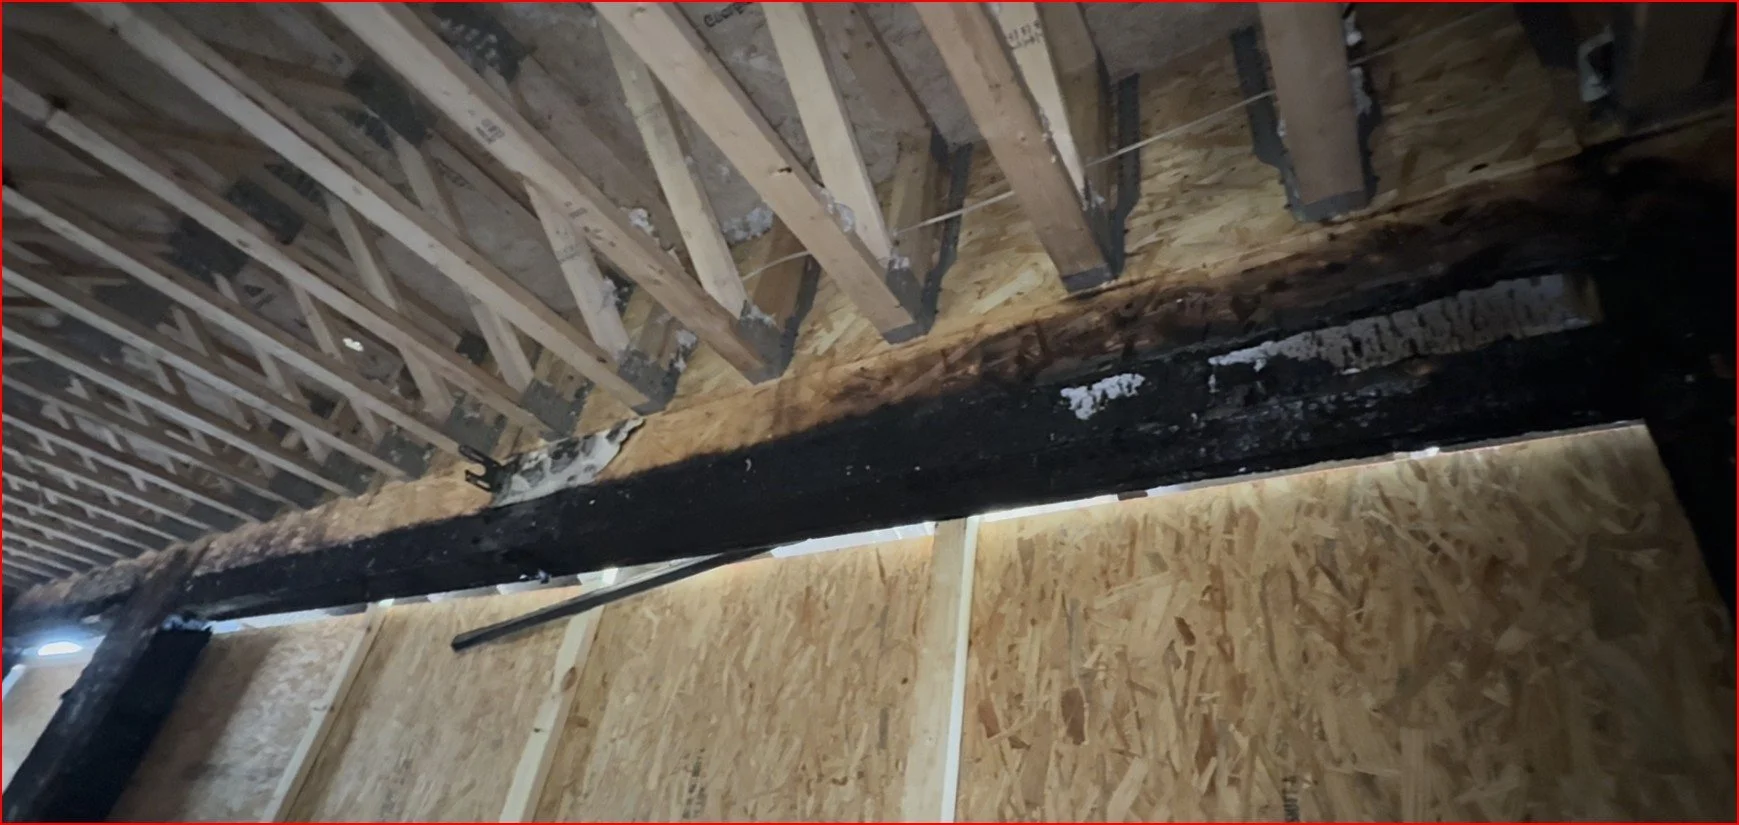
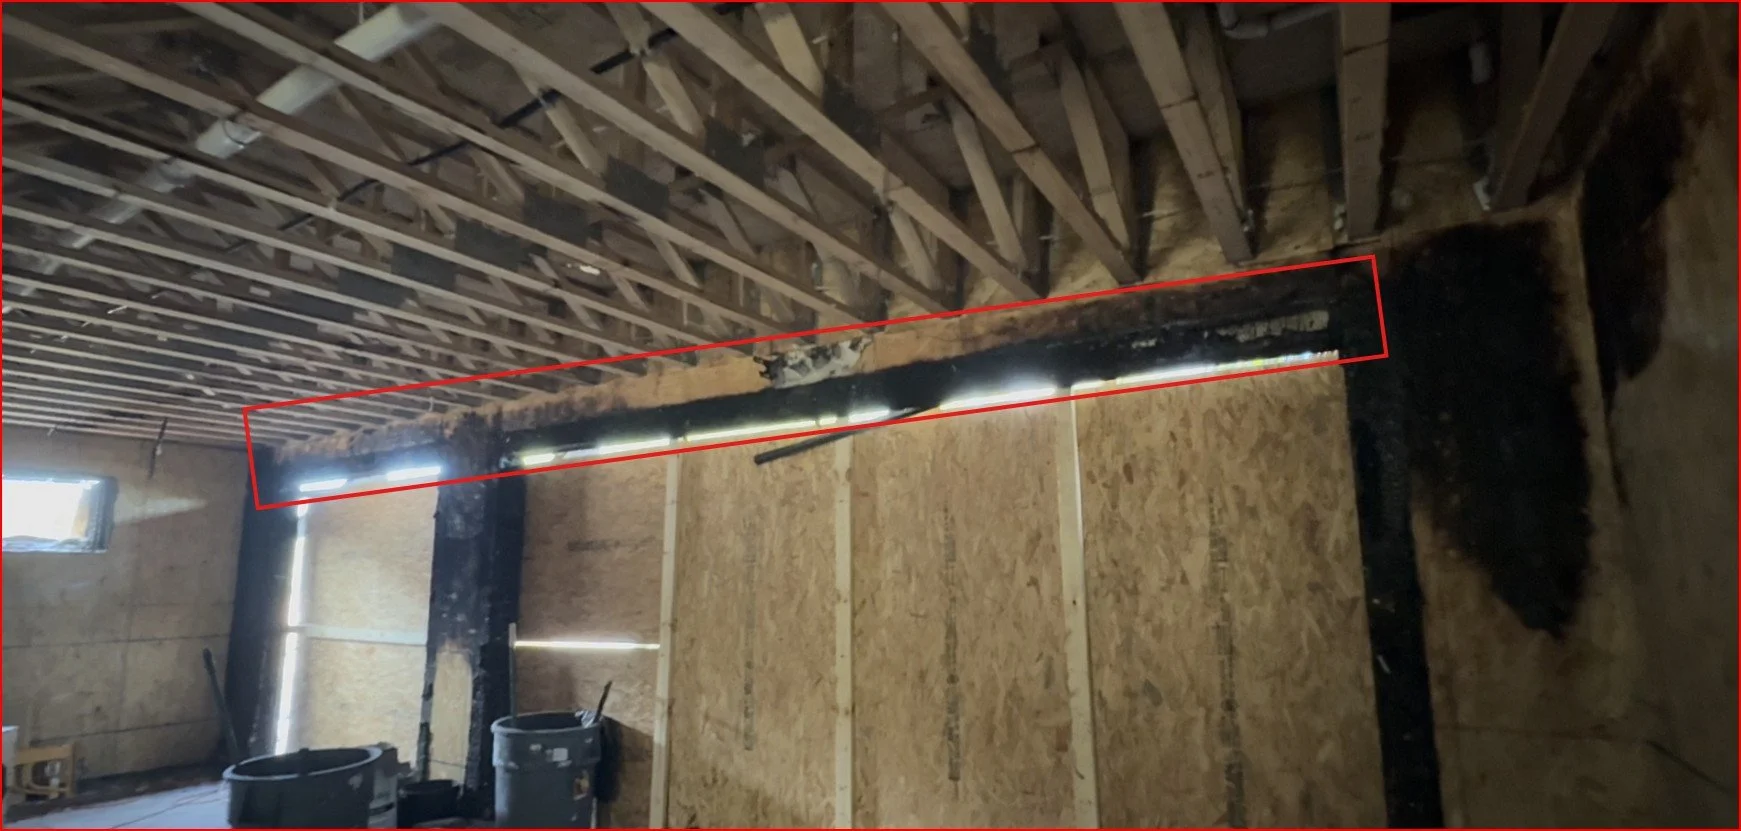
The garage door headers are the part of this job I'd want every adjuster to see. The SIP material right next to them was gone, and someone eyeballing it could easily call the whole wall a loss. But the headers were carrying the load, and the drywall ceiling kept them out of the worst of the heat. If you don't know where the load is going, you'll replace things that don't need replacing.
-- Joe Pasma, PEThis room had the most severe damage. The OSB skins on the inside, south wall, had no covering yet, so they faced the fire directly. The roof panels above had heavy charring and foam melt-back, and the wall panels showed different levels of charring. Core samples 12 and 13 showed melt-back and failed bonds.
There was one important exception. The west wall, the common wall between the garage and the mechanical room, had a plywood covering. The plywood charred, but core sample 11, taken behind it, showed the SIP skin and foam were completely intact.
Verdict: The roof panels were replaced. Wall sections that had a covering held up, the south SIP wall was replaced.
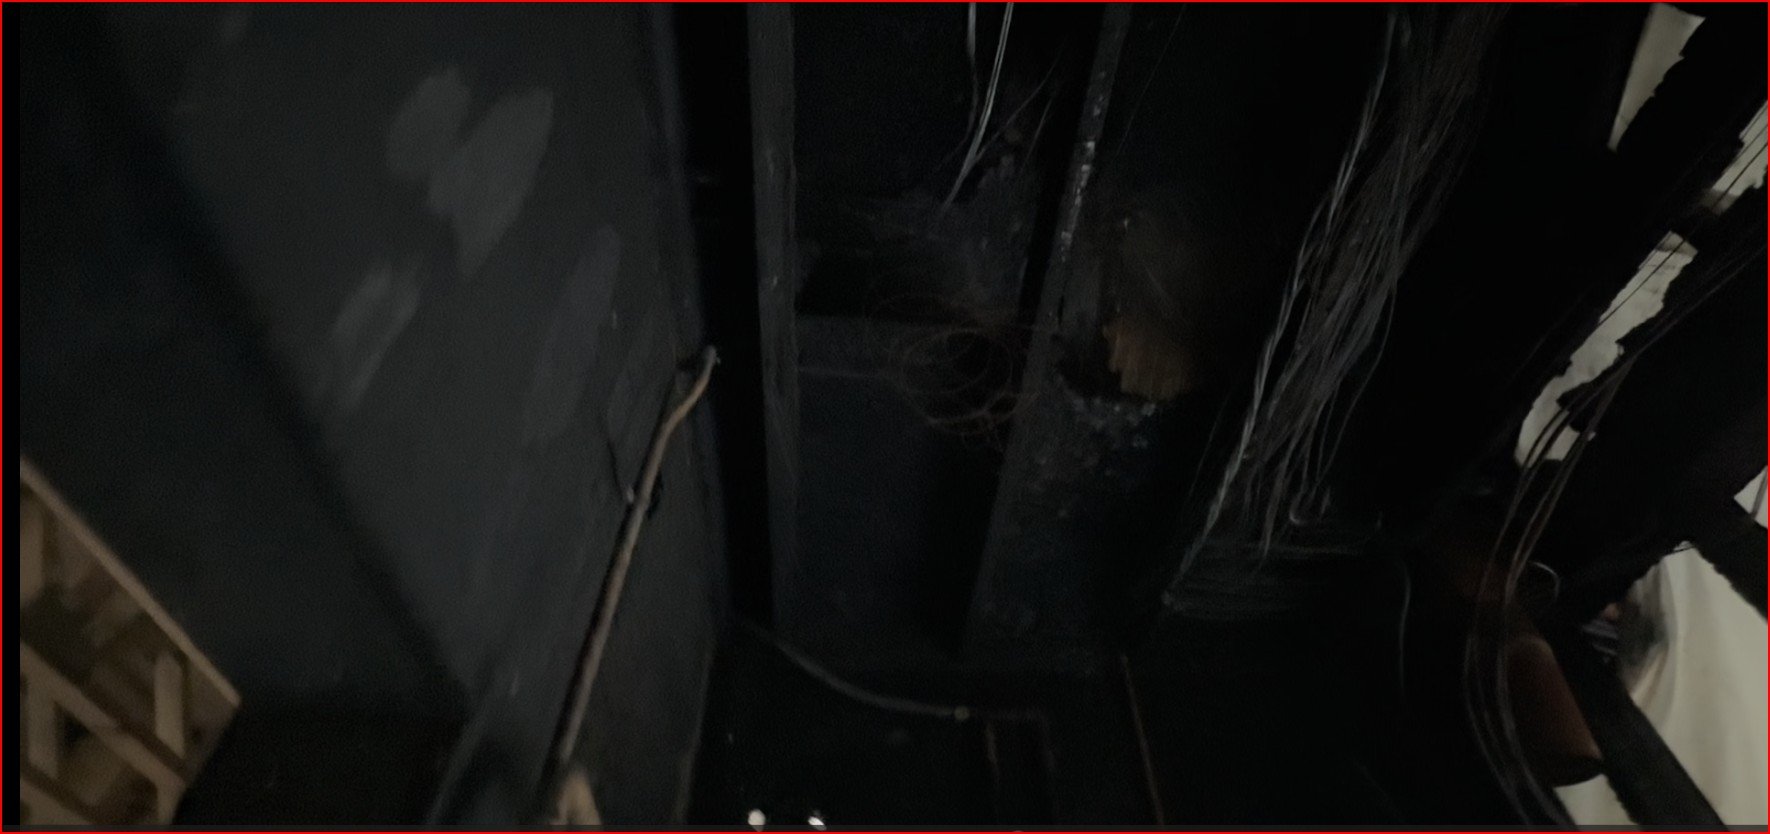
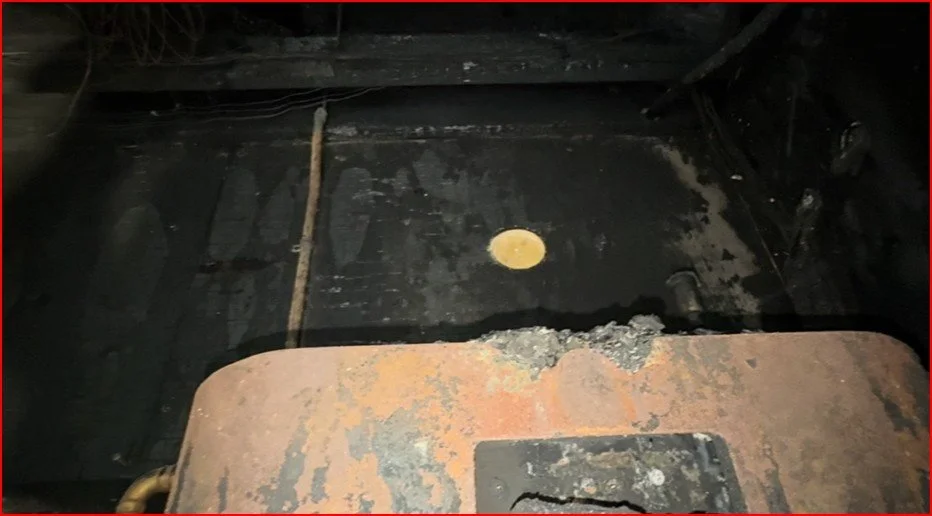
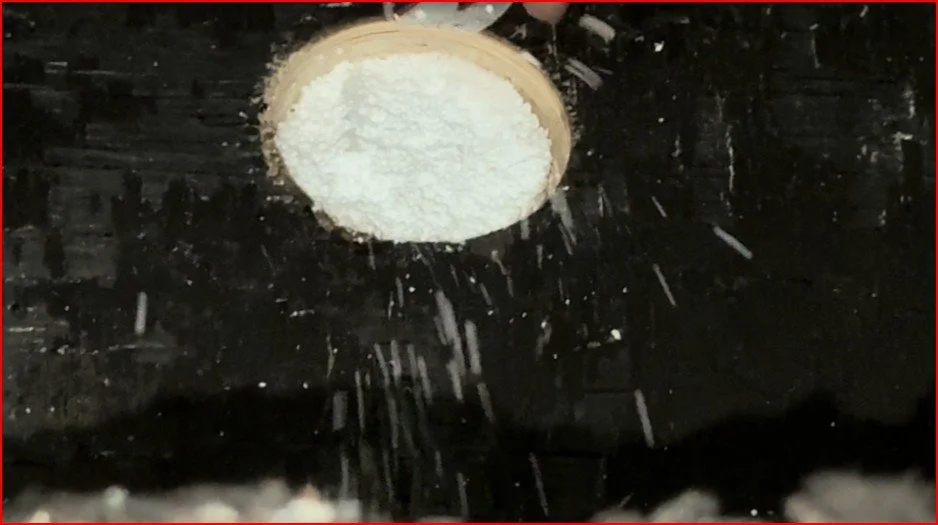
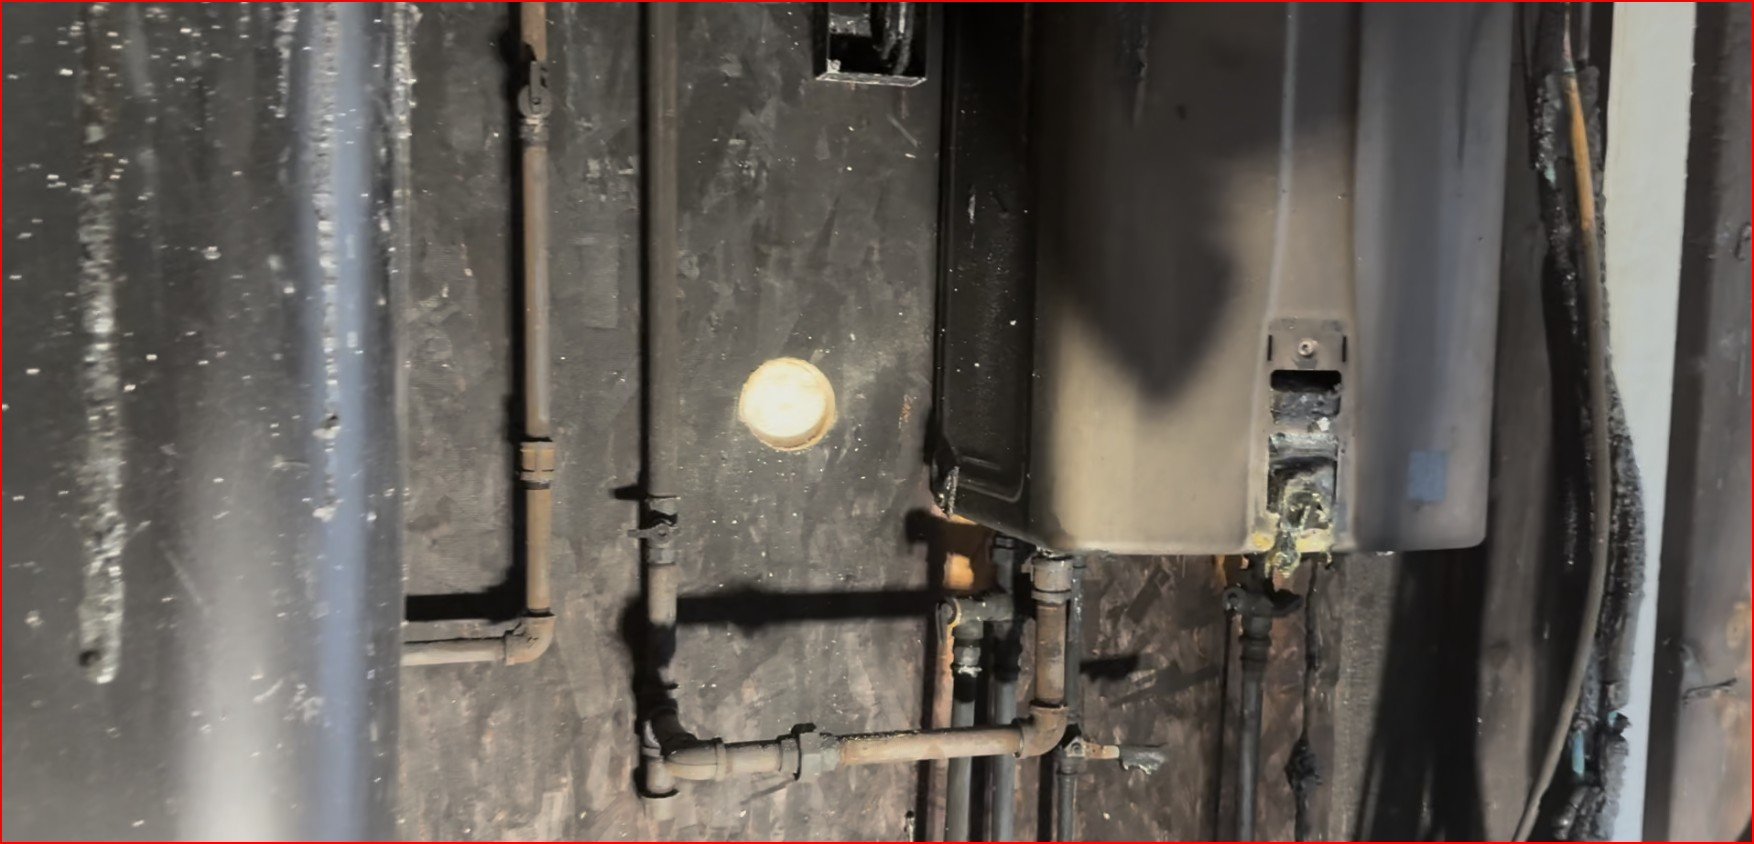
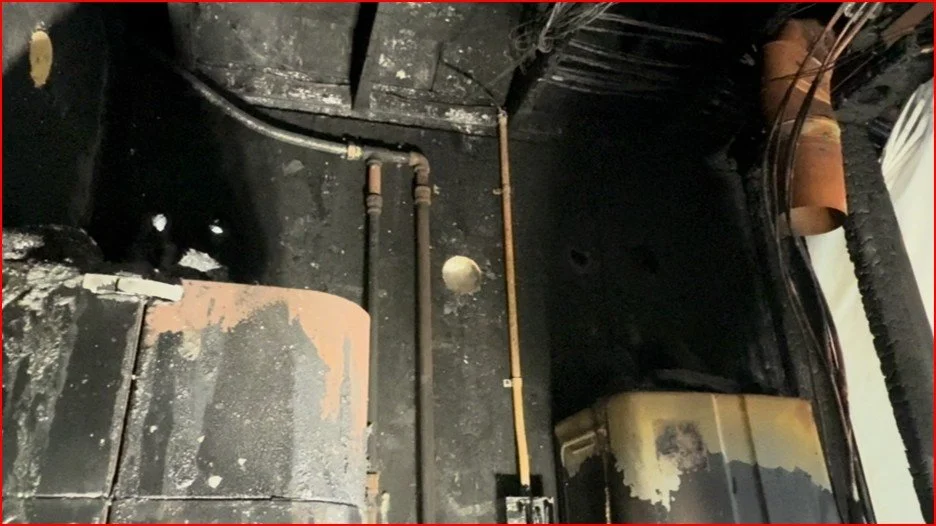
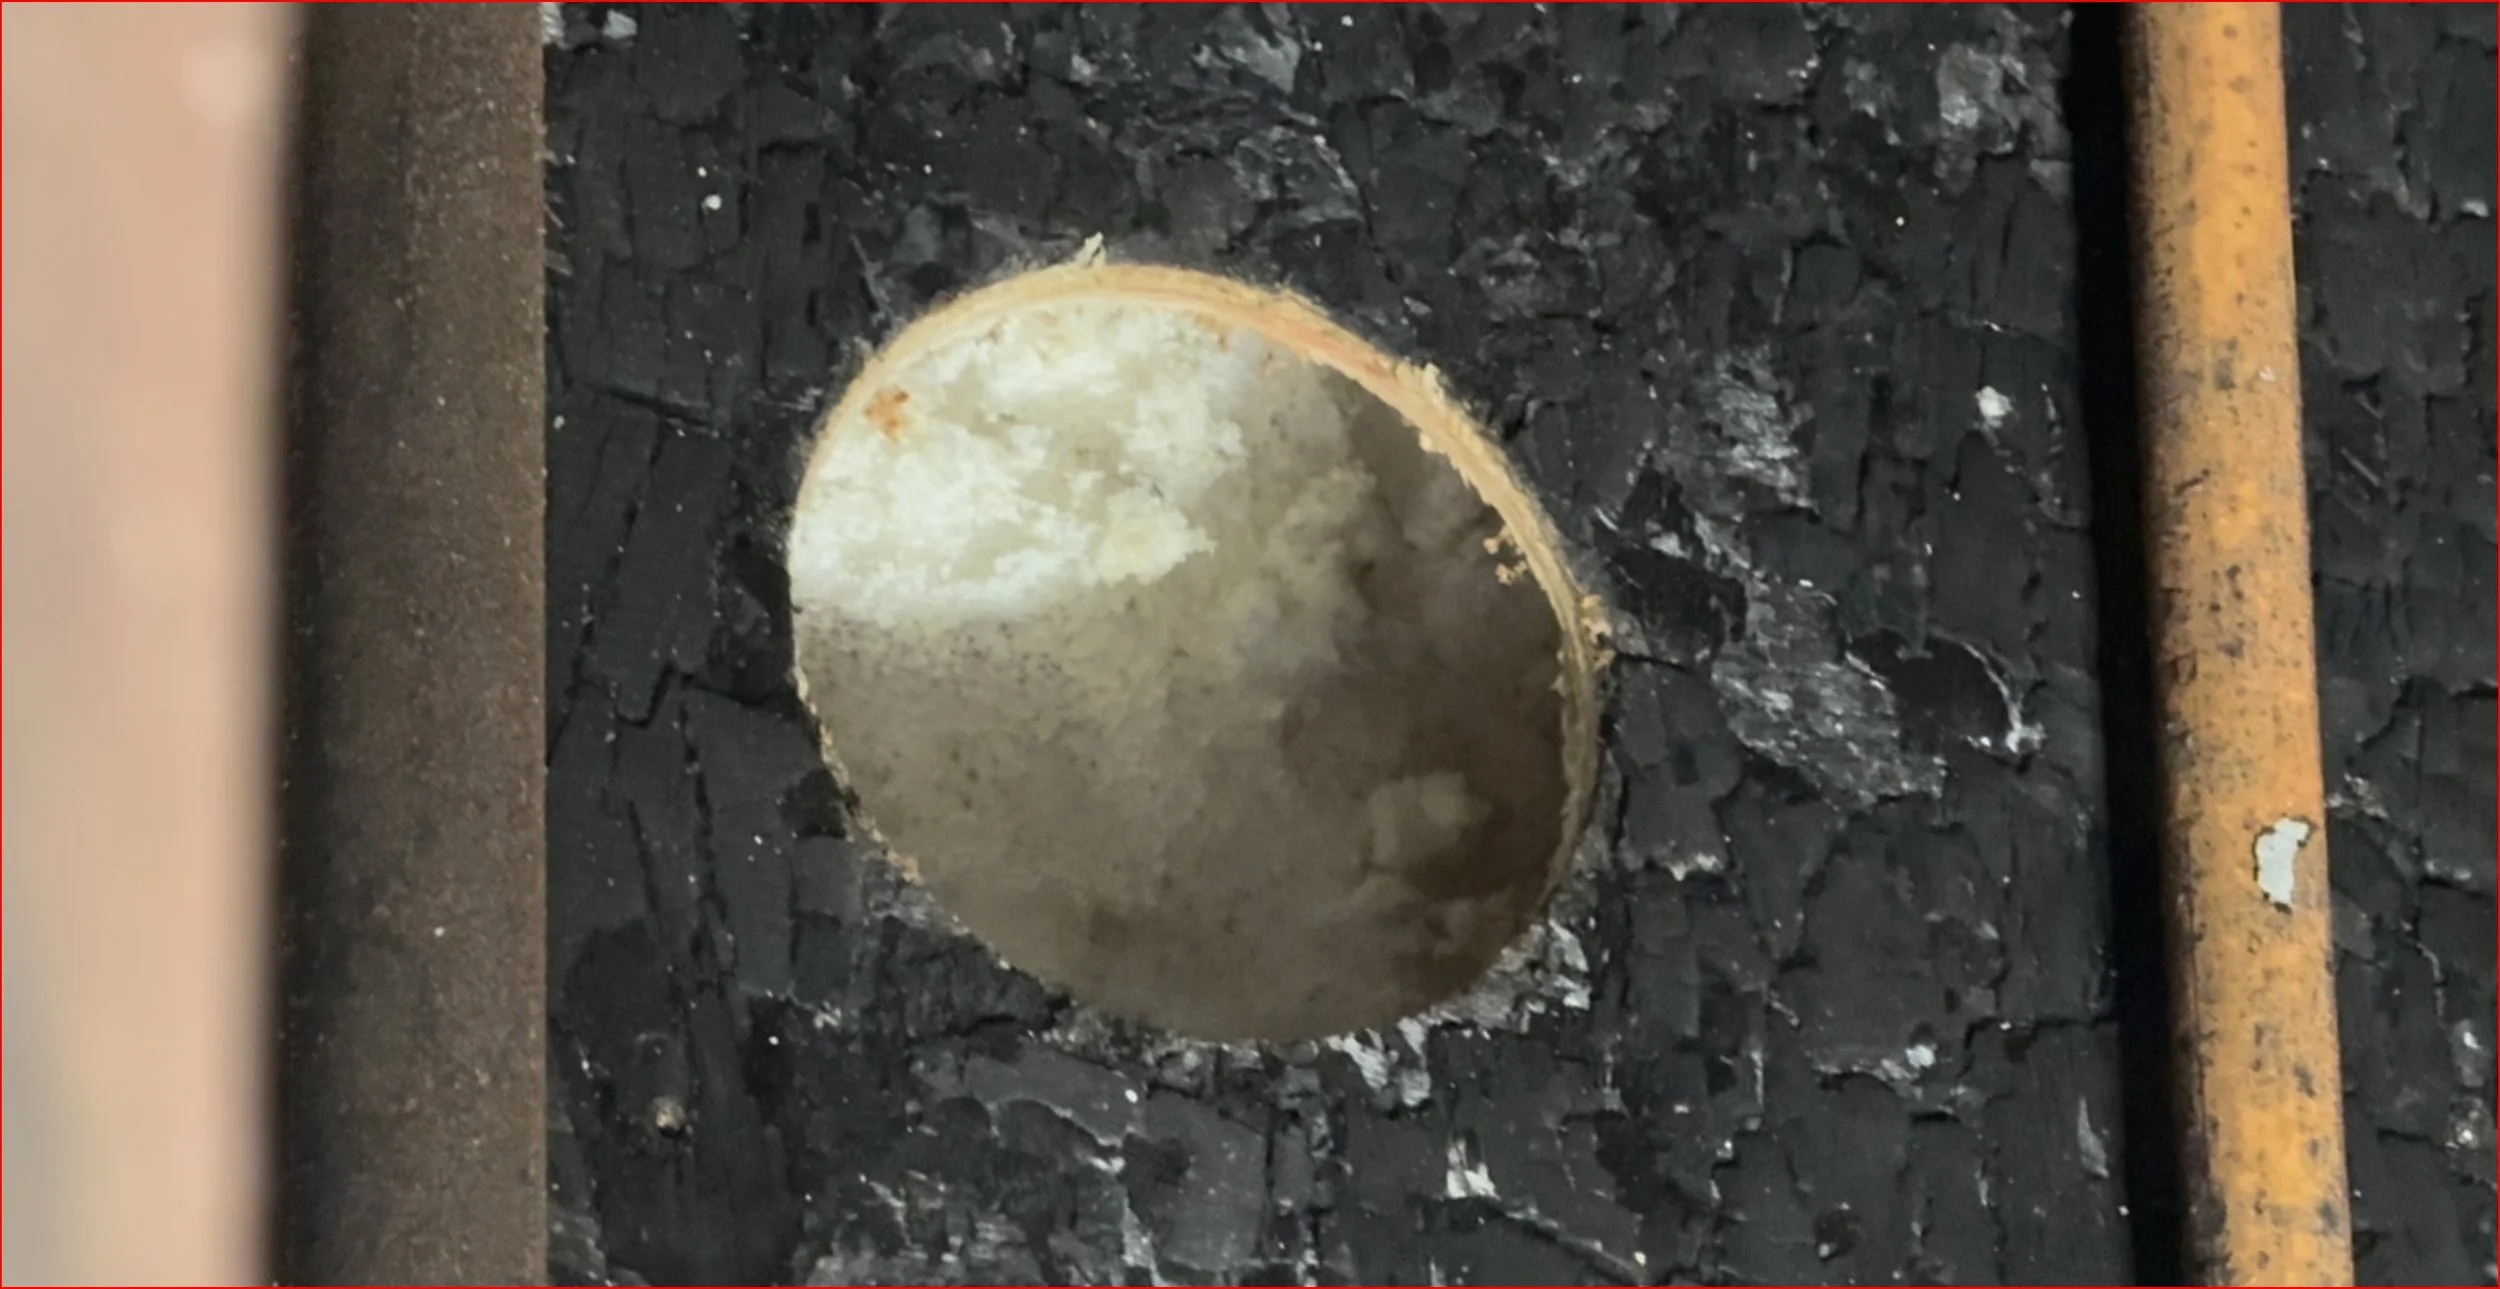
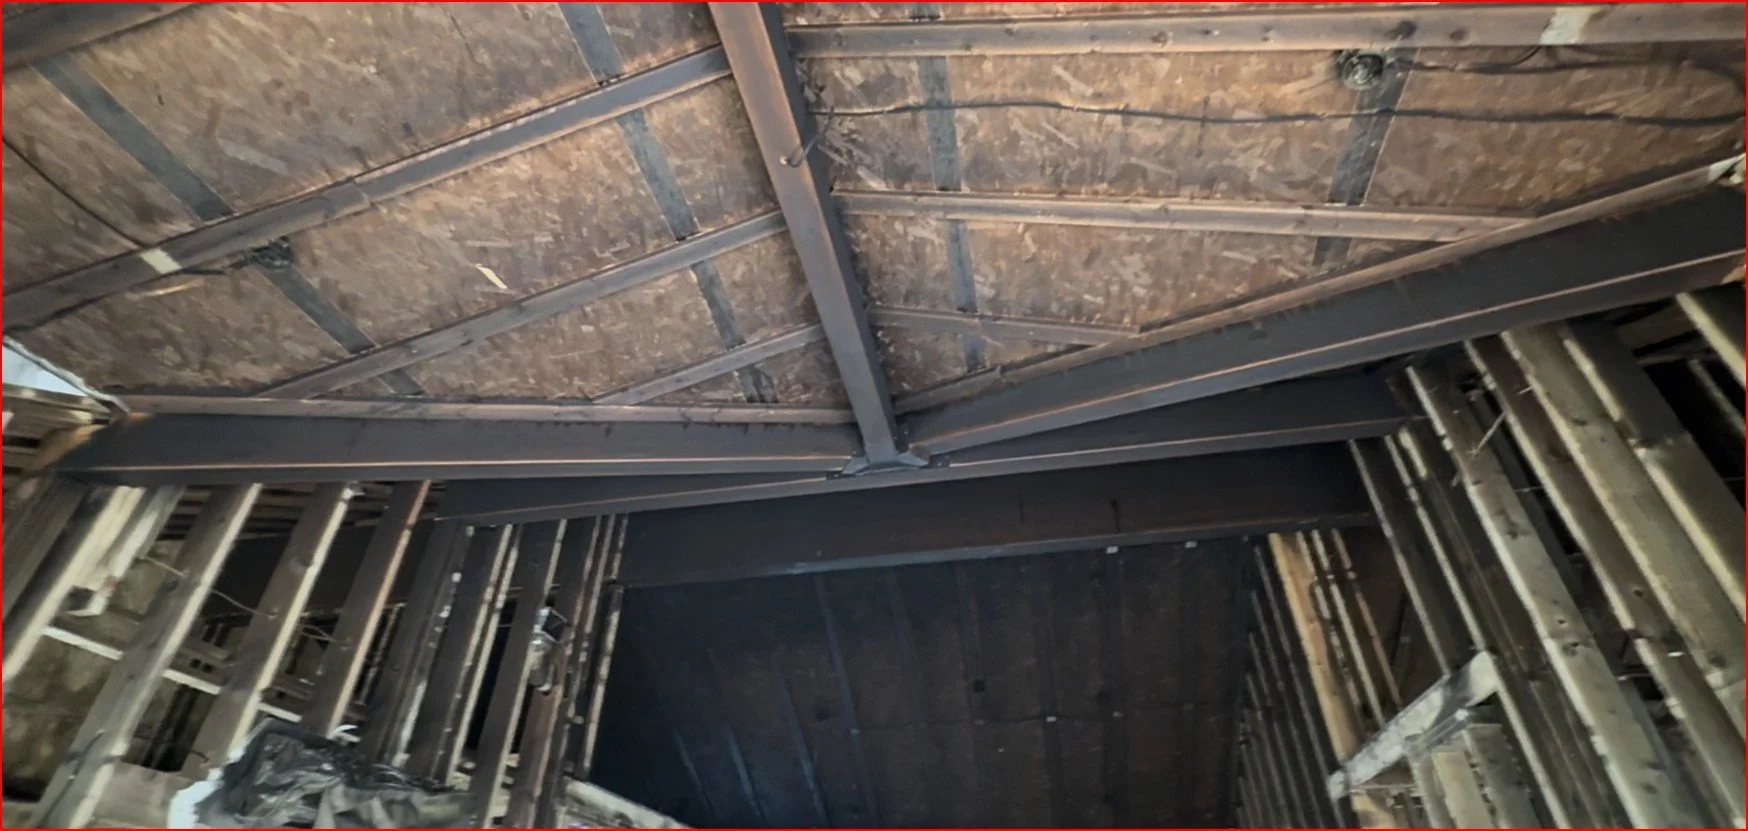
Above the front entrance, the roof panels had severe charring and foam melt-back, plus firefighter cuts. Core samples 14, 15, and 16 all showed failed bonds.
Verdict: Panels were replaced.
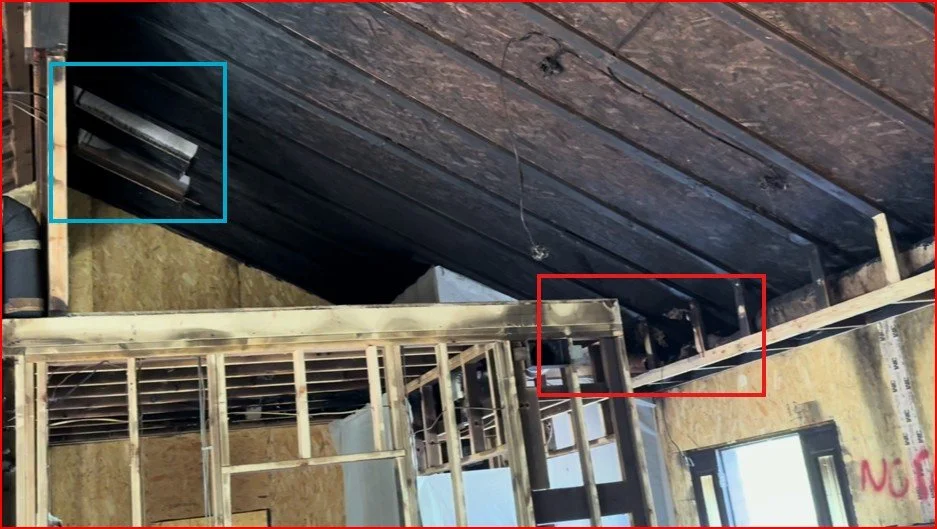
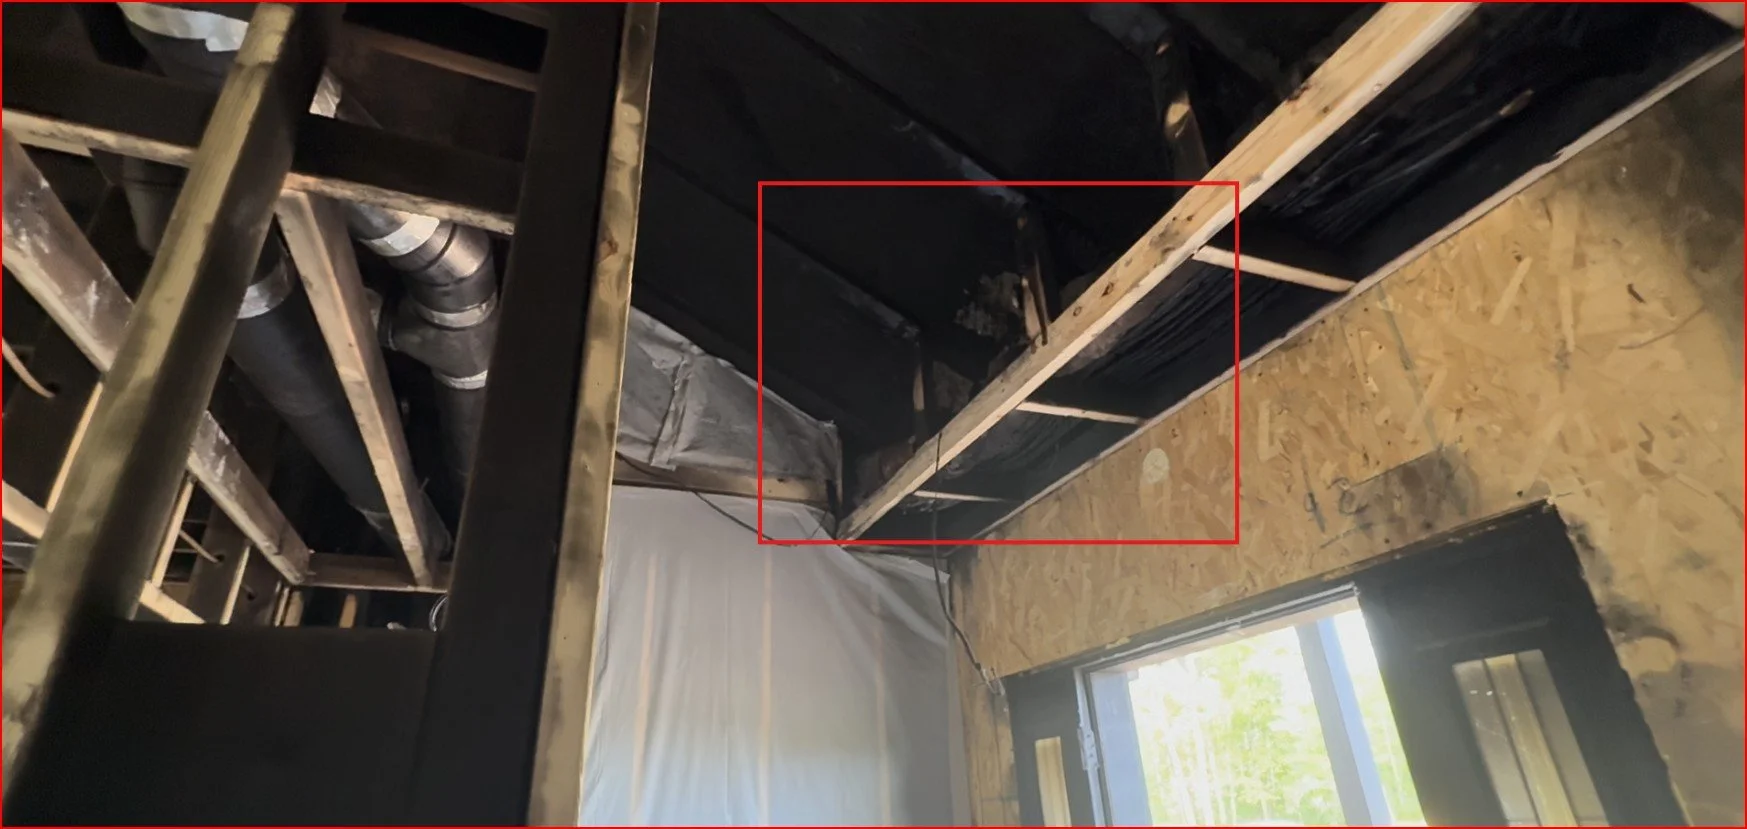
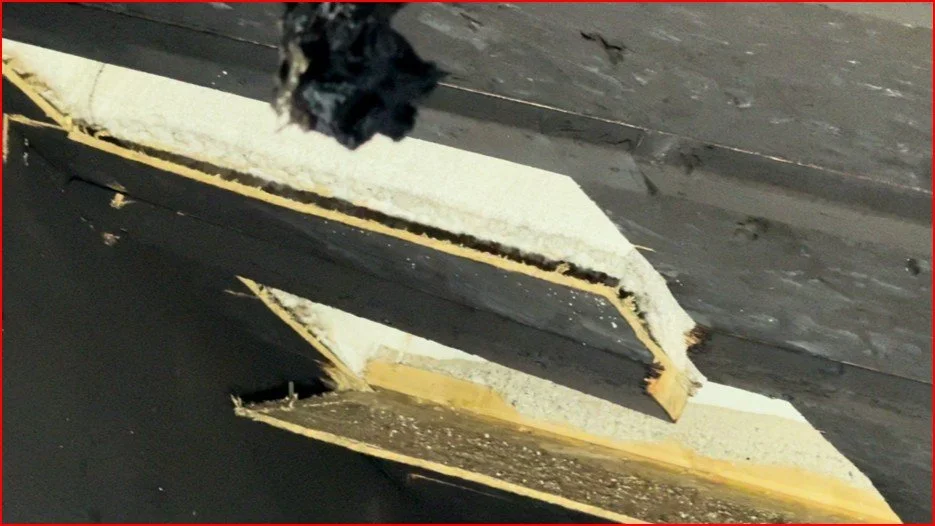
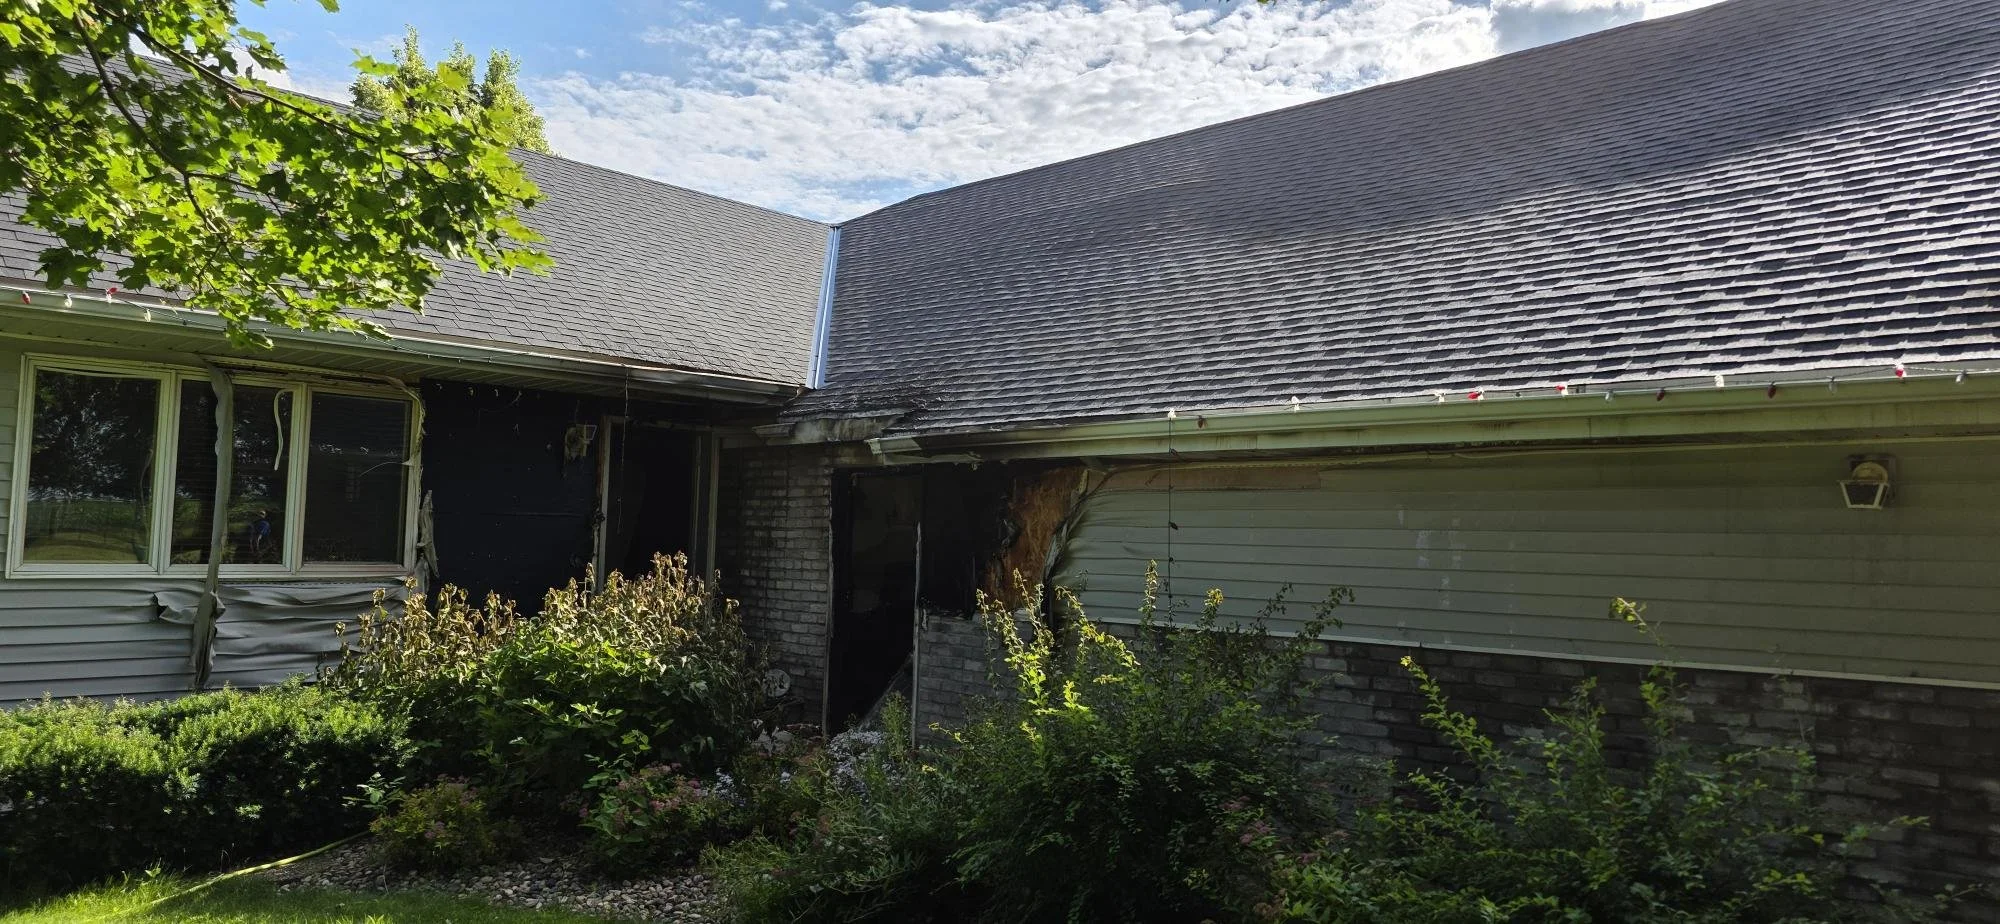
The other side of the same roof only had soot on it, with minimal charring. Core samples 17 and 18 showed no melt-back.
Verdict: Panels remained sound. Soot is a cleaning job, not a structural problem.
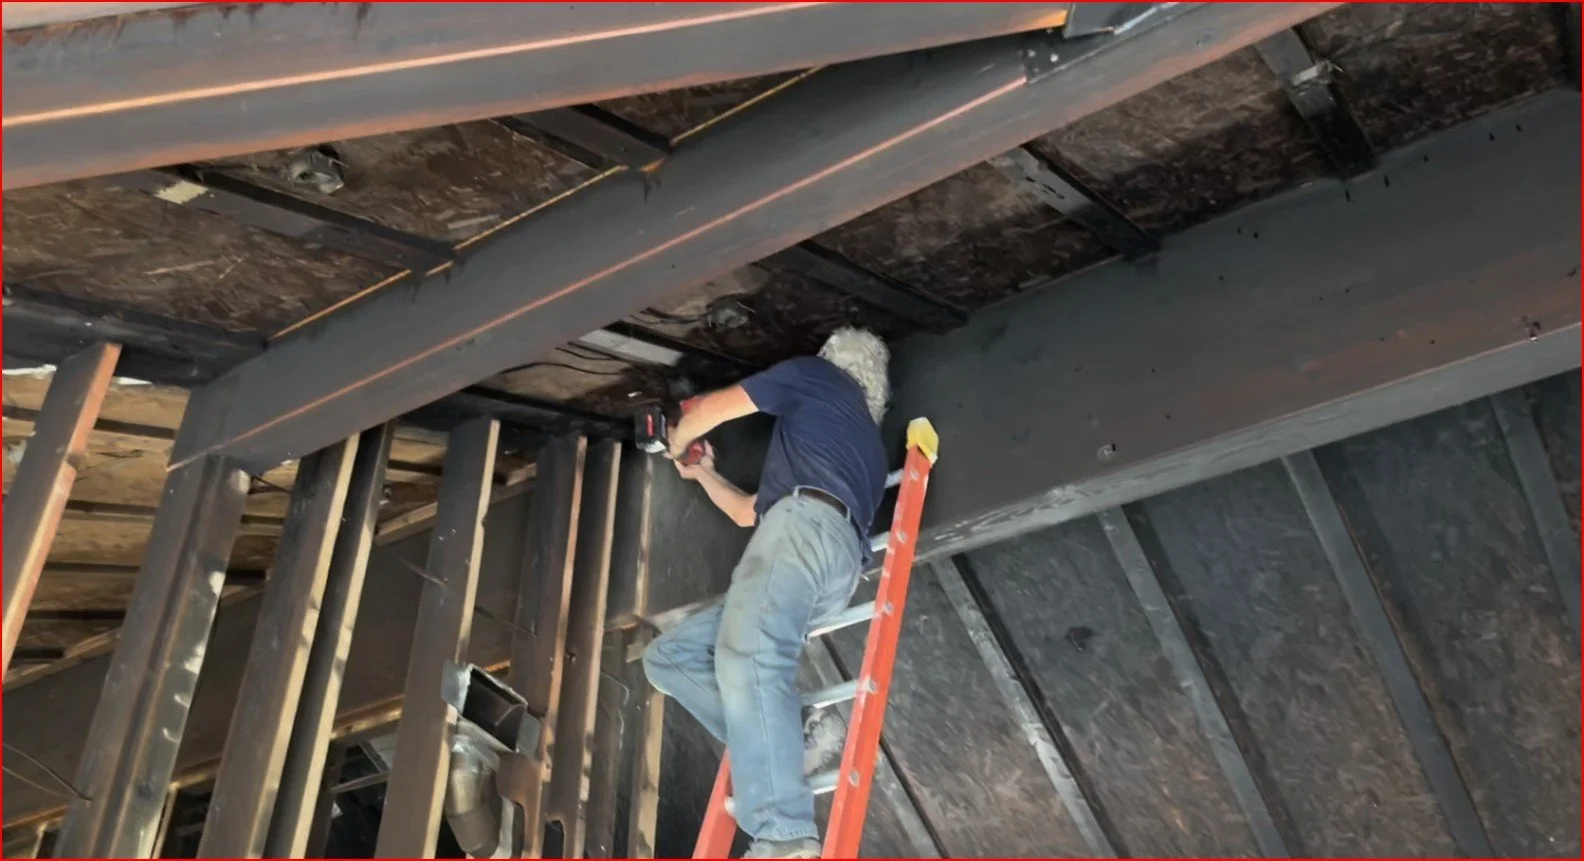
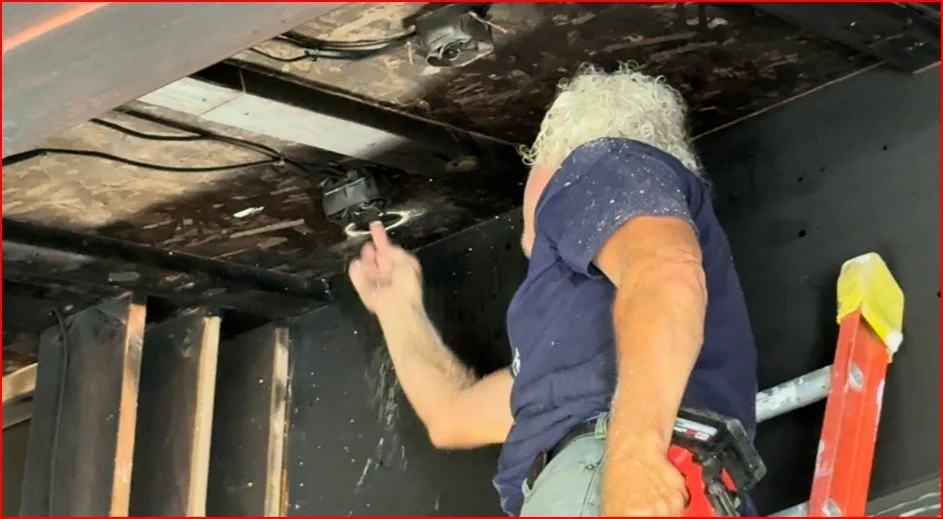
← Swipe to view full table →
| Area | What Protected It (or Didn't) | Core Samples | Result |
|---|---|---|---|
| Stairway | Drywall and wood ceiling | 1-3: bond held | Sound |
| 2nd floor, south wall | Distance from fire | 4-5: bond held | Sound |
| 2nd floor, north wall | Heat never reached panel | Firefighter cuts showed no damage | Sound |
| Garage door wall | Direct, sustained flame | 6-10: bond failed | Repaired, other structural elements carried the load |
| Garage door headers | Drywall ceiling shielded header zone | Visual: no damage over headers | Headers held, surrounding SIP replaced |
| Mechanical room south wall & roof | Uncovered, direct flame | 12-13: bond failed | Replaced |
| Mechanical room west wall | Plywood covering | 11: bond held | Sound |
| North roof slope | Direct flame | 14-16: bond failed | Replaced |
| South roof slope | Soot only | 17-18: bond held | Sound, cleaned |
The investigation didn't end with "the house had a fire." It ended with a clear, panel-by-panel list.
Areas that stayed or could be repaired:
Stairway walls and roof panels
Second floor south wall
Second floor north wall
Garage door wall panels, since other members were carrying structural load
Covered sections of the mechanical room west wall
One-story south roof slope (cleaning only)
Areas that needed replacement:
SIP material below the garage door headers
Mechanical room south wall and roof panels
One-story north roof slope
The deciding factor was never "how bad does it look?" It was "did the bond fail, and is that section carrying load?" If the bond held, the panel stayed. Small, localized damage in a sound panel can often be fixed by patching the OSB skin or injecting expanding foam. Where the bond failed in a section the house depends on for strength, we replaced that section. This is an engineering call made one panel at a time, which is why a general fire damage estimate often gets SIPs wrong in one direction or the other.
Dealing with fire or smoke damage on a SIP home and not sure which panels can stay? Talk to Joe Pasma, PE: he'll tell you what core sampling would show before anyone signs off on a repair scope.
This isn't the first SIP fire we've documented. Our earlier SIP fire case study found the same patterns:
Foam melted back where the panel edges had no protective trim.
Charred OSB on its own did not mean the panel had failed.
Smoke spread soot far from the fire without causing structural damage.
Two different fires, different houses, panels from different manufacturers, and the same result. SIPs don't fail randomly. They fail in predictable, diagnosable ways, which is good news for anyone who has to decide on a repair.
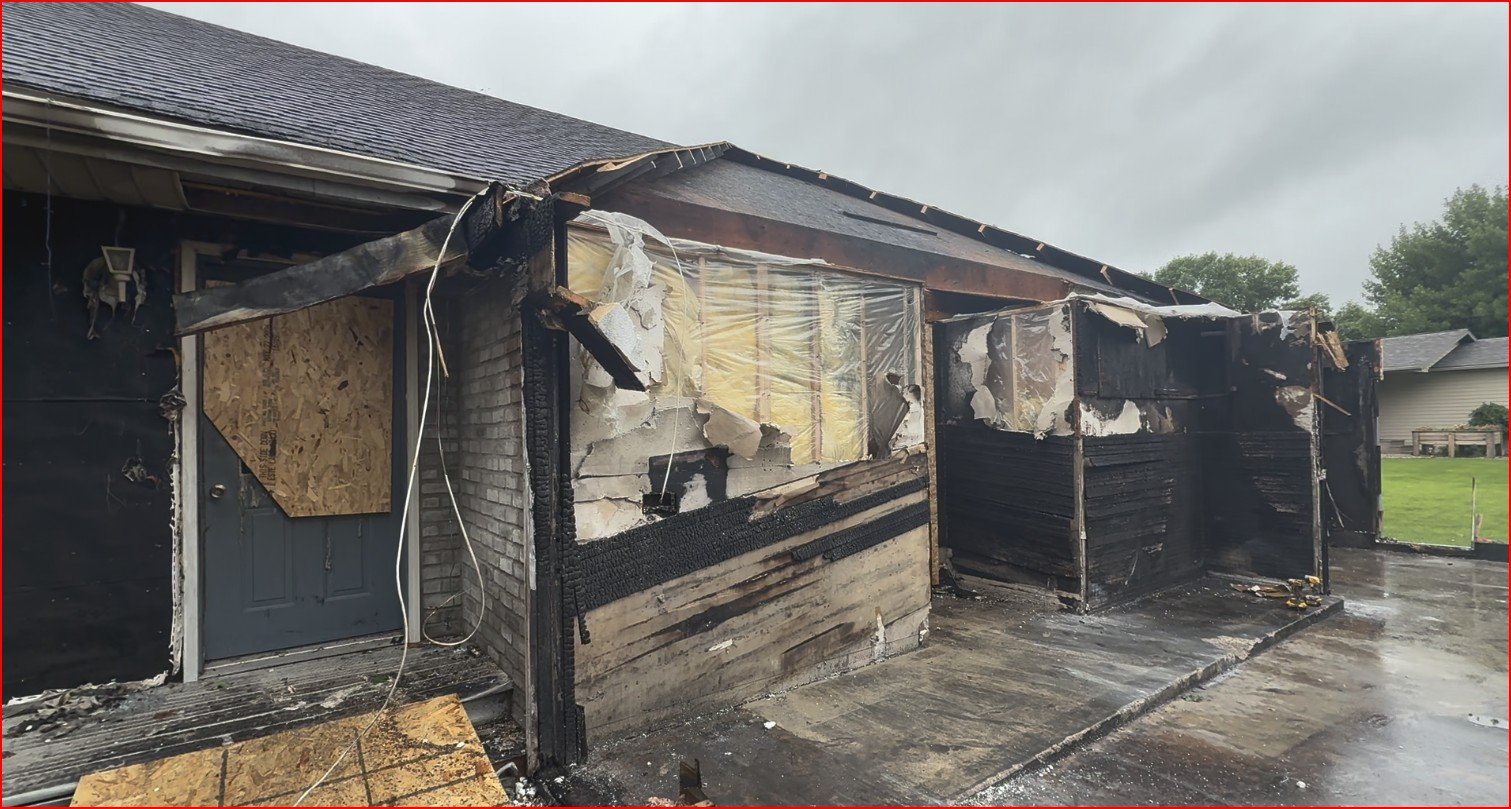
This case study shows the evidence. Our SIP Fire Myths article takes the seven most common fire fears about SIPs and checks each one against what we found in this house.
Read SIP Fire MythsYour drywall is doing real fire-safety work. Code requires it over interior SIP surfaces for exactly this reason, and this fire showed why. Keep it continuous, and don't leave panels exposed in finished spaces.
A SIP home is most vulnerable during construction, before the drywall, siding, and trim go on. The same is true of a stick-framed house. In Duluth, the worst damage happened where panels had no covering yet. Getting coverings on promptly and protecting exposed panel edges with trim reduces that risk. See our SIP Installation Guide for detailing basics.
Don't price a SIP fire claim from the surface. Char, soot, and smoke smell don't tell you whether a panel lost its strength. Core samples do. A SIP-specific forensic evaluation keeps you from paying to replace panels that only needed cleaning, and from missing panels that really did fail.
EPS melt-back is when heat causes the foam core of a SIP to shrink and pull away from the wood skin. It starts once the foam gets hotter than about 180°F. When the foam pulls away, the glue bond that gives the panel its strength is lost in that area. It's the most important warning sign in a SIP fire investigation.
No. When OSB heats up, its surface chars, and that char layer actually slows heat from reaching the foam inside. In Duluth, several panels had charred coverings or surfaces but a perfectly good bond underneath. A panel has only failed when the char comes with foam melt-back and a broken bond.
Because they were covered. Drywall, siding, plywood, and wood ceilings absorbed the heat and kept the panels behind them below the temperature where foam starts to melt. In the mechanical room, a plywood-covered wall survived intact while the uncovered roof above it had to be replaced.
A drywall ceiling attached to the floor trusses shielded the header zone from the worst heat. Headers are structural framing that carries load, so they behave differently than foam-only parts of a panel. The SIP material below them was replaced, but the headers themselves held. Read more in our SIP Fire Myths article.
You can't see the glue bond from the outside. A core sample cuts a round plug through the panel skin so you can see whether the foam is still stuck to the skin. It's the only reliable way to know if a panel is still structurally sound. Learn more about SIP forensic analysis.
Often, yes. If the bond between the foam and the skin is still holding and the damage is limited to the surface or a small area, repairs like patching the OSB skin or injecting expanding foam can be realistic. A licensed engineer should make that call for each panel.
When the bond between the foam and the skin has failed in a section the building depends on for strength. In Duluth, that was the mechanical room roof, and the north roof slope above the front entrance. Those areas had melt-back and failed core samples.
Yes, and so is every other type of house. Before drywall, siding, and trim go on, the panels don't have the protective layers a finished home has. In Duluth, the most severe damage happened where the SIP skins had no covering yet, or the fire was so intense that it consumed the drywall and the SIP panel. Code-required drywall in a finished home is there for exactly this reason.
No. Smoke and soot are a cleaning problem. On the south roof slope in Duluth, the panels were covered in soot, but core samples showed no melt-back and a solid bond. Only sustained heat damages the bond.
Look for foam melt-back, check the bond with core samples, note which areas had protective coverings, check the condition of headers and other structural framing, and separate smoke-only areas from areas with direct flame. For background on how SIPs handle fire and code requirements, see Are SIPs Combustible?
SIP Fire Myths: What's True and What's Not: the seven most common SIP fire fears, checked against this investigation.
SIP Fire Performance Case Study: how SIPs respond to full flame, high heat, and smoke-only exposure.
Are SIPs Combustible?: materials, drywall thermal barriers, and what the building code requires.
How SIPs Perform in Wildfire Zones: what solid-panel construction means for ember resistance.
SIP Forensic Analysis: What It Is, When You Need It, and How It Works: what a real SIP investigation looks like.
SIP Problems and Failure Modes: the most common ways SIP assemblies fail and how to spot them.
PGS Consulting LLC provides independent, SIP-specific fire investigations, including core sampling and panel-by-panel repair vs. replacement recommendations, backed by 40+ years of engineering, manufacturing, and forensic experience.
Talk to Joe Pasma, PE
A residential SIP fire produced three very different outcomes depending on exposure: total loss, partial damage, and no structural loss at all. Here's what determined the difference — and what builders, insurers, and adjusters should take from it.
Written and Analyzed By Joe Pasma, PE | PGS Consulting LLC, Licensed Professional Engineer | 40+ Years in SIP Engineering, Manufacturing, and Forensic Analysis | Published July 30, 2026 | Updated October 9, 2026
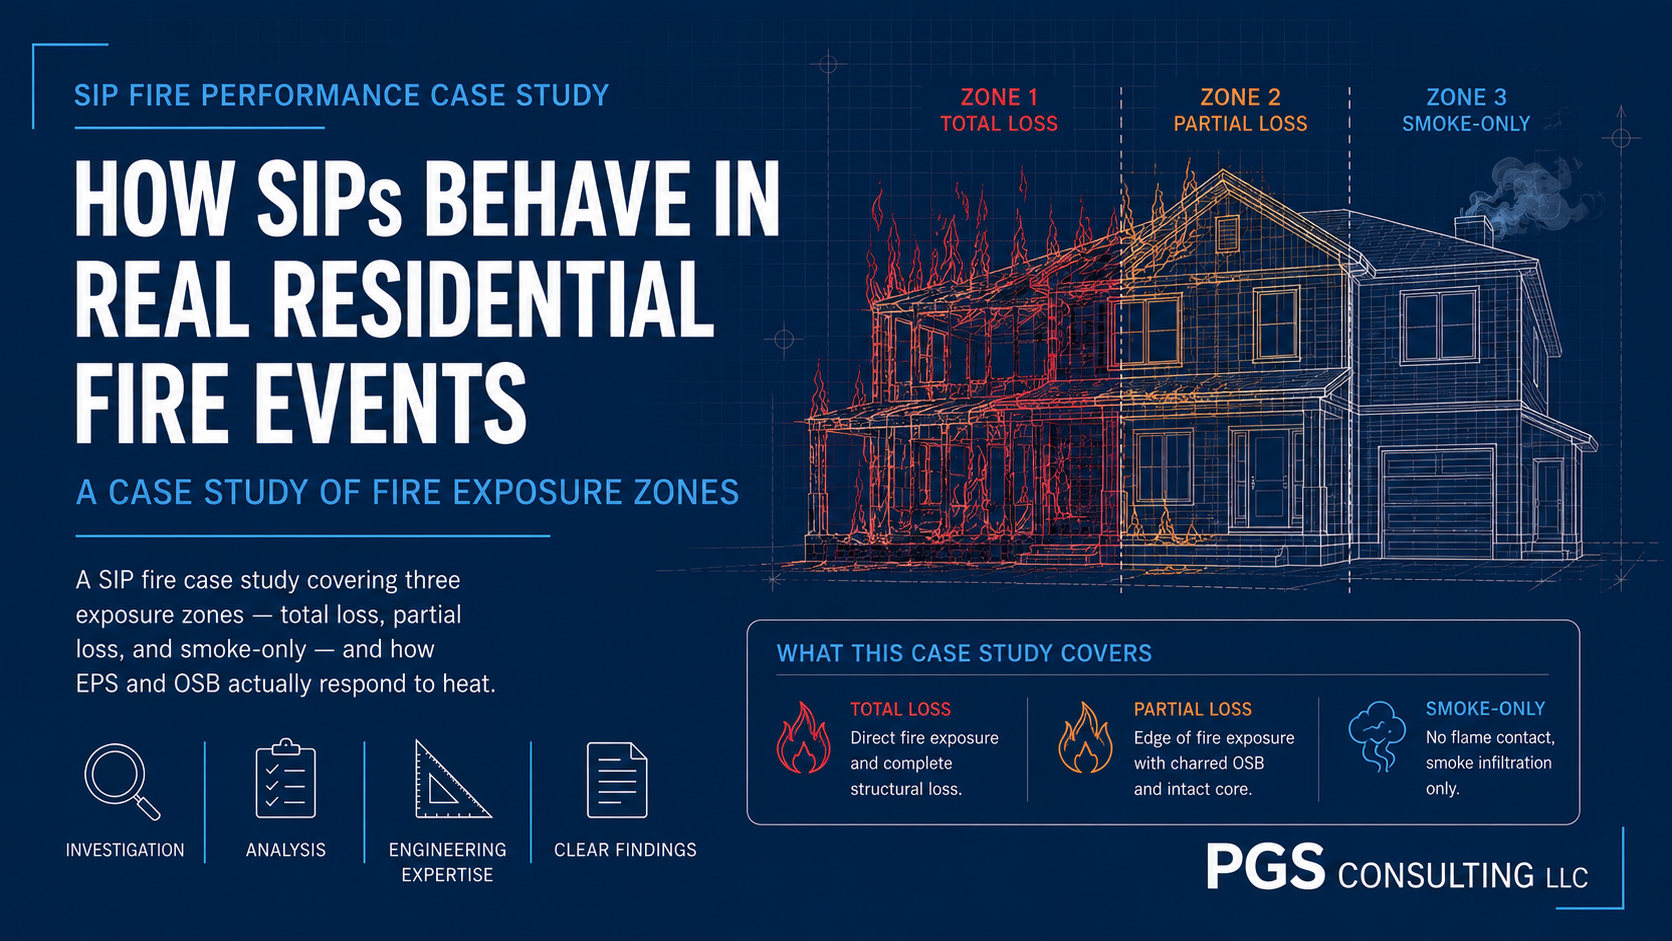
If you have ever wondered what actually happens to a Structural Insulated Panel in a house fire, the honest answer is: it depends entirely on how close the panel was to the flames. This case study walks through an actual residential fire in Cottonwood MN, and breaks the outcome into three zones so you can see exactly how distance and heat exposure change the result.
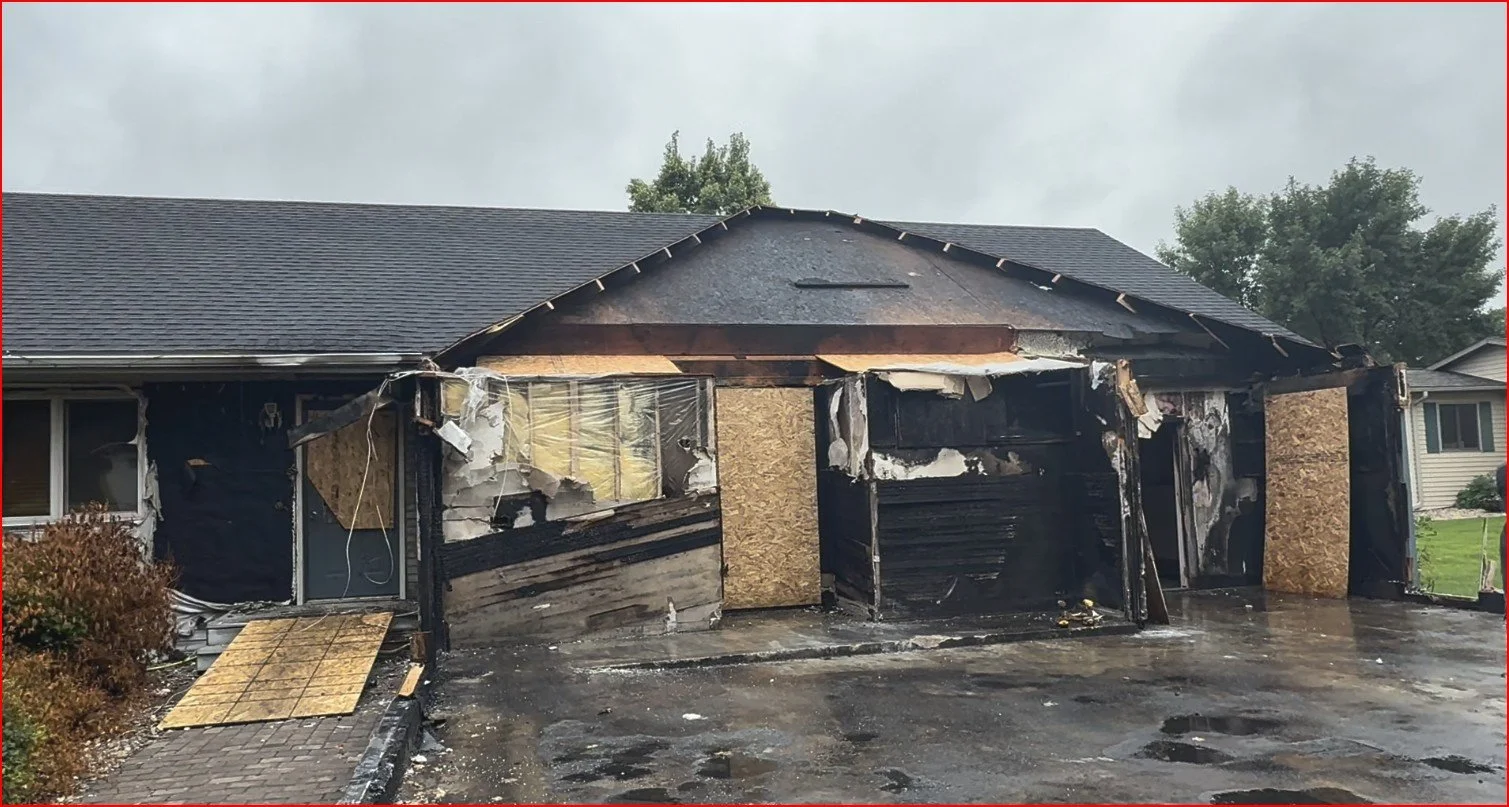
A garage fire spread and became fully involved before it could be safely fought from the inside. That fire compromised the SIP wall panels and the truss framed roof in the garage itself, affected some SIP panels where the garage met the home, and sent smoke into a vaulted SIP roof space in the home that never got hot at all. Three zones, three very different outcomes, all from the same event.
That spread of results is the whole point of this case study. It gives builders, designers, insurers, and anyone doing forensic work a clear, real-world picture of how SIPs actually behave in fire, instead of a vague yes-or-no answer to "are SIPs safe."
Note: This scenario is a specific example of a SIP home occupied by homeowners for many years after the SIP installations were completed. The material behavior, damage thresholds, and construction details described are representative of what we documented in the field and are recurring patterns across multiple SIP fire investigations.
| Detail | Summary |
|---|---|
| Project Type | Residential SIP home with an attached SIP garage |
| Construction | SIP home built in the mid-1990s, plus a SIP garage addition from a different manufacturer, joined by a stick-framed common wall |
| Fire Origin | Garage fire, fully involved before firefighters could safely enter |
| Exposure Zones Studied | Full flame involvement, localized high heat, and smoke-only |
| Outcome | Garage SIPs: total loss. Interface SIPs: partial loss, replaced. Attic SIPs: no structural loss, cleaned only |
SIPs did not fail uniformly in this fire. The outcome depended entirely on exposure: full flame contact caused total loss, localized high heat caused partial loss, and smoke alone caused no structural loss at all.
No building system, not SIPs, not stick framing, not ICF, not mass timber, is designed to survive a fully involved structure fire. The garage's total loss reflects normal fire behavior, not a defect in SIP construction.
Smoke and soot do not damage the structural integrity of a SIP. Panels that were only exposed to smoke needed cleaning, not replacement.
Small construction details made a real difference. Missing fascia that left foam edges exposed, and a roof design that trapped heat against the panels, both made the damage worse than it needed to be.
An open attic ladder gave smoke a direct path into the home's vaulted space, which is why smoke reached an area far from the actual fire.
Telling heat damage apart from smoke damage is critical for an accurate insurance claim. Confusing the two leads to either unnecessary panel replacement or missed structural damage.
Builders and designers can reduce fire risk to SIPs with a few specific choices: protect exposed foam edges, avoid roof details that trap heat against panels, and control how smoke can travel through open spaces like attic ladders.
A Structural Insulated Panel is a sandwich: two rigid facers, almost always OSB (oriented strand board) in the US, glued to a foam core, almost always EPS (expanded polystyrene) in the US. The strength of the panel comes from all three layers working together. That matters here because it explains why SIP fire performance is not one simple story. It is a story about what happens to each layer at different temperatures.
Under sustained direct flame, the EPS core melts. The OSB facers char on the surface first, similar to how heavy timber chars while staying solid underneath, but under prolonged heat that char layer is eventually consumed. Once the foam has melted and the OSB is compromised, the panel loses what is called composite action, meaning the layers no longer work together structurally. For a broader explanation of how SIPs handle fire and what the building code requires, see our full breakdown: Are SIPs Combustible? Performance, Codes, and What Actually Keeps You Safe.
EPS foam begins to lose structural integrity above roughly 180°F and fully melts under sustained flame. OSB behaves differently: under moderate, contained heat it forms a protective char layer, but that protection is eventually consumed once flame exposure continues long enough. Those two thresholds, not one single "ignition point," are what actually determine how much of a panel survives a given fire.
The home in this case had a fairly common layout for SIP construction: a SIP-built house (walls and roof) from the mid-1990s, and a garage, added later, with SIP wall panels by a different manufacturer and a truss framed roof. The two structures were connected by a stick-framed common wall, and the roof where the garage met the home was "over-framed," meaning a small framed cavity was built over the SIP roof connection. The home also had a vaulted SIP roof space above the living area, reachable through an attic ladder.
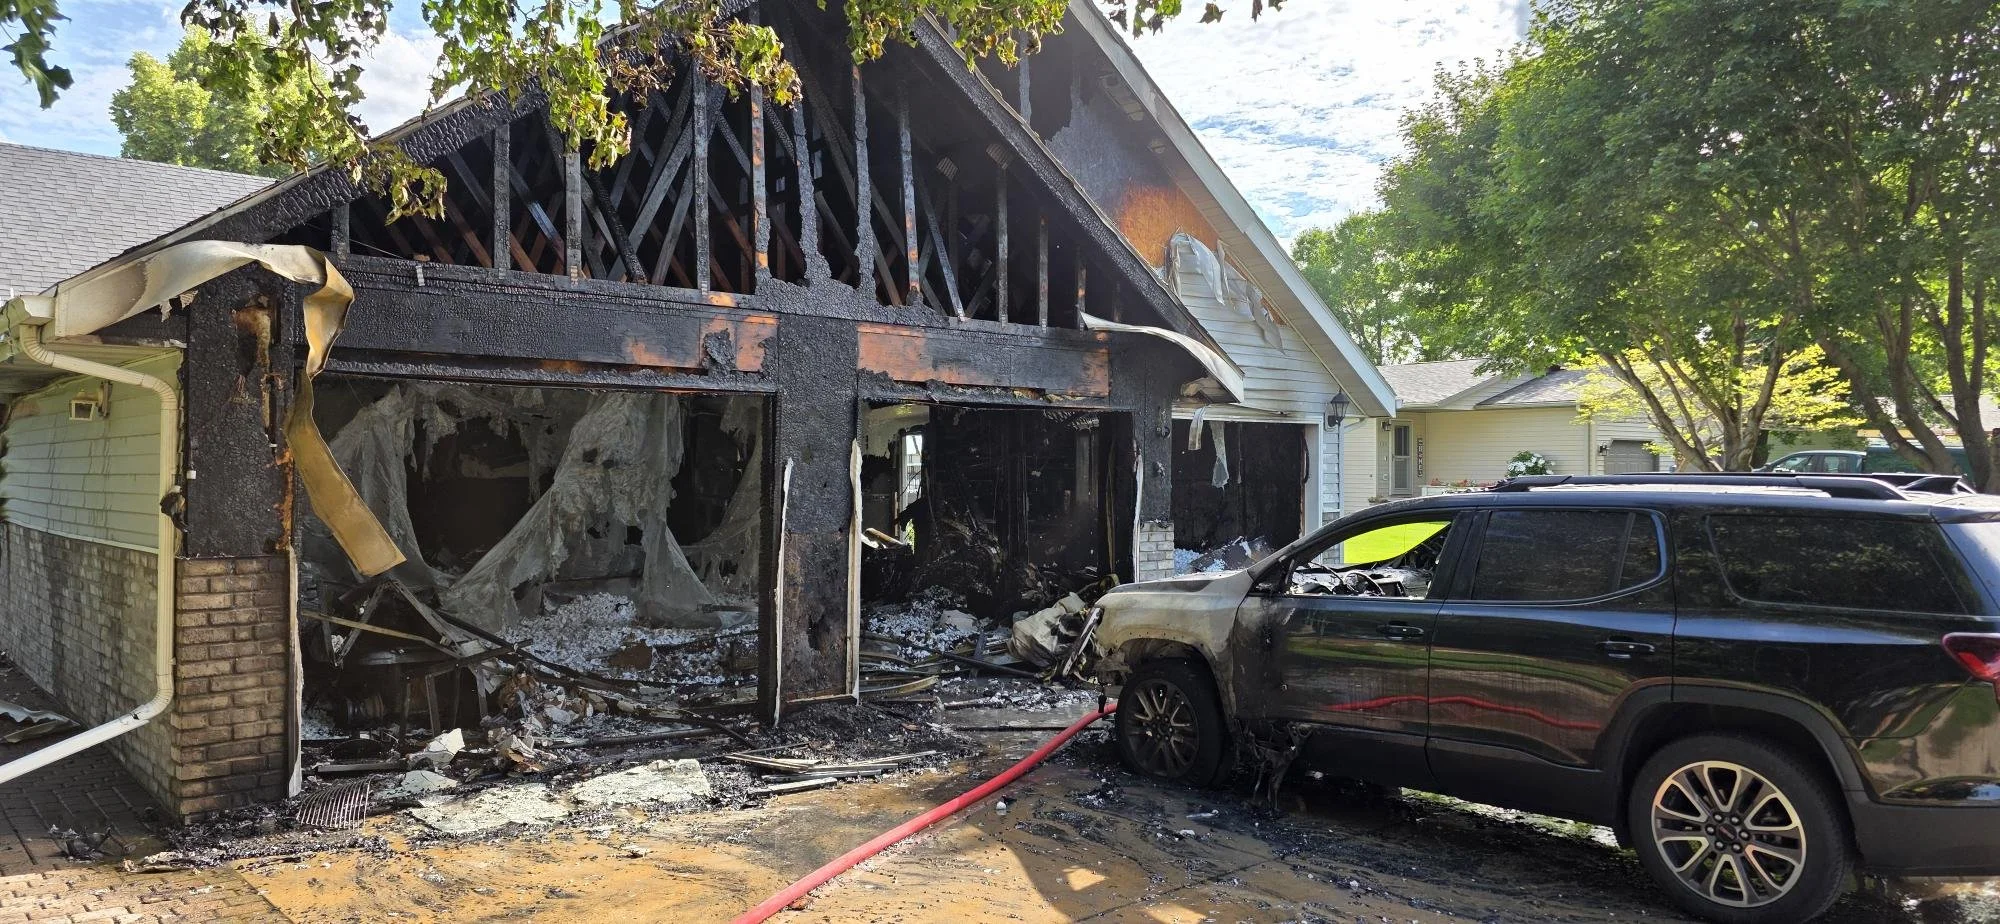
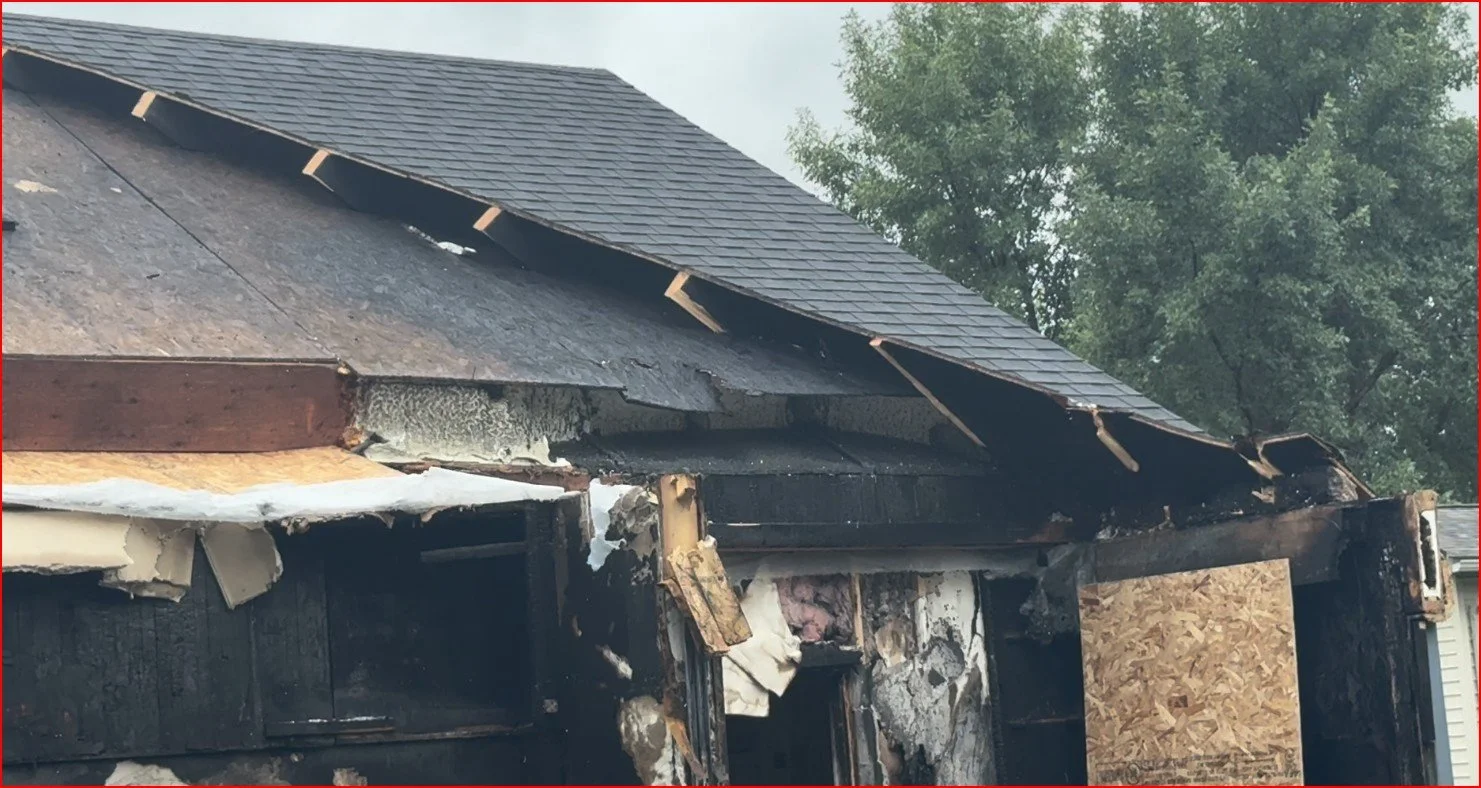
When the garage fire started, it grew quickly and became fully involved, meaning the entire structure was burning and firefighters could not safely enter to fight it from the inside. That fire directly hit the garage's SIP wall panels along with the truss framed roof, and also reached the SIP roof panels of the home right where the two structures connected. At the same time, heavy smoke worked its way into the home's vaulted roof space, helped along by that open attic ladder acting as a direct pathway.
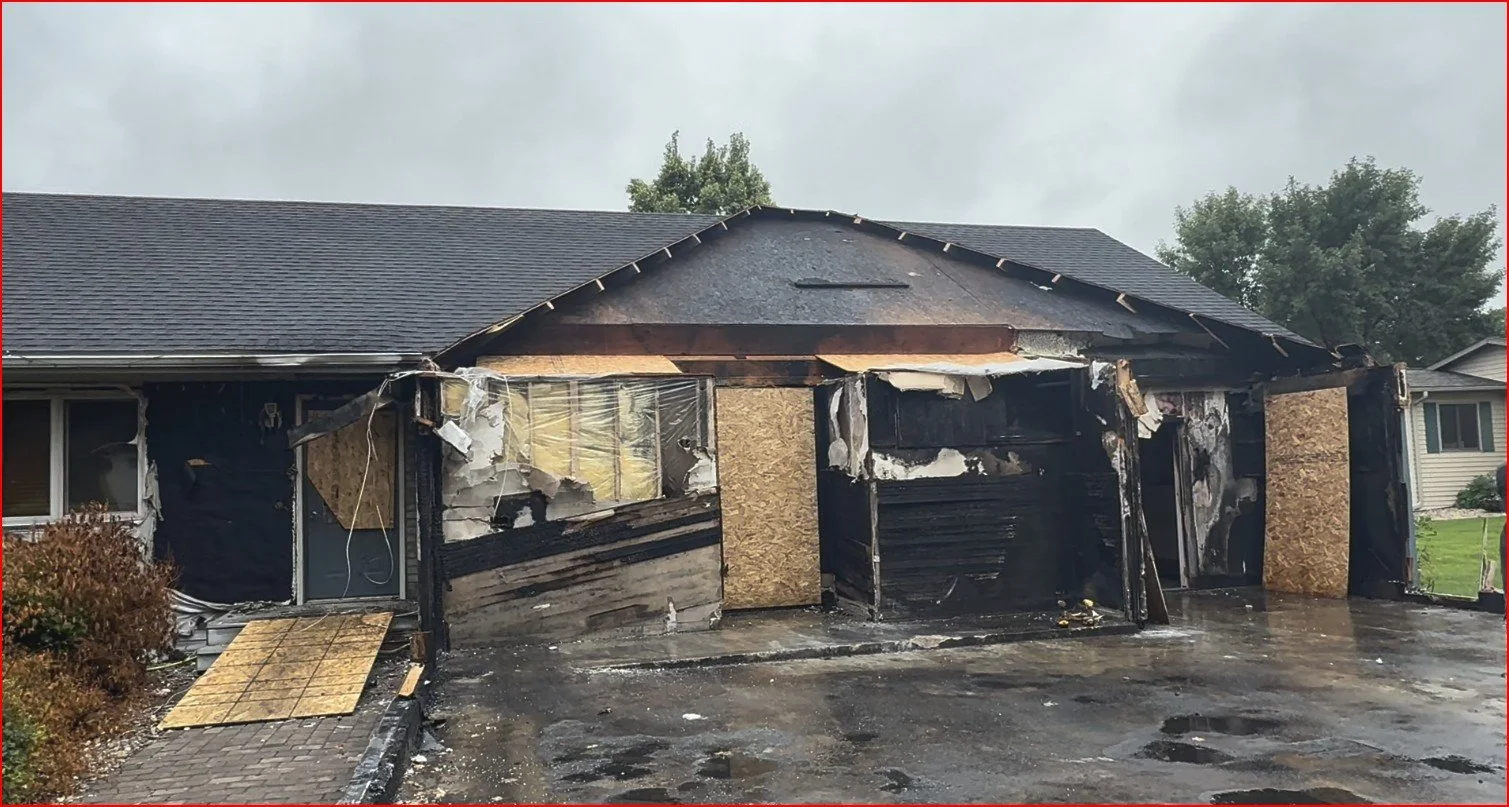
A few construction details shaped how the damage played out. Fascia trim was missing at the roof edge in one area, which left the EPS foam exposed instead of protected. The over-framed roof connection created a small cavity that trapped heat right where the two SIP systems met.
| Zone | Exposure | EPS Response | OSB Response | Outcome |
|---|---|---|---|---|
| Zone 1 | Full flame involvement | Complete melt-out | Char consumed, material lost | Total loss, panel failure |
| Zone 2 | Localized high heat | Melt-back at the facer | Surface char formed | Partial loss, panels replaced |
| Zone 3 | Smoke only | No degradation | No discoloration | No structural loss, cleaned only |
The garage roof and wall panels took the worst of it. Once the structure was fully involved, those panels were exposed to sustained flame and temperatures well beyond what EPS or OSB can handle.
What happens to a SIP under that kind of exposure:
The EPS core fully melts. Above its structural limit, the foam loses shape and melts out under sustained flame.
The OSB burns past its char layer. Moderate heat produces a protective char, but prolonged flame consumes the wood material underneath it.
Composite action is lost. Once the foam is gone and the OSB is compromised, the panel no longer behaves as a structural sandwich.
The panel fails. SIPs, like every other building material, are not engineered to remain structurally intact under full involvement.
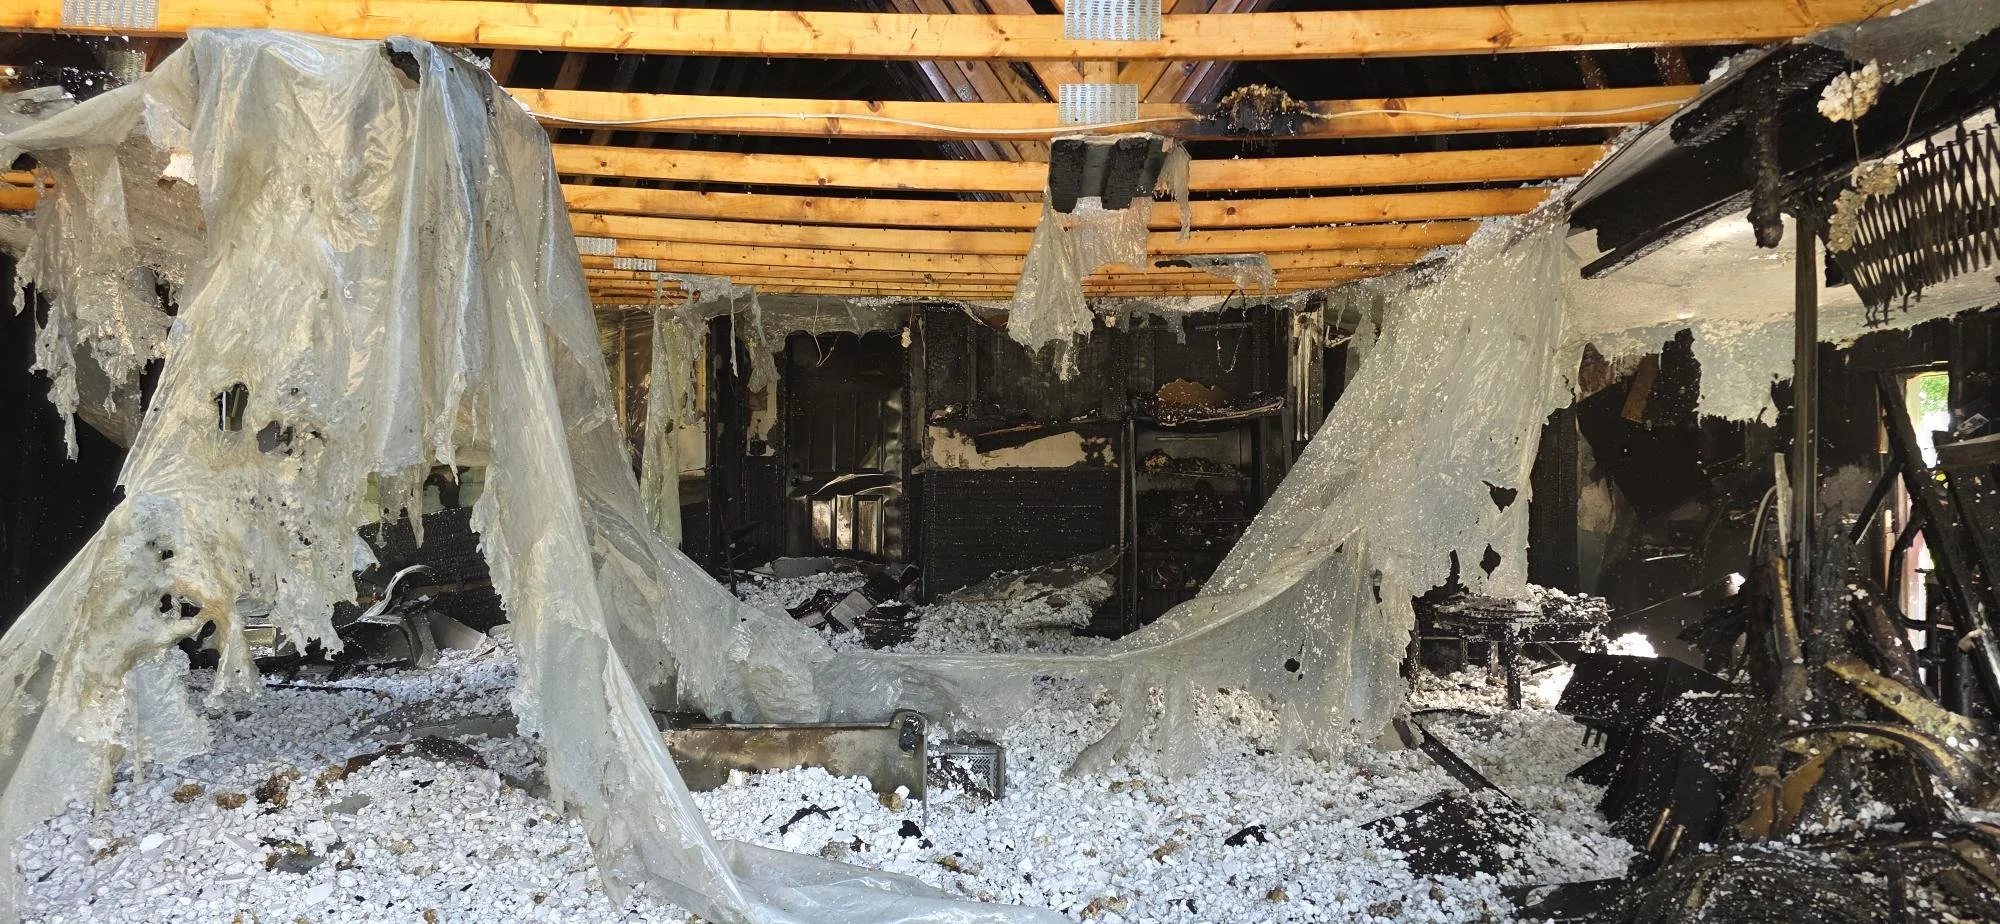
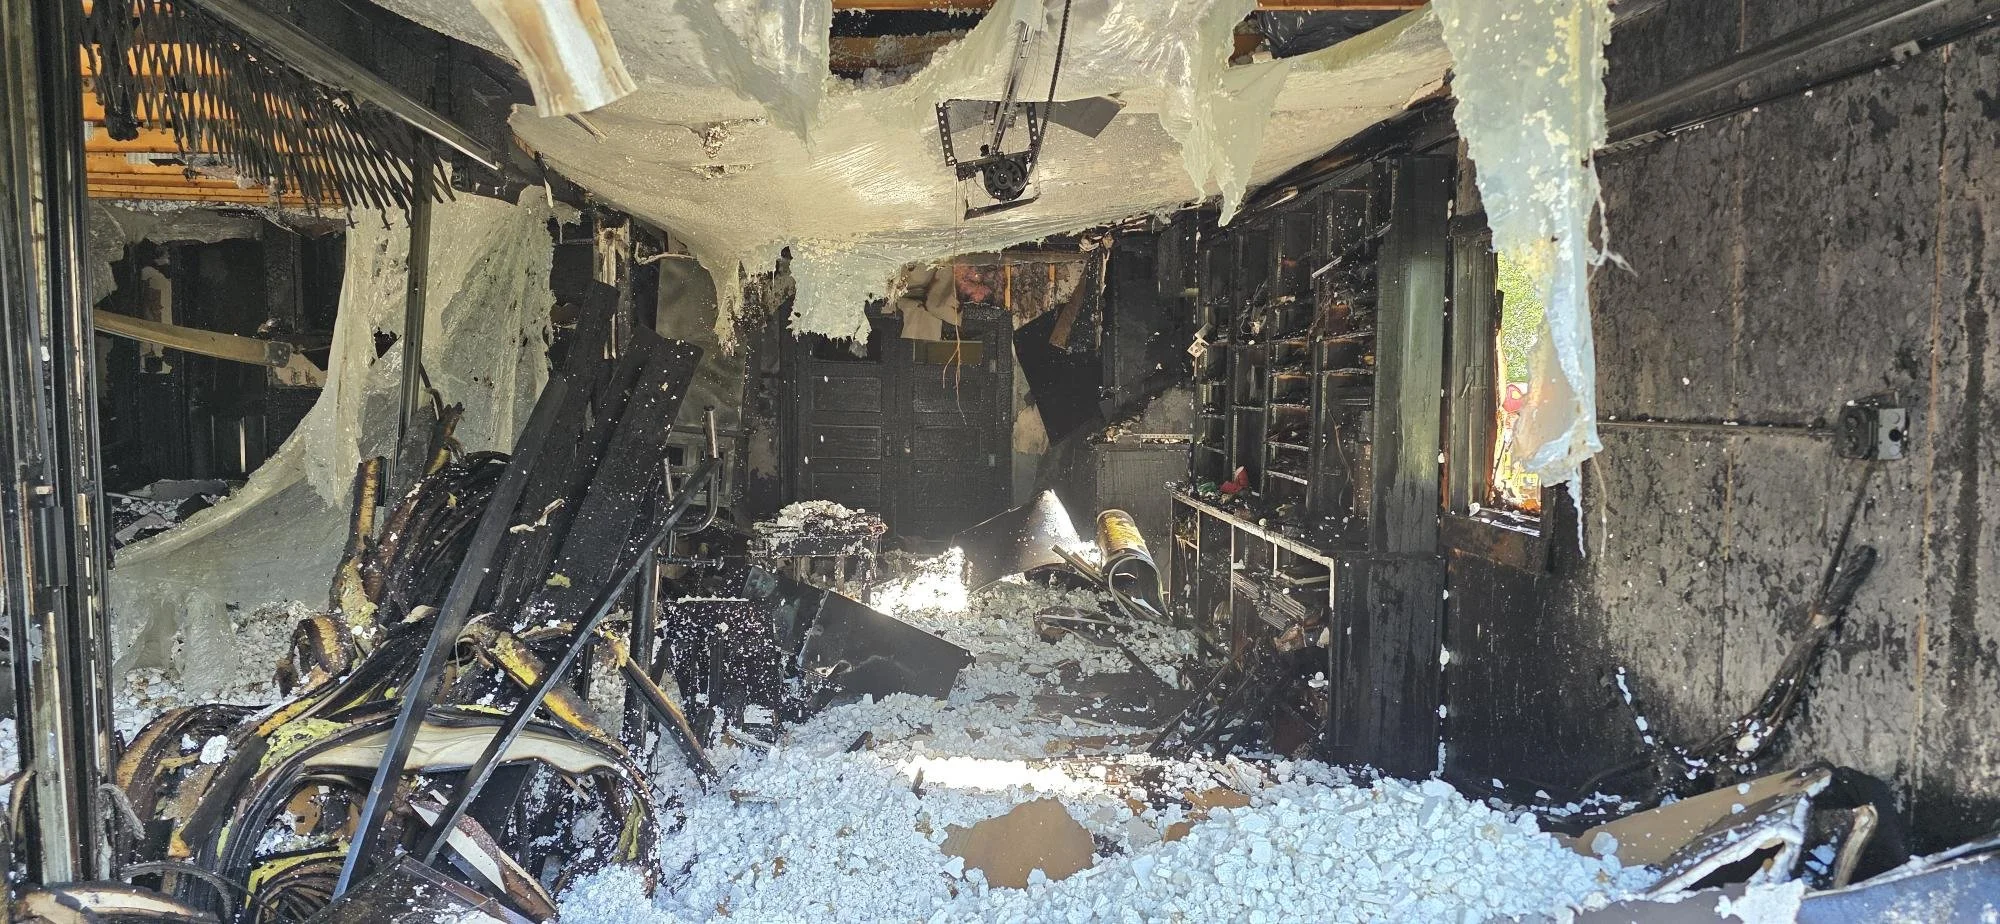
In 40+ years of SIP forensic work, full involvement fires are the one scenario I never expect a panel to survive intact, and I would say the same thing about stick framing, ICF, or mass timber. That is not a knock on any of these systems. It is just what fire does once suppression is not possible.
-- Joe Pasma, PEThe panels right at the home-garage connection tell a different story. These panels were close enough to feel serious heat, but they were not sitting inside a fully involved structure. The result was damage, but not total failure.
What was found in this zone:
EPS melt-back. The foam retreated from the facer in the areas closest to the heat source, rather than melting out completely.
OSB char formation. The wood facers charred on the surface, the expected first response to heat.
Surface charring on an adjacent LVL header. The engineered wood beam supporting that section also showed heat exposure.
Loss of composite action where the foam retreated. Wherever the EPS pulled away from the OSB, the panel's structural sandwich behavior broke down in that specific area.
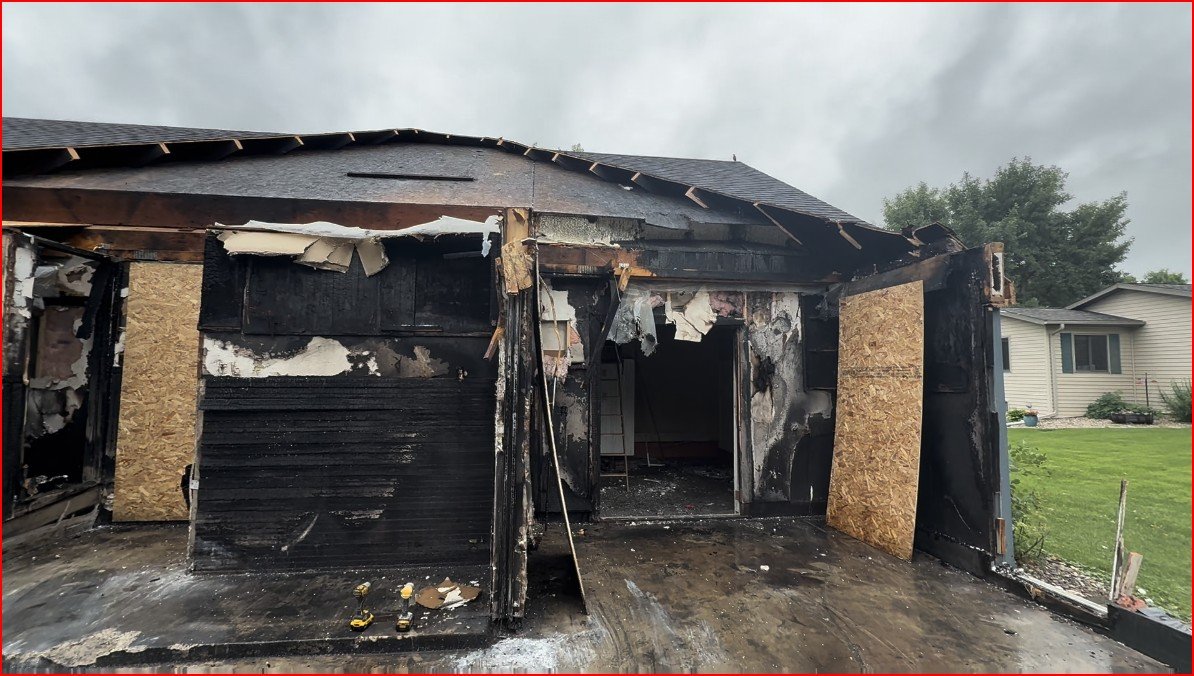
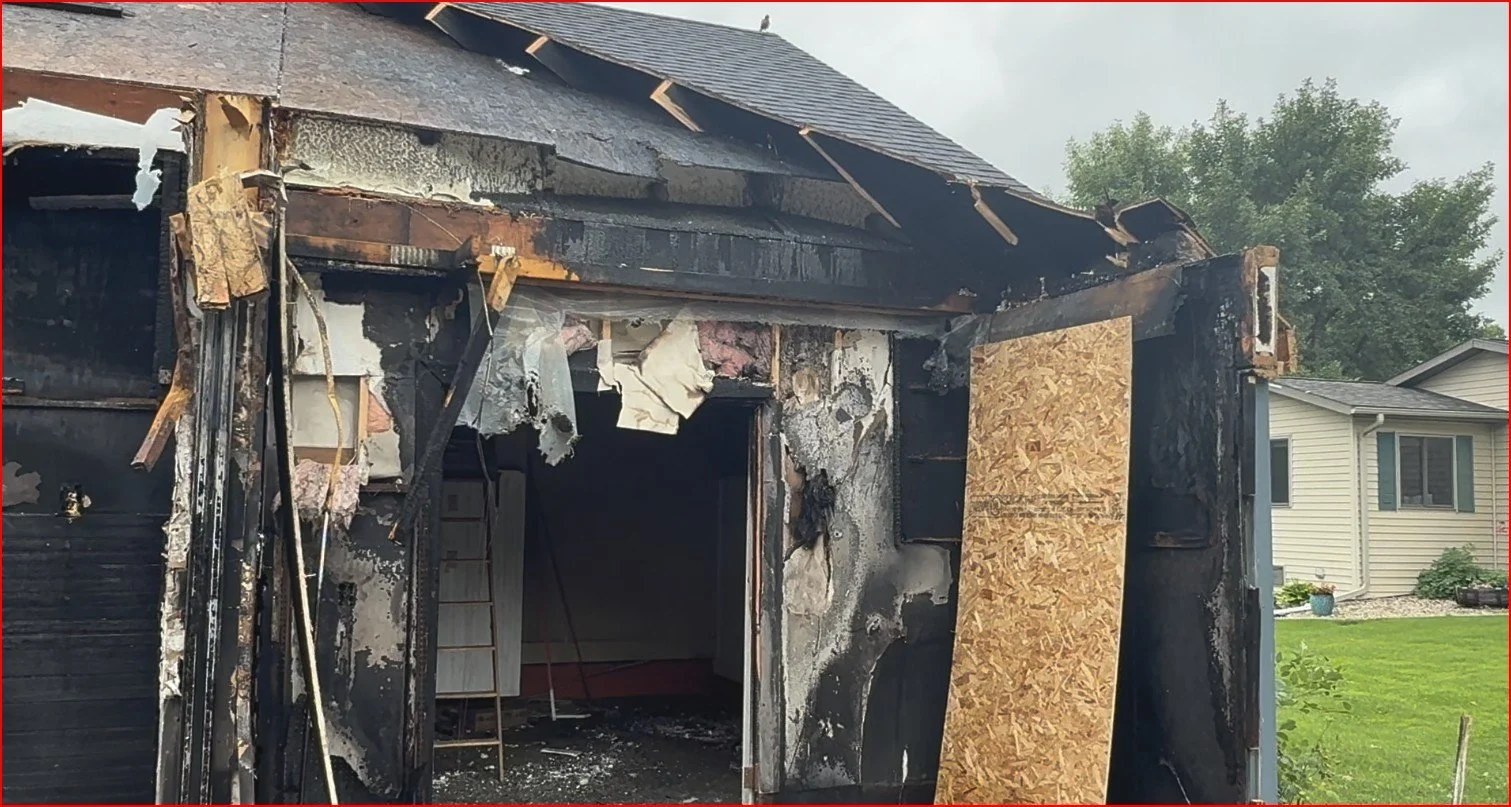
These panels, along with the LVL header, needed to be fully replaced. Two construction details made this zone worse than it should have been: missing fascia left foam edges exposed to direct heat, and the over-framed roof connection trapped heat right against the SIP facers instead of letting it dissipate. Both are addressable at the design and installation stage, and both are covered in more detail in our SIP Installation Guide.
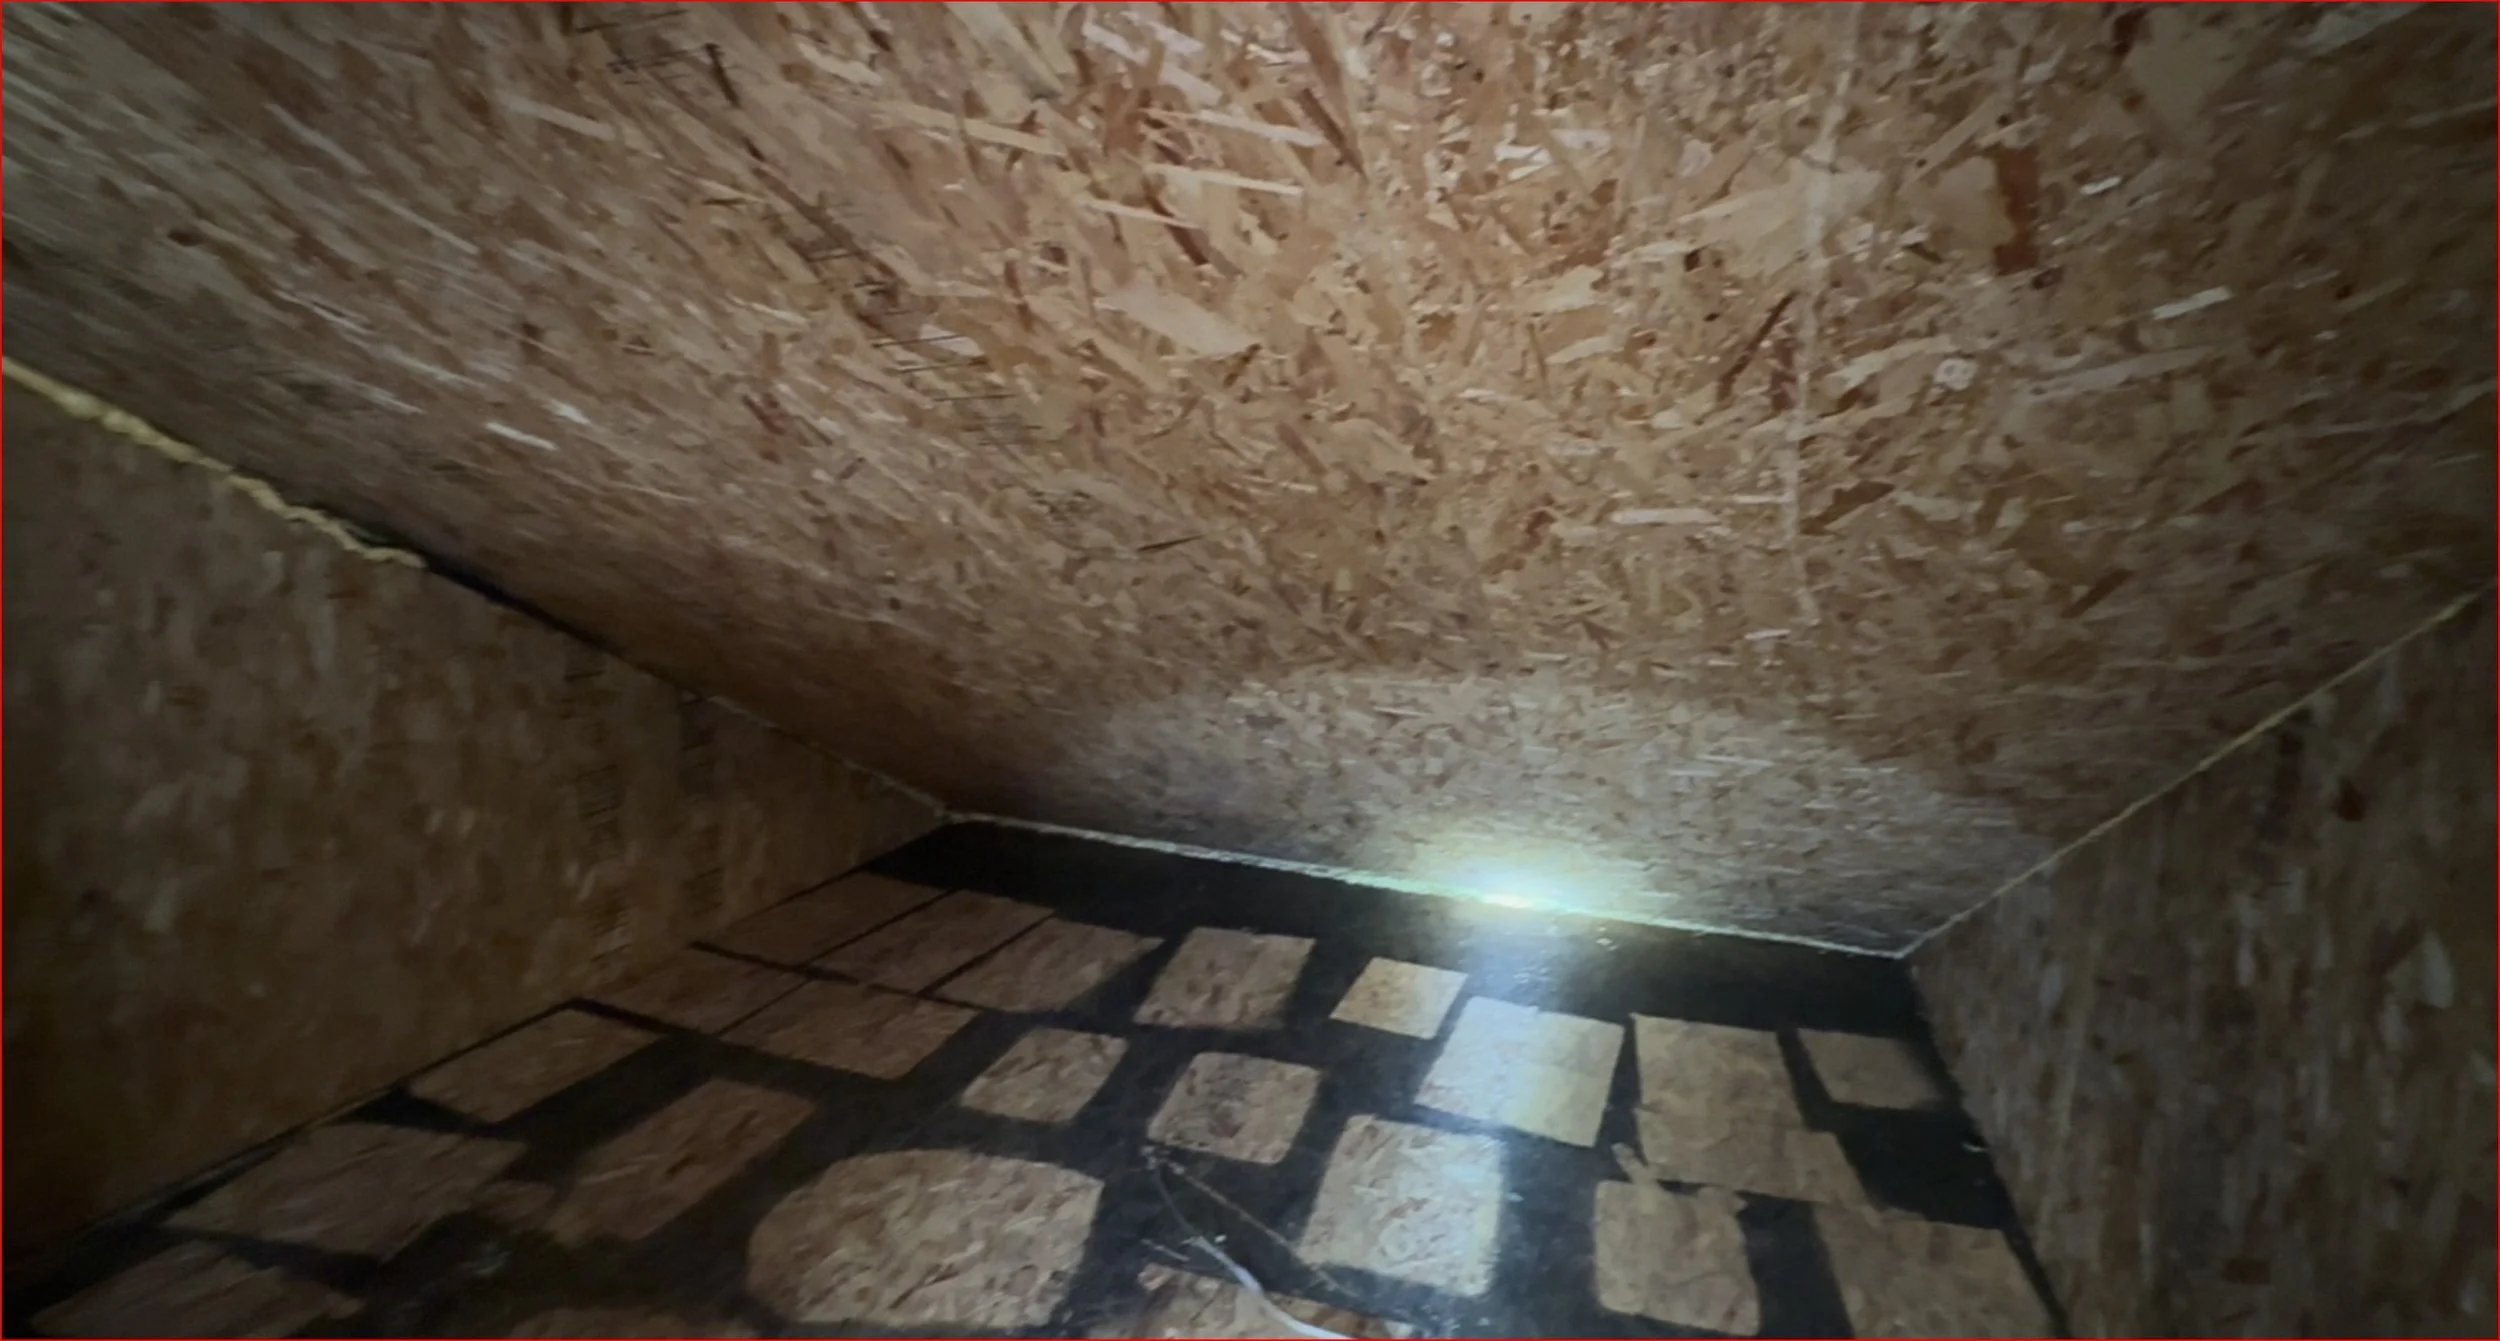
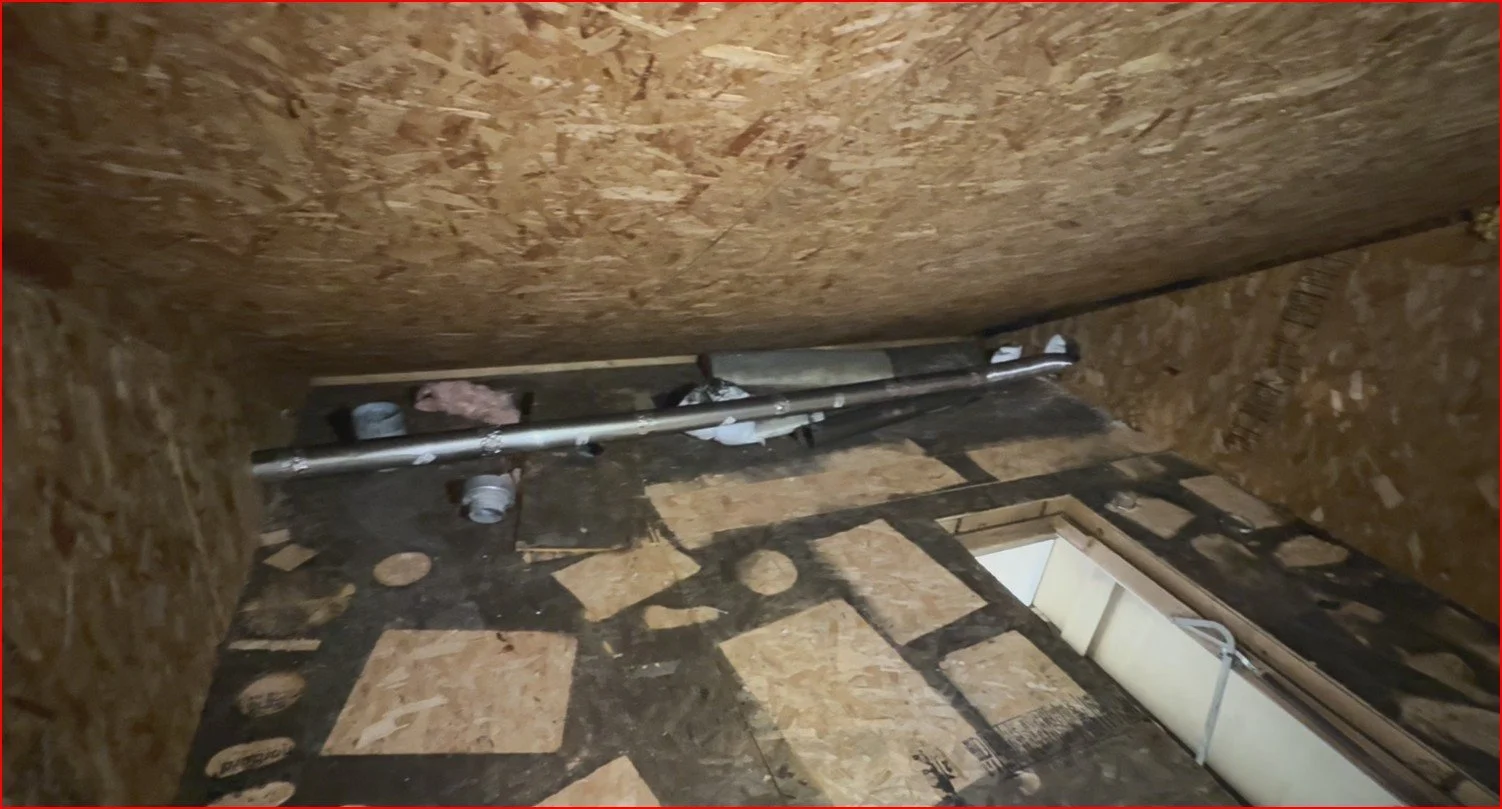
This is the zone that often surprises people. The vaulted SIP roof space behind the garage was never touched by flame or direct heat. It only saw smoke, carried in through the open attic ladder.
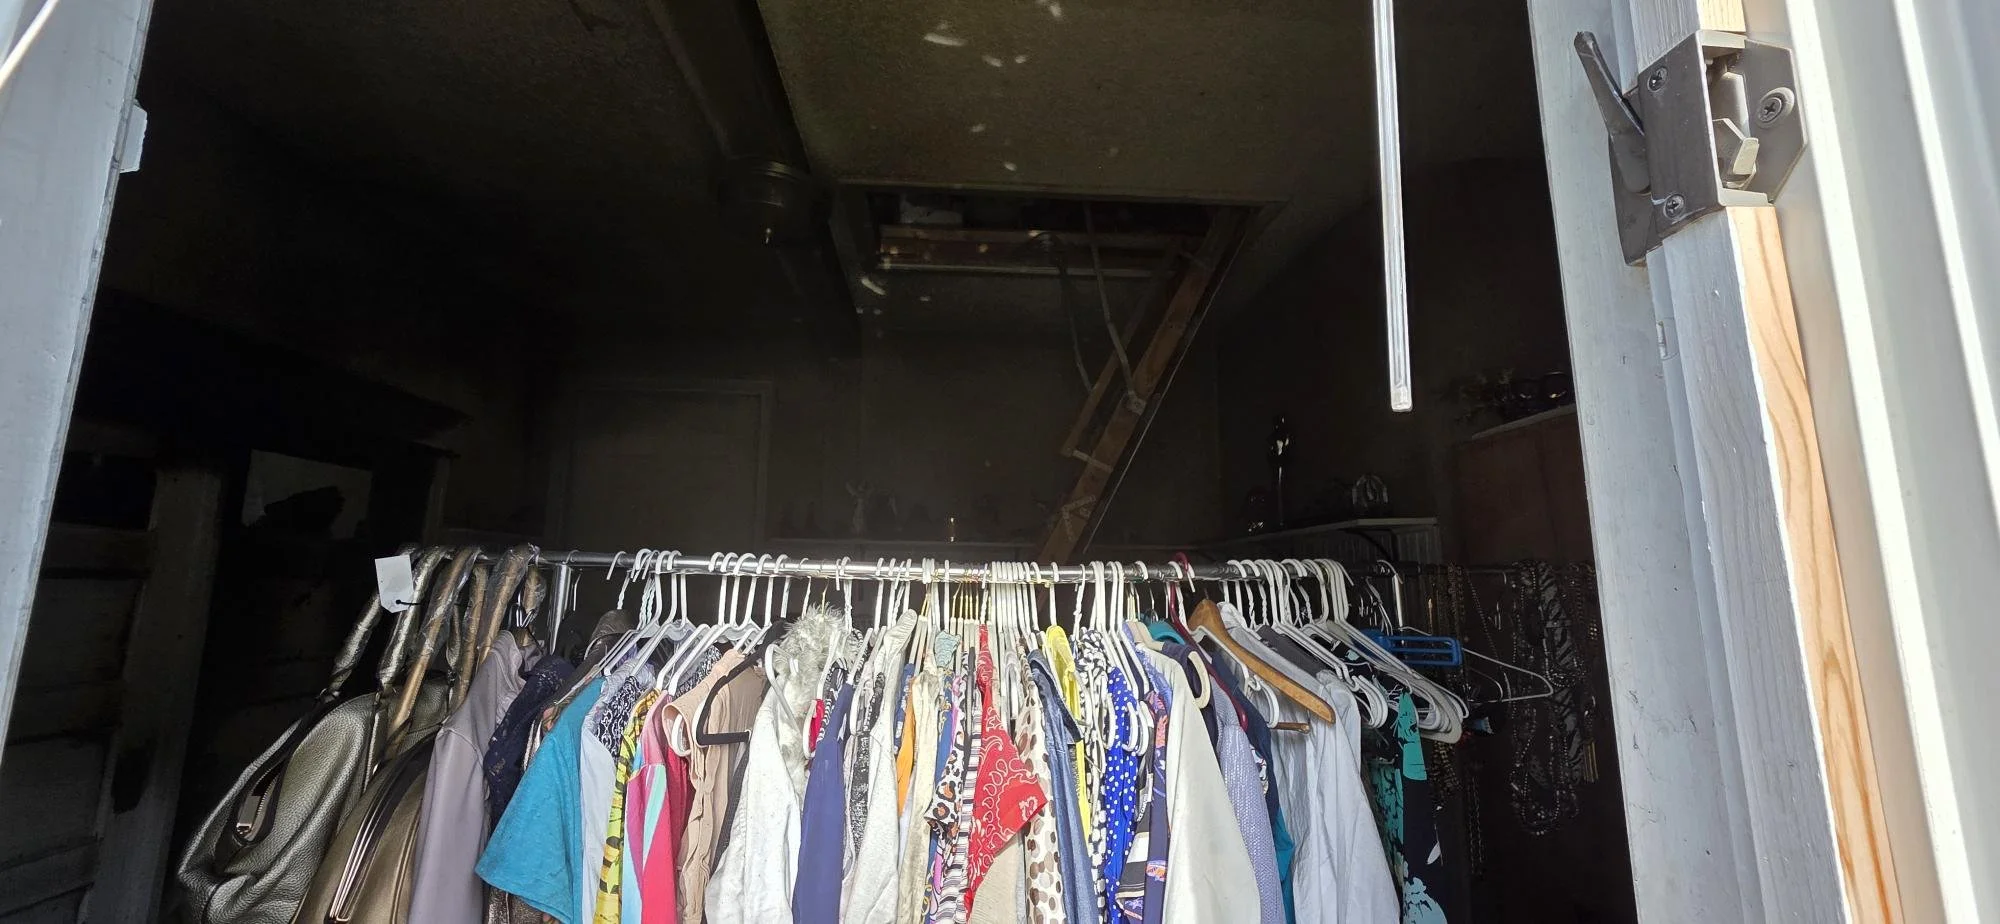
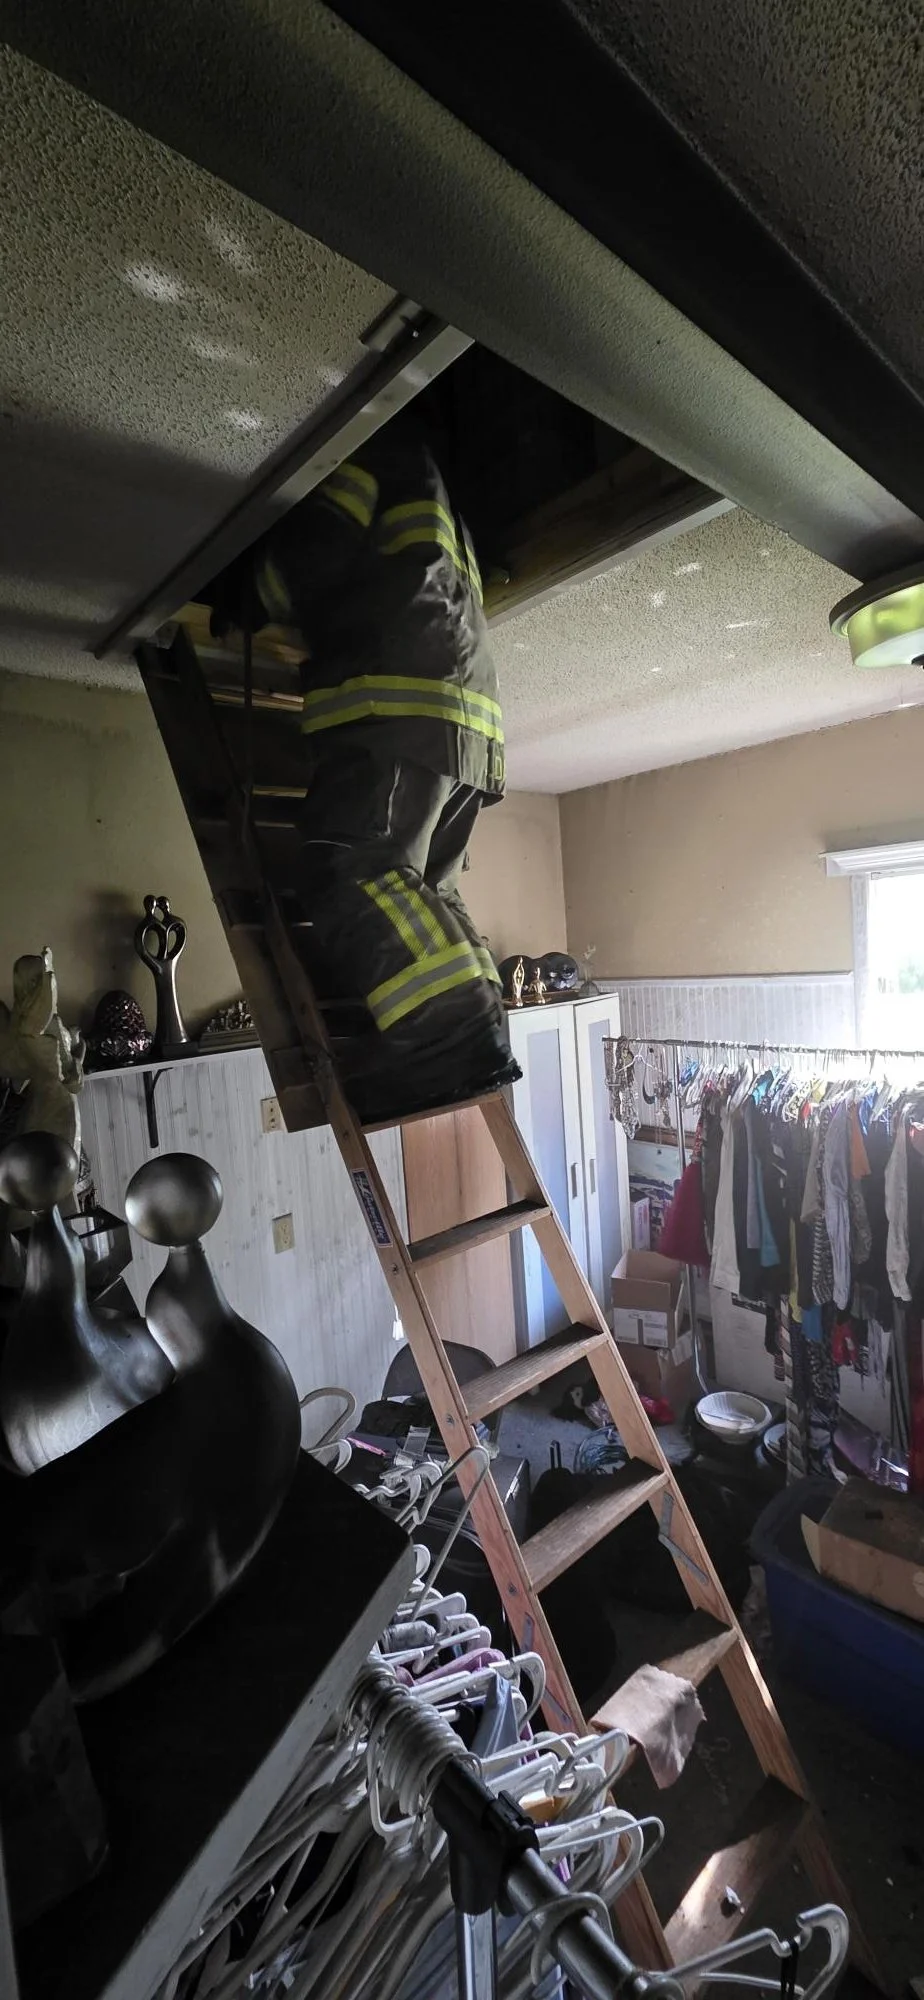
What was found in this zone:
Heavy soot deposits on the floor framing and blackened flooring from smoke migration
Soot buildup where the wall panels met the roof panels
No discoloration of the OSB facers
No degradation of the EPS core
No delamination and no loss of adhesion between the foam and the facers
Despite how much smoke moved through this space, the SIPs here stayed fully structurally sound. The fix was cleaning, not replacement.
| Factor | Why It Mattered |
|---|---|
| Missing fascia | Left EPS foam edges directly exposed instead of shielded, accelerating heat damage in Zone 2 |
| Over-framed roof connection | Created a cavity that trapped heat against the SIP facers at the home-garage interface |
| Open attic ladder | Provided a direct, unobstructed pathway for smoke to migrate into the home's roof space |
| Mixed construction types | SIPs, stick framing, and LVL headers all responded differently to the same fire event, complicating the damage pattern |
None of these factors are unique to SIP construction. They are the kind of detailing issues that affect fire outcomes in any building system. The difference is that SIPs respond to them in specific, predictable ways once you understand how the material behaves.
This distinction is the single most important thing an insurer, adjuster, or forensic investigator needs to get right after a SIP fire event. Getting it wrong means either replacing panels that only need cleaning, or missing panels that actually lost structural integrity.
Heat-damaged SIPs show physical material change. Look for EPS melt-back or melt-out, OSB char or consumption, and any separation between the foam core and the facer. These indicate real structural compromise.
Smoke-damaged SIPs show surface residue only. Soot deposits, blackened surfaces, and smoke odor with no change to the EPS or OSB material itself mean the panel is still structurally sound.
Location relative to the fire source is a strong early indicator. Panels with direct or near-direct flame exposure are candidates for heat damage. Panels several rooms or floors away, reached only through smoke pathways like an open attic access, are far more likely to be smoke-only.
When in doubt, a SIP-specific forensic evaluation settles it. General fire damage assessments are not built to evaluate composite panel behavior. For more on how that process works, see SIP Forensic Analysis: What It Is, When You Need It, and How It Works.
Not sure if that damage is structural or just cosmetic? Guessing wrong costs money either way — replacing panels that only needed cleaning, or missing a structural compromise that shows up later as a bigger repair. Schedule a consultation with Joe Pasma, PE, and get a straight answer before you write the repair scope.
Not sure if you're looking at a total loss or a cleaning job? That's exactly the call a SIP-specific forensic evaluation is built to make — I've seen adjusters miss it in both directions. Talk to Joe Pasma, PE before you sign off on a repair scope.
Fascia, trim, and other coverings exist for more than looks. They keep EPS foam edges shielded from direct heat exposure. Skipping them, or letting them go missing, creates a weak point in an otherwise well-performing wall or roof assembly.
Over-framed roof connections, like the one at this garage-to-home interface, can create small cavities that trap heat directly against SIP facers. Where two different SIP systems or two different construction types meet at a roofline, that connection deserves extra attention during design.
Open attic access points, unsealed chases, and similar gaps do not just affect air leakage and energy performance. They also give smoke a direct route into spaces far from the actual fire. Sealing and detailing these pathways properly limits how far smoke damage spreads.
A general contractor or a standard fire damage assessment is not equipped to tell EPS melt-back from cosmetic soot staining. That distinction requires someone who understands how the composite panel behaves under heat.
Once heat damage and smoke damage are correctly separated, the repair scope becomes much clearer. Heat-compromised panels need replacement. Smoke-only panels need cleaning. Treating every affected panel the same way leads to either wasted cost or overlooked risk.
SIPs fail predictably under extreme heat, not randomly. EPS melts, OSB chars and eventually burns, and composite action breaks down once the foam separates from the facer. Understanding this sequence makes fire damage far easier to evaluate accurately.
Full structural involvement is not a fair test of any building material. The garage's total loss says nothing negative about SIP technology. It reflects what happens to virtually any building system under sustained, uncontrolled flame.
Smoke exposure alone is not a structural threat to SIPs. This is worth repeating because it is so often assumed otherwise. Soot on a panel does not mean the panel is compromised.
Small detailing choices carry real fire-performance consequences. Fascia coverage and roof cavity design are not just aesthetic or energy-efficiency decisions. They directly affect how a SIP assembly responds to heat.
Forensic evaluation needs to be SIP-specific. Insurers and adjusters who understand how to read EPS and OSB behavior after a fire will make more accurate, more defensible damage assessments.
For a broader look at how SIP assemblies fail and how to recognize the warning signs, see SIP Problems and Failure Modes in the Resource Hub.
Yes. SIPs behave as a composite panel, meaning the OSB facers and the EPS foam core work together structurally. Under high heat, the EPS melts and the OSB chars, and the panel loses that composite behavior once the two layers separate. Stick framing fails differently because the studs, sheathing, and insulation are separate systems that respond independently to heat.
The garage became fully involved, which exposed those panels to sustained flame and extreme temperatures beyond what EPS or OSB can withstand. No building system, SIPs, stick framing, ICF, or mass timber, is designed to survive full structural involvement. The home's SIPs experienced either localized heat or smoke-only exposure, both of which are survivable conditions for the material.
No. Smoke and soot deposits alone do not degrade EPS foam or OSB facers. SIPs exposed only to smoke typically need cleaning, not replacement. Structural damage only occurs when temperatures actually exceed the thermal limits of the panel materials.
Detailing matters more than people expect. Exposed foam edges from missing fascia, poorly sealed joints, and roof configurations that trap heat against the panel can all accelerate damage. Proper detailing protects the EPS core and limits how much heat actually reaches the panel. See the SIP Installation Guide for more.
Insurers should distinguish between heat-compromised SIPs, showing EPS melt-back, OSB char, or loss of composite action, and smoke-only SIPs, showing soot deposits with no material degradation. SIP-specific forensic evaluation is essential here to avoid replacing panels that only need cleaning, or missing panels that are actually structurally compromised. Learn more in SIP Forensic Analysis: What It Is, When You Need It, and How It Works.
Yes. SIPs are not fireproof, and nothing is, but they behave predictably and consistently under fire conditions once you understand how EPS and OSB respond to heat. When properly detailed, protected, and finished per code (typically with a fire-rated interior membrane such as gypsum board), SIP assemblies are built to meet the same fire-resistance requirements as conventional framing under the applicable building code. For a full breakdown of SIP fire performance and code requirements, see Are SIPs Combustible? Fire Performance, Codes, and What Actually Keeps You Safe.
Are SIPs Combustible? Fire Performance, Codes, and What Actually Keeps You Safe -- A full breakdown of how EPS and OSB respond to heat and what the building code requires
SIP Forensic Analysis: What It Is, When You Need It, and How It Works -- What a real SIP forensic investigation looks like, from a licensed PE
SIP Problems and Failure Modes -- An overview of the most common ways SIP assemblies fail and how to recognize them
SIP Installation Guide -- How SIP assemblies should be detailed, sealed, and protected during construction
SIP Building Codes and Compliance -- Code requirements relevant to SIP fire performance
Forensic Case Study: Exterior OSB Deterioration at the SIP Ridge Joint -- Another real-world SIP forensic case study, this one on moisture rather than fire
PGS Consulting LLC provides independent, SIP-specific forensic evaluation, distinguishing heat-compromised panels from smoke-only exposure, backed by 40+ years of engineering, manufacturing, and forensic experience.
Talk to Joe Pasma, PE
If you've ever seen a stained or swollen OSB panel and wondered whether your SIP is failing, here's the short answer: it's not the panel, it's the moisture. I walk through what actually causes OSB rot, how to tell mold from rot before you panic, and the four controls that keep it from happening in the first place.
By Joe Pasma, PE | PGS Consulting LLC | SIP Engineering & Consulting | Published July 14, 2026
If you work with Structural Insulated Panels (SIPs) long enough, you'll eventually hear the same worried question: "Do SIPs rot?"
It's a fair question. When the OSB (oriented strand board) skin on a SIP shows a dark stain, some swelling, or a patch of mold, it's easy to assume the panel itself has failed.
Here's the short answer, based on every forensic investigation I've led across manufacturers, climates, and building types: OSB rot is not a SIP problem. It's a moisture problem. And moisture problems are solvable, with the right systems, training, and follow-through.
This guide walks through what actually causes OSB to break down, what mold does and doesn't mean, and the practical steps builders, designers, and homeowners can take to keep SIP walls and roofs performing the way they're designed to for decades. My goal isn't to point fingers. It's to give you the same clarity I'd want if it were my own project.
OSB rot happens when water or damp air reaches the wood and can't dry out over time. It is not something unique to SIPs.
SIPs are high-performing, tightly built assemblies. That means moisture problems show up sooner than they would in a traditional wall, which is a feature, not a flaw.
Mold and rot are not the same thing. Mold is a surface issue that can be cleaned. Rot is permanent structural decay that requires replacement.
Nearly every OSB moisture issue traces back to one of four things: liquid water, air leaks, humid indoor air, or a cold condensing surface.
A simple checklist covering design, construction, and homeownership prevents the vast majority of moisture problems in SIP buildings.
OSB doesn't fail on its own. It breaks down when liquid water, or air carrying moisture condenses, reaches the wood and stays there long enough that it can't dry out.
There are really only three ways that happens:
Bulk water intrusion. A roof leak, a window leak, a gap in the weather-resistive barrier (WRB), or missing flashing lets rainwater in directly.
Air leakage carrying moisture. Warm, humid air escapes through a gap, hits a cold surface, and condenses into liquid water wetting the OSB, the same way a cold glass of water "sweats" on a summer day.
Vapor drive. In cold climates, high humidity inside the home pushes moisture toward the colder roof or wall skin, where it can condense.
None of these three causes are unique to SIPs. What makes SIPs different is that they're a high-performance, tightly sealed assembly with fewer places for moisture to hide or escape. That's a strength, but it means the details matter. SIPs reward precision. They don't require perfection, just intentional, careful work.
Understanding how OSB responds to moisture helps everyone, from builders to homeowners, make sense of what they're looking at.
OSB absorbs water unevenly. The cut edges soak up moisture faster than the flat faces.
Mold can start once moisture content climbs above roughly 19-20%. Below that level, there isn't enough available water for mold to grow.
Staying wet for a long time weakens the wood's internal bond, reducing the panel's strength over time.
Repeated wetting and drying cycles cause permanent swelling. A panel that "dried out" isn't automatically back to normal. It's worth checking, not just assuming.
Knowing the distinction between mold and rot prevents a lot of unnecessary panic on a job site or during a home inspection.
← Swipe to view full table →
| Category | Mold | Rot |
|---|---|---|
| What it is | Surface-level biological growth | Structural decay of the wood itself |
| Can it be fixed? | Yes, it's cleanable | No, the material must be replaced |
| Does it mean the panel failed? | Not on its own | Yes |
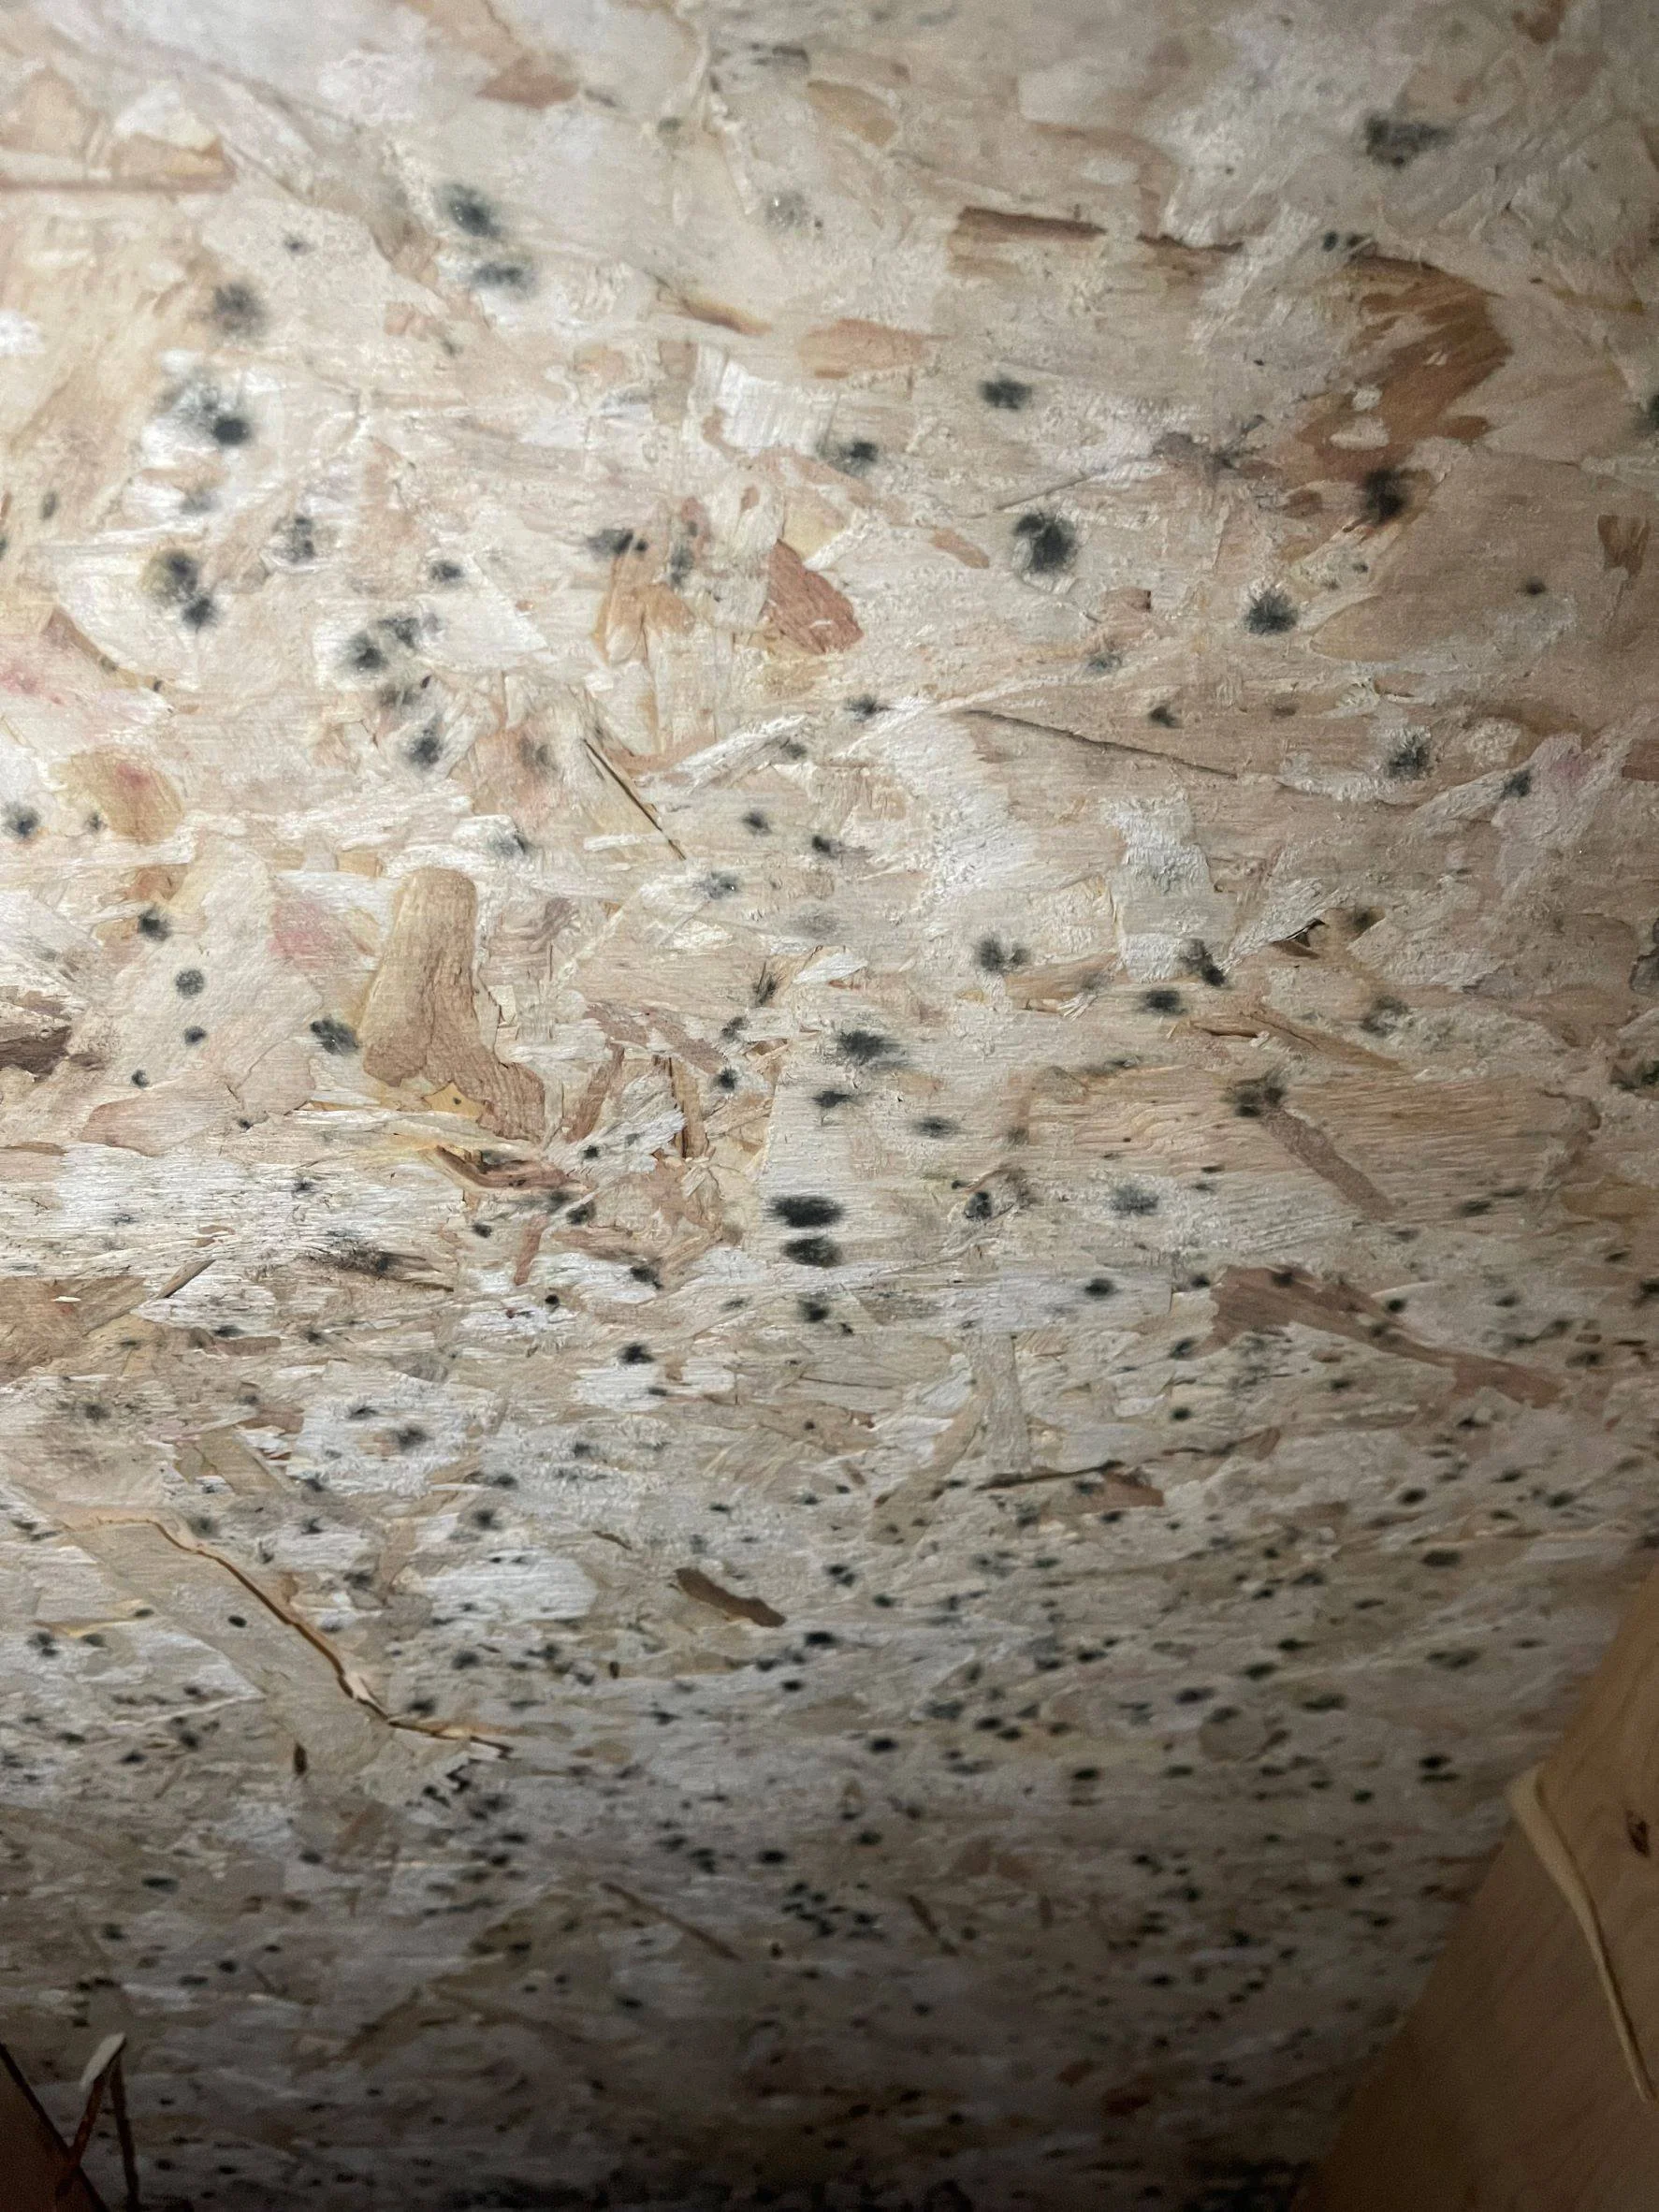
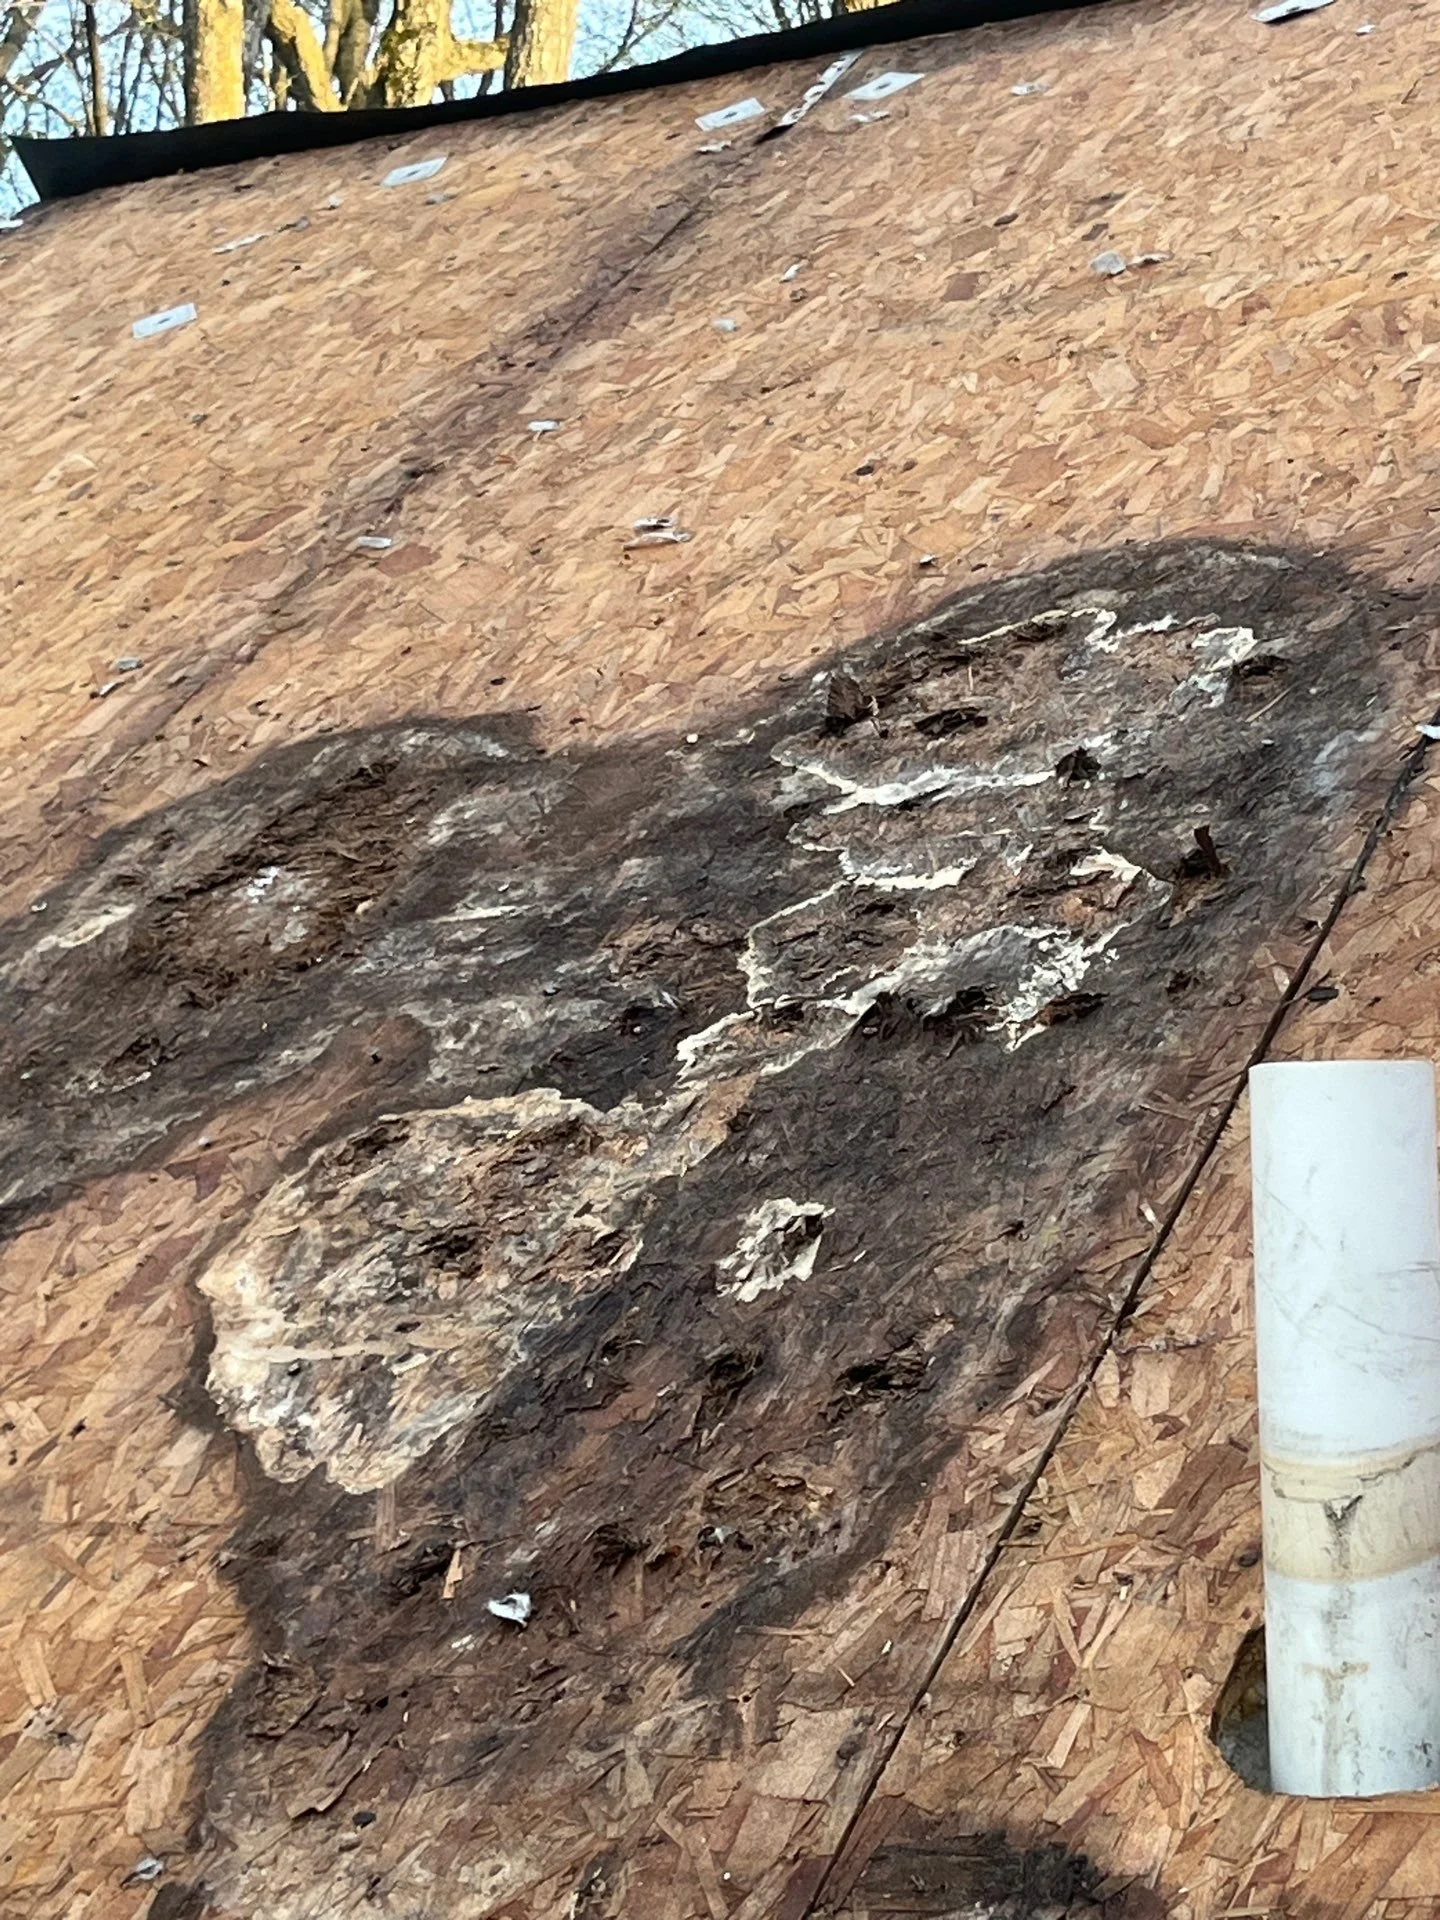
SIPs aren't fragile. They're direct. Because a SIP wall or roof doesn't have a vented cavity hiding behind the insulation, there's nowhere for a moisture problem to quietly sit for years unnoticed. When something's off, it tends to show up sooner rather than later.
That's not a defect. It's useful feedback, and it's part of why SIPs outperform stick framing on energy efficiency and long-term durability when they're built correctly.
SIPs depend on three things working together: continuous bonding between the OSB skin and the foam core, airtight joints between panels, and proper sealing at splines, ridges, and penetrations through the panel. When those three things are done well, SIPs are one of the most durable enclosure systems available. When a step gets skipped or rushed, moisture will find the gap. It always does.
In 40+ years investigating SIP performance, I have never found a case of OSB rot that couldn't be traced back to one of four things: water, air, vapor, or temperature. When those four are controlled, the material simply does what it was engineered to do.
-- Joe Pasma, PEThese patterns show up again and again, across manufacturers and climates. That's actually good news: predictable problems are preventable problems.
Ridge beams and roof peaks. Warm moist air rises, so the ridge is the first place condensation can form if sealant is missing or a spline wasn't installed correctly.
Eaves and fascia edges. Ice dams, a reversed weather barrier lap, or a missing kick-out flashing can let water travel behind the fascia and into the OSB.
Windows and doors. Gaps in the weather barrier, a missing sill pan, or an unsealed rough opening are common entry points.
Mechanical penetrations. Vents, plumbing stacks, and electrical lines all need to be sealed properly.
Indoor humidity. Tight, energy-efficient homes need balanced ventilation, or humidity can build up in winter and push moisture toward cold surfaces.
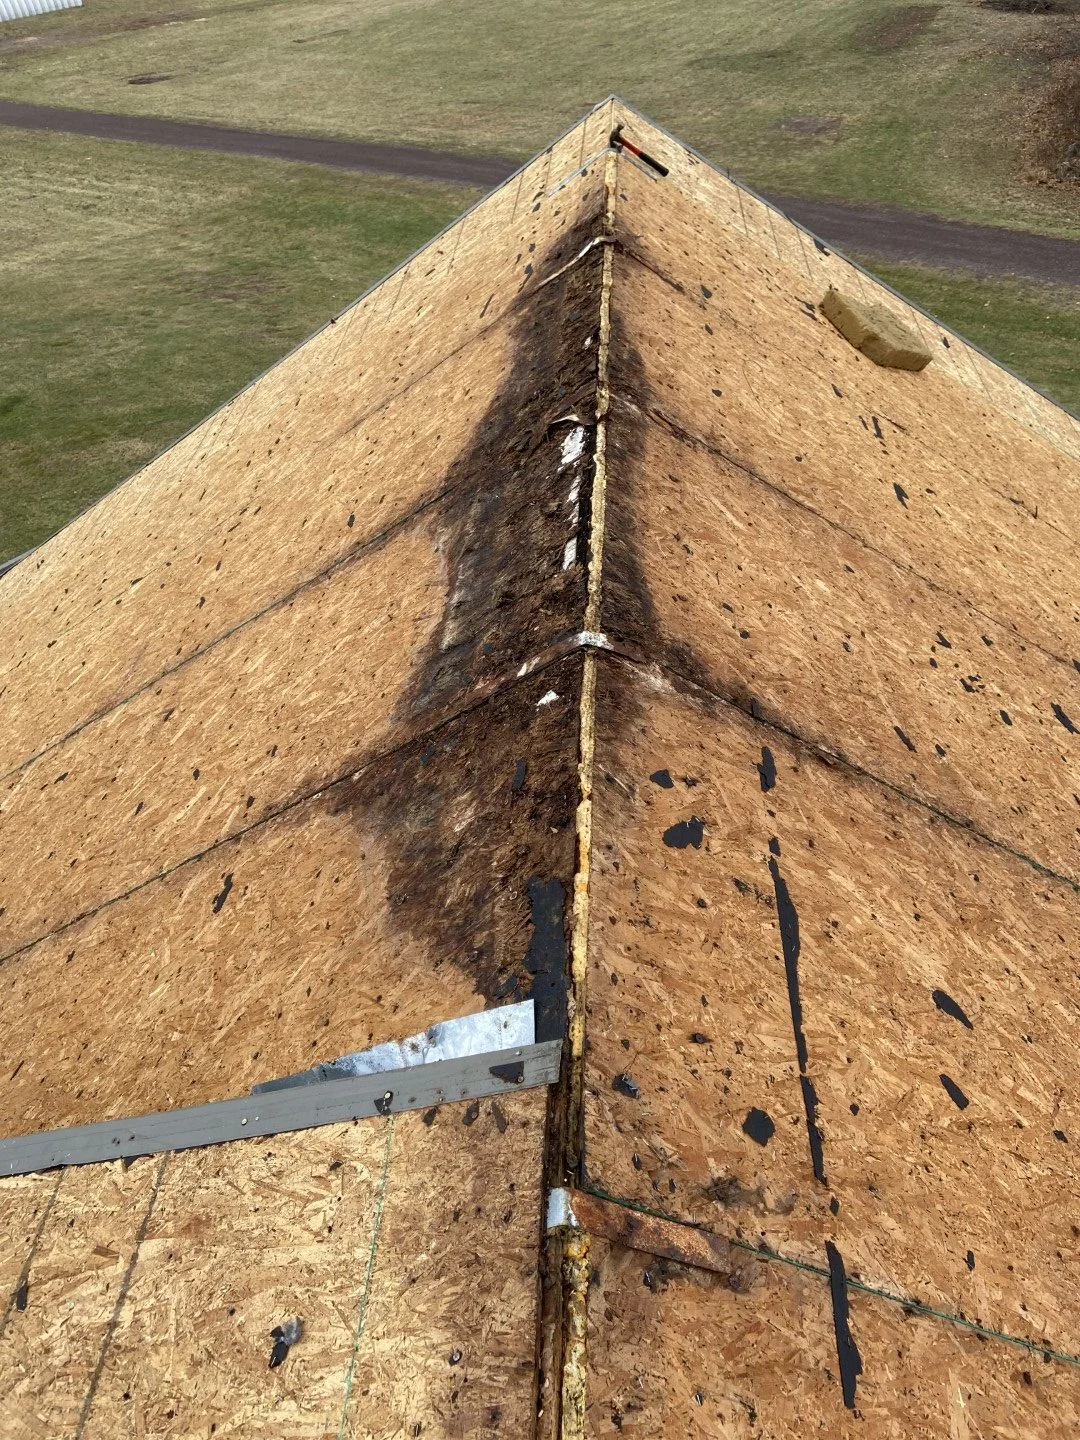
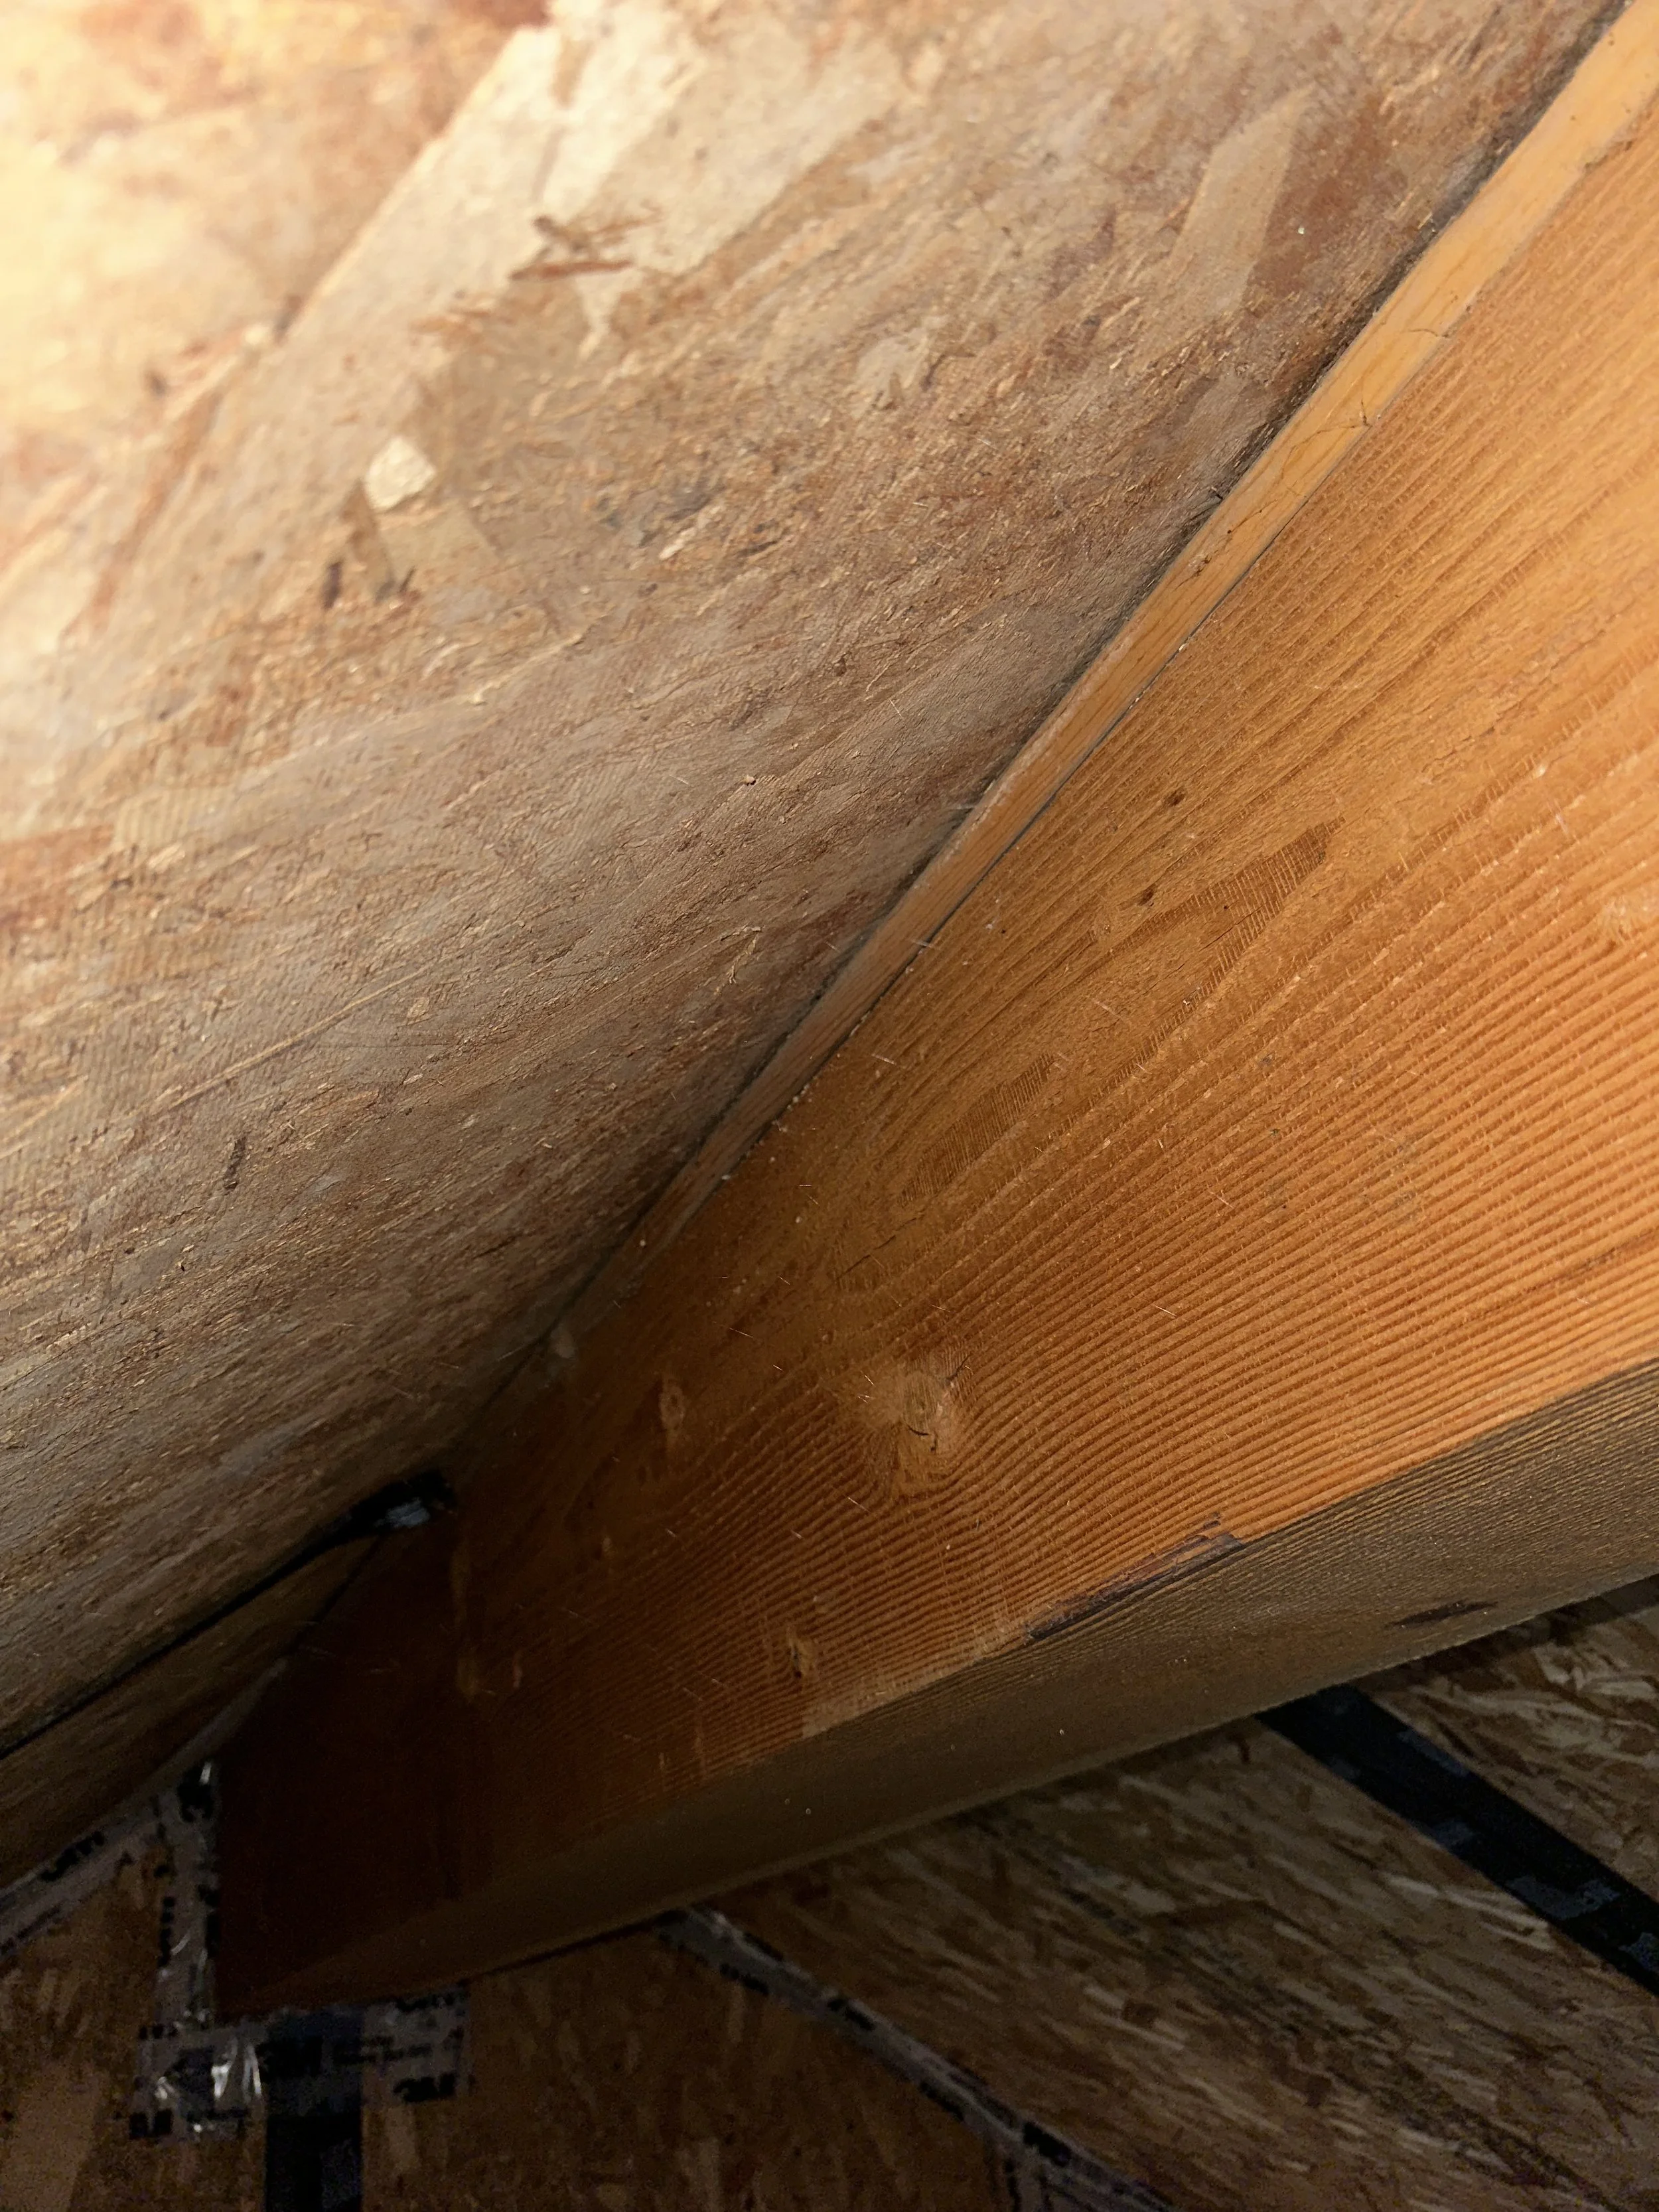
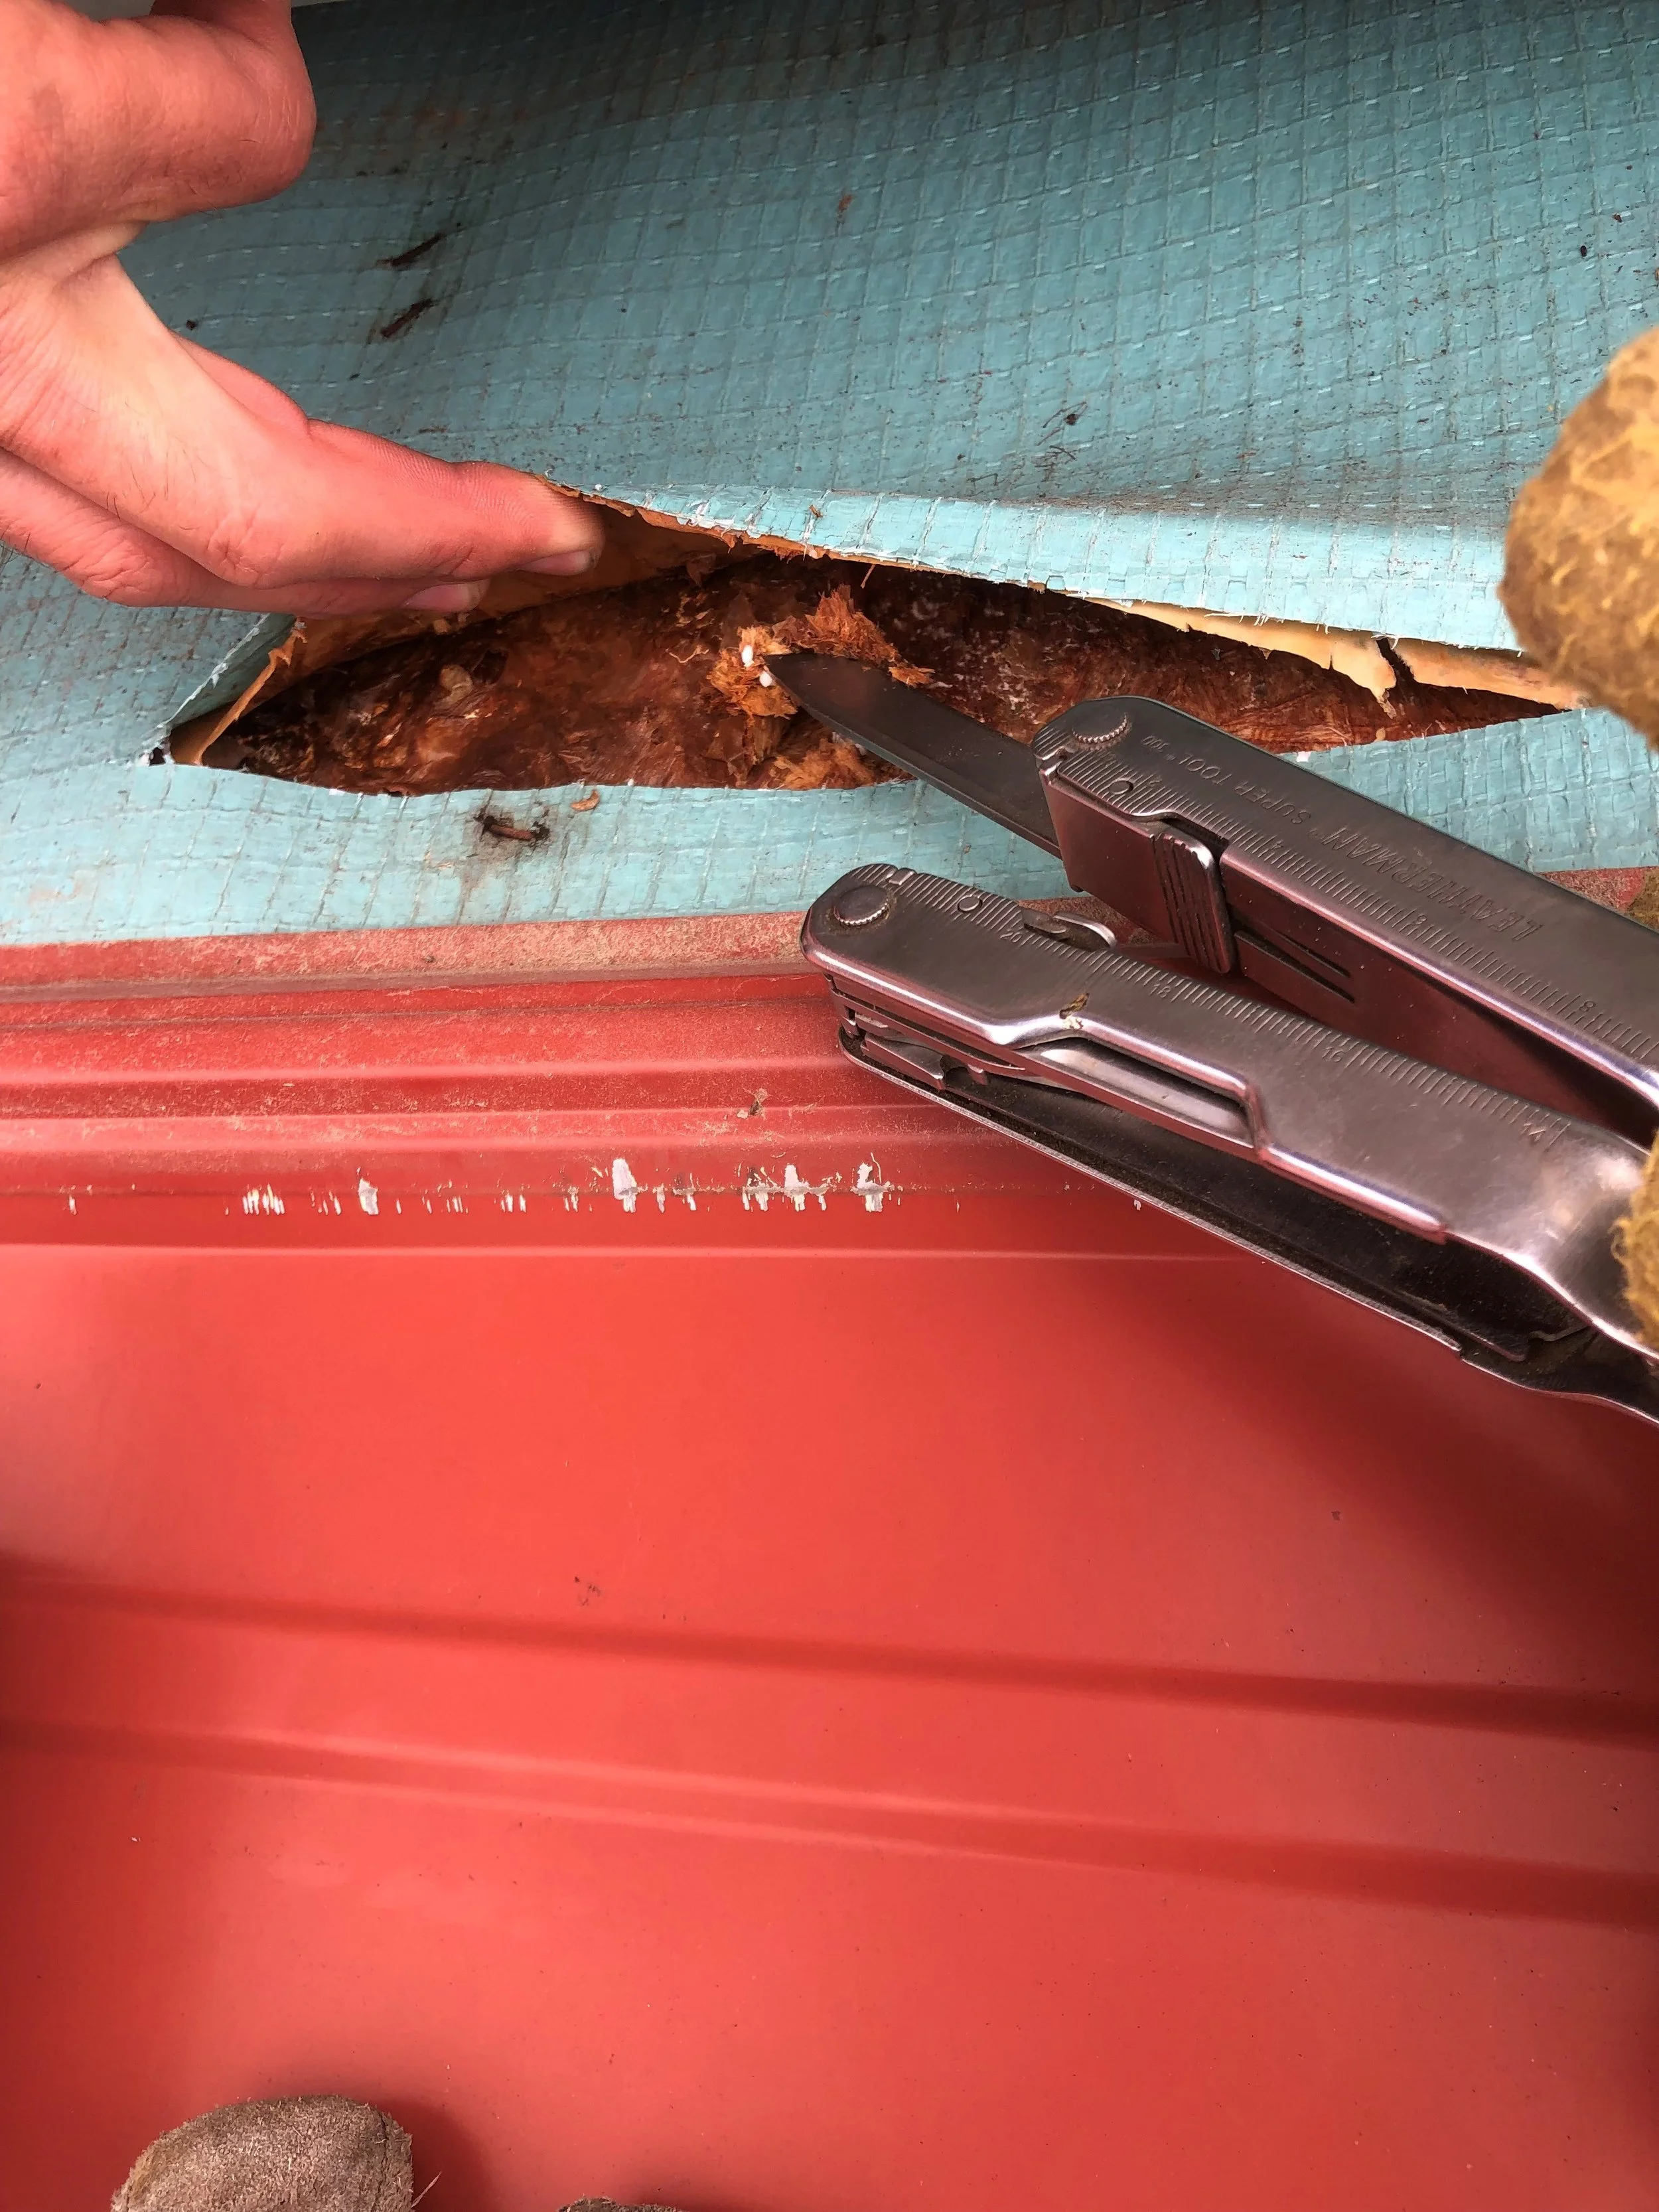
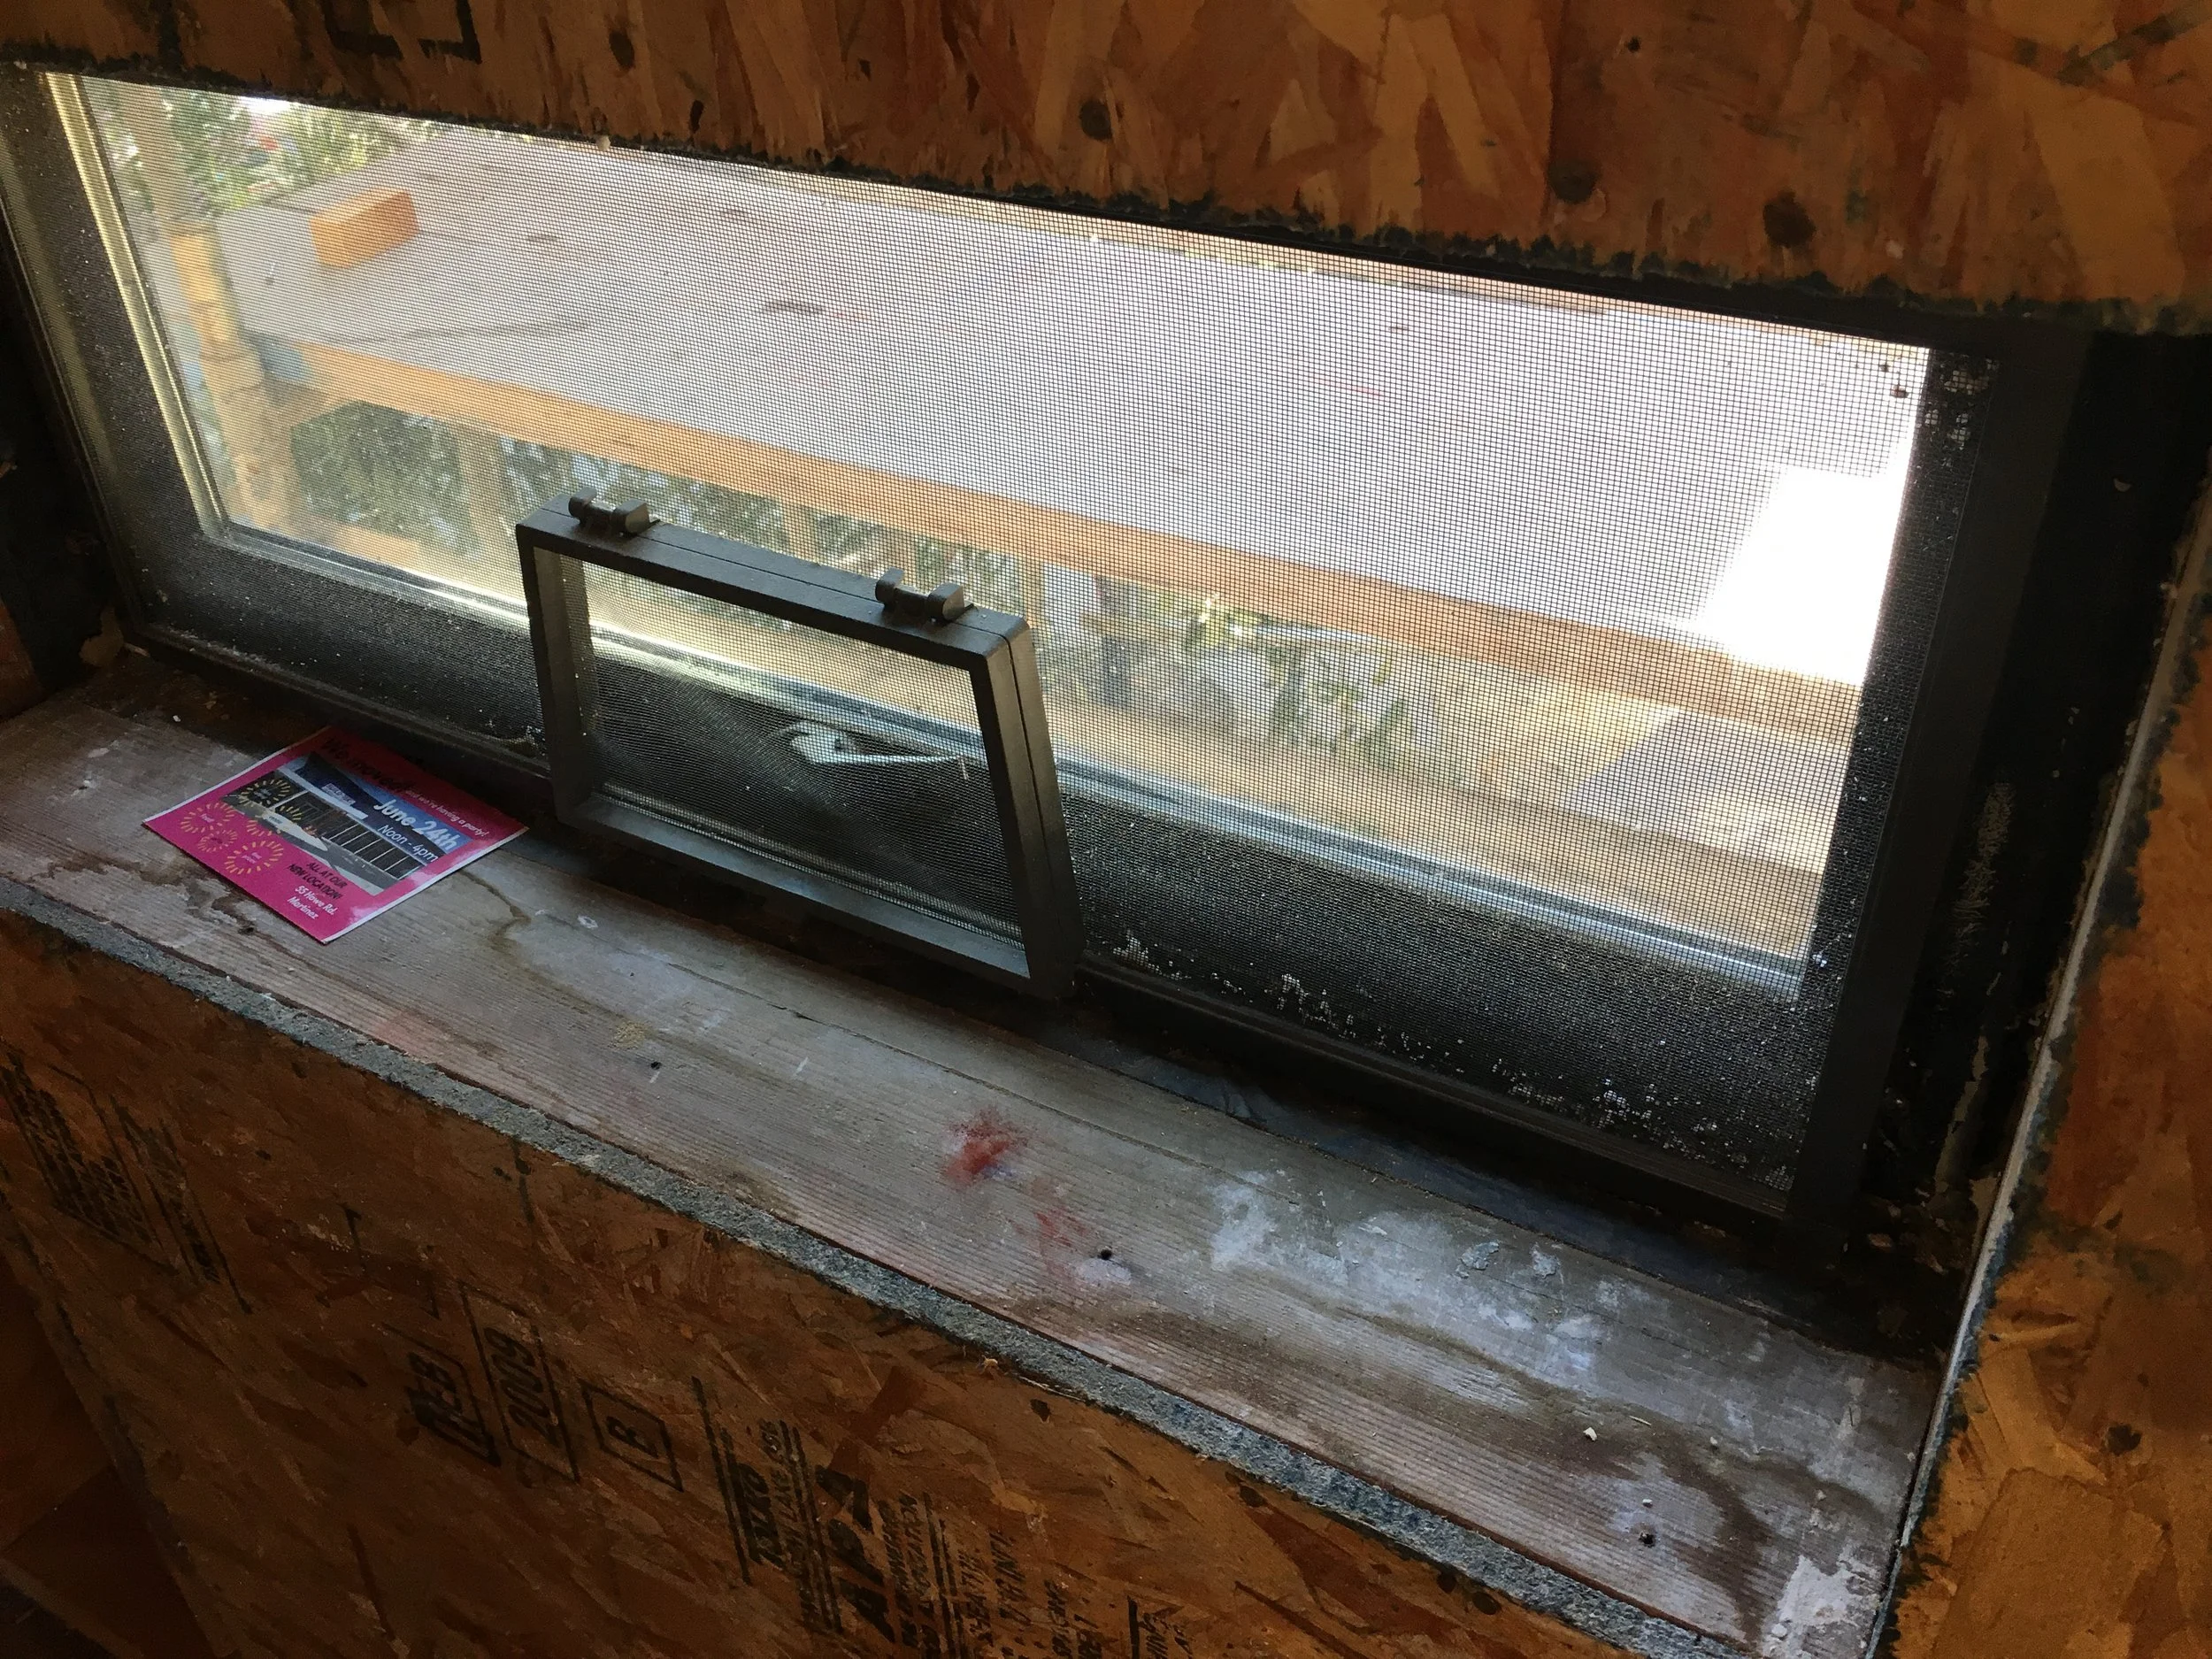
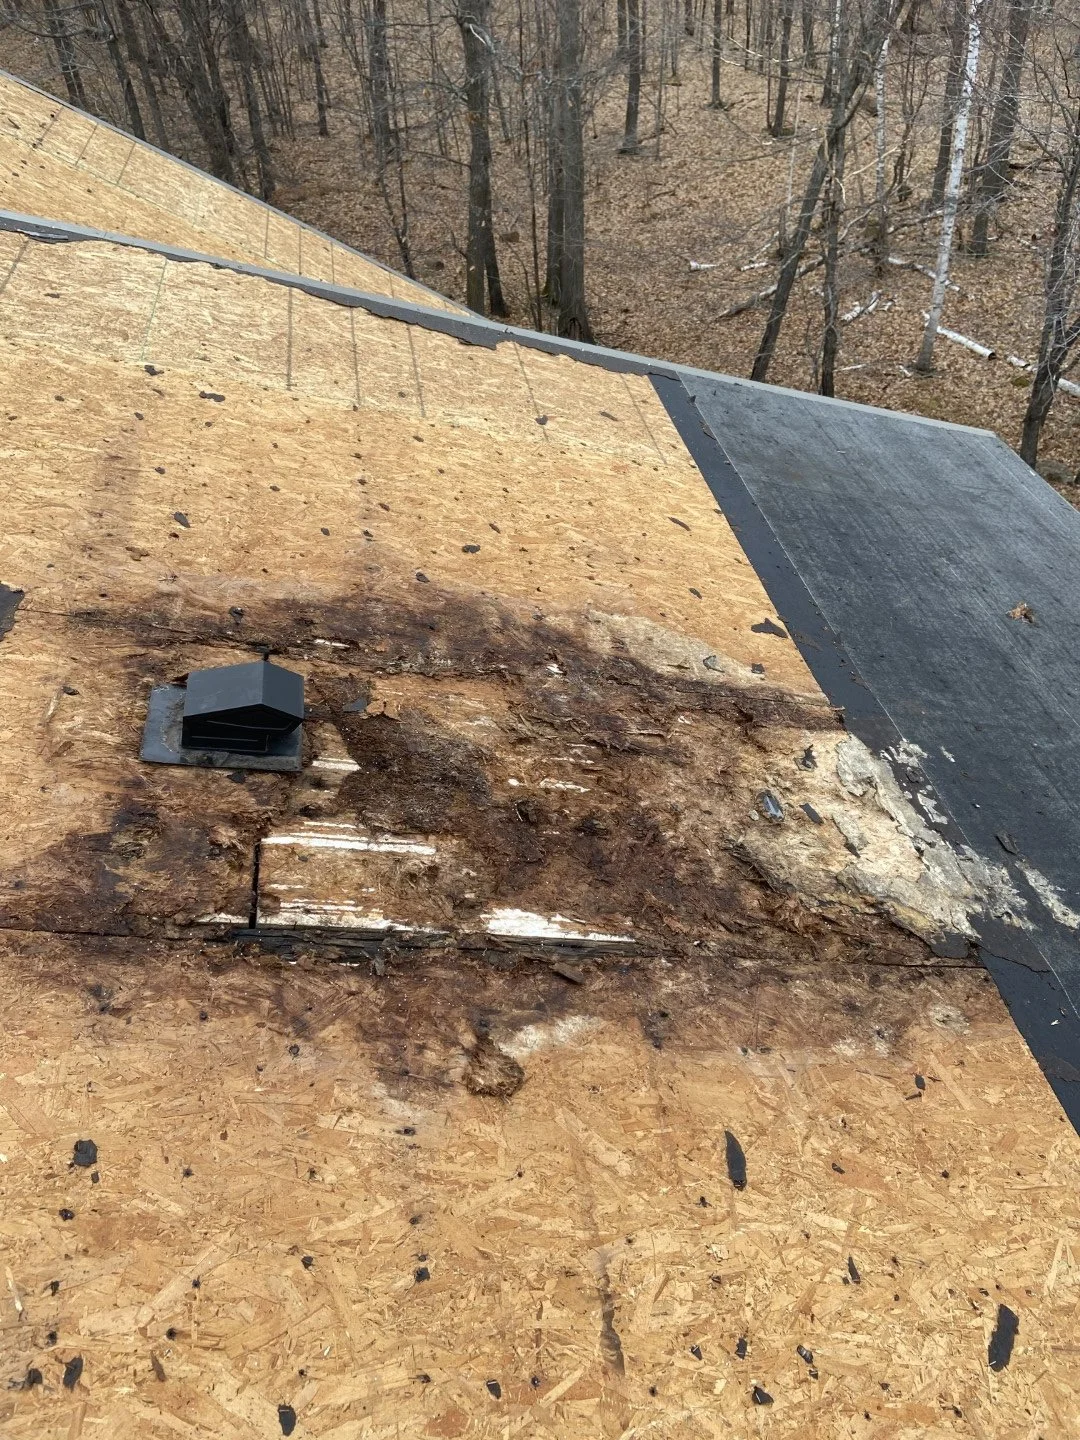
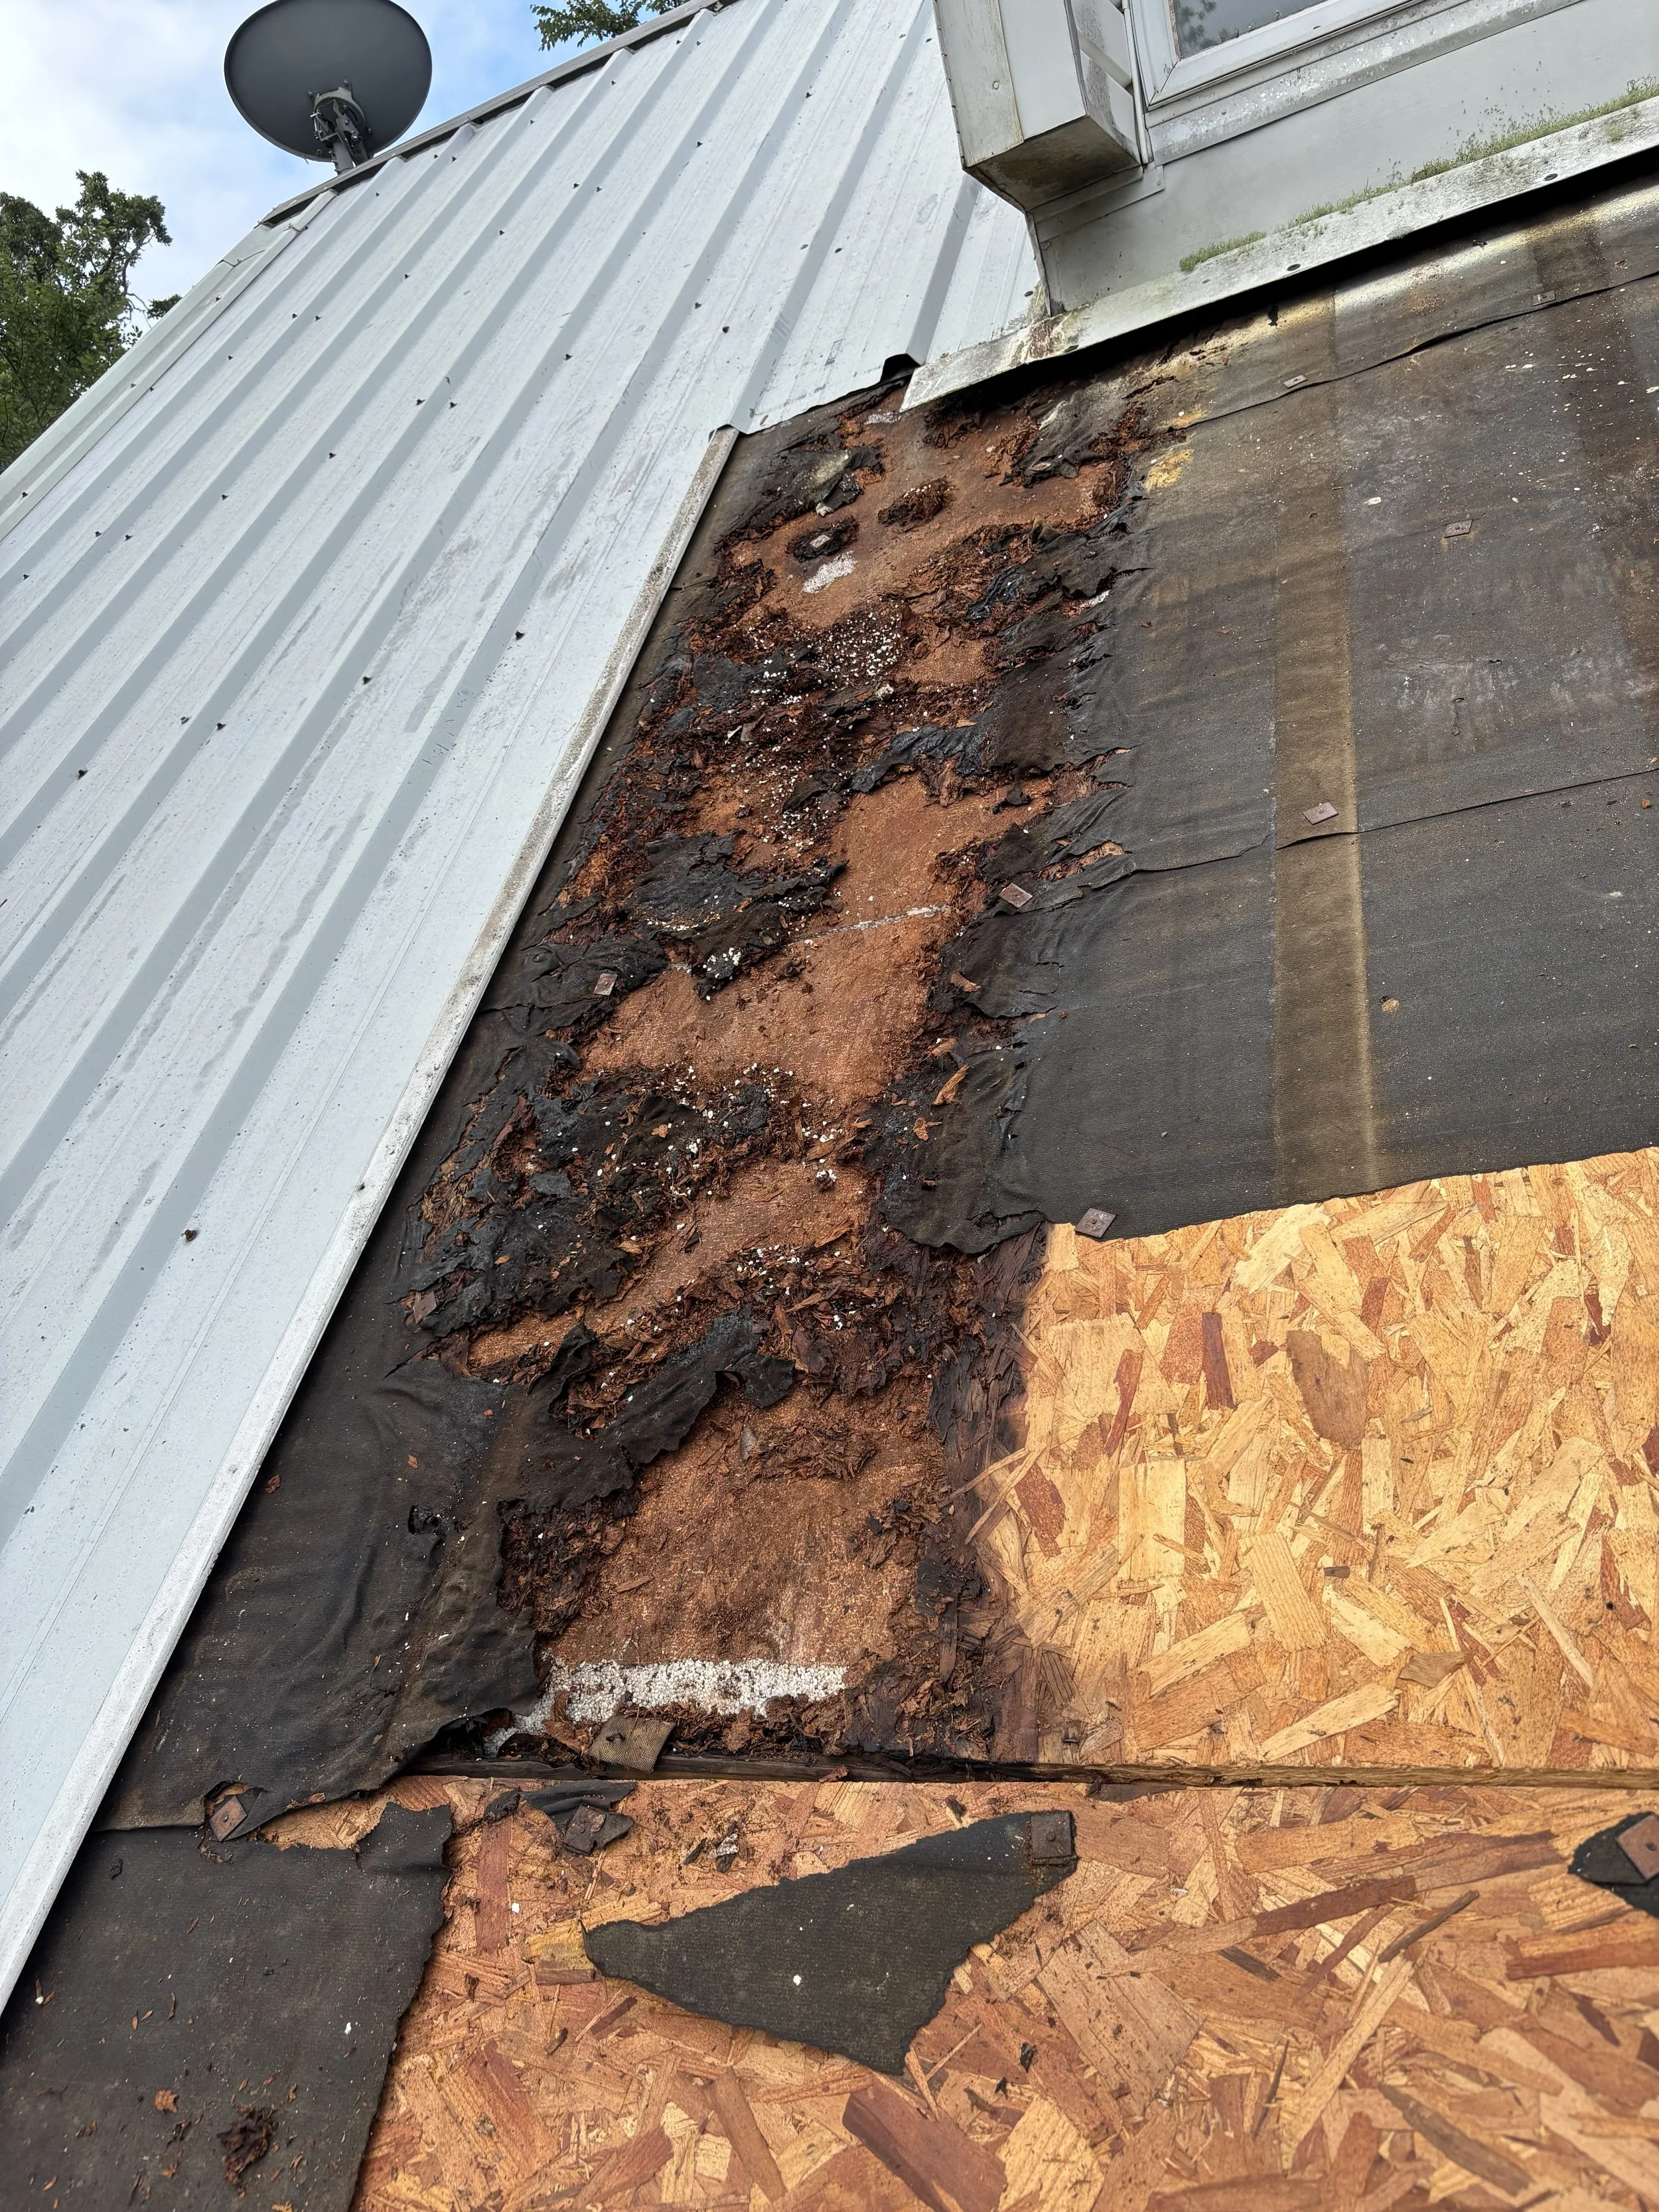
None of these require heroics to fix. They require attention to a known checklist, which is exactly what Section 7 below provides. And because OSB rot is just one of several documented SIP failure modes, our SIP Problems & Failure Modes guide covers the full picture if you want to see how this one fits alongside the others.
Every SIP project that holds up well over time, residential or commercial, gets these four things right.
Control liquid water. Correctly layered weather-resistive barrier details, flashing that sheds water downward, kick-out flashing at every roof-to-wall transition, and underlayment that actually sheds water.
Control air. Sealant and SIP tape at every joint, spline, and penetration, plus a verified blower-door test rather than guesswork.
Control vapor. Keep indoor humidity in check, use balanced ventilation (an ERV or HRV).
Control temperature. Keep the building's thermal layer continuous, design the roof correctly for the climate, and use vented cold roofs where appropriate.
Get these four right, and OSB rot stops being something to worry about.
It helps to know what's actually fixable and what isn't, so a stained panel doesn't turn into unnecessary panic, or an unnecessary teardown.
Surface mold is cleanable and cosmetic. It's a sign moisture was elevated at some point, not that the structure was compromised.
Localized wetting can often be dried if caught early, though it should be monitored, not just assumed fine.
Structural rot is permanent. The affected OSB or panel section needs to be removed and replaced.
This is also where it's worth being clear about roles: PGS Consulting LLC provides diagnosis, documentation, and repair planning. The actual field labor and repair work belongs with your contractor.
Most mold species need wood moisture content above roughly 19-20%, sustained over time, before they can grow. Below that threshold, water is held tightly inside the wood's cell walls and there isn't enough "free" moisture for mold to use. OSB behaves a little differently than solid lumber: because it's resin-bound, it absorbs moisture more slowly at first, but once wet, it can hold that moisture longer at cut edges. Mold also needs warmth (roughly 40-100°F) and several days of exposure. Remove any one of the three, moisture, warmth, or time, and mold growth slows or stops. Mold is a signal that an assembly saw elevated moisture. On its own, it doesn't mean the OSB lost structural strength.
During design: confirm the SIP assembly design fits the local climate, specify balanced ventilation, require continuous weather-resistive barrier sequencing, and require specific sealing details at the ridge, eaves, and penetrations.
During construction: seal every joint with the manufacturer-approved sealant and tape, verify spline installation before panels are closed in, protect panels from weather while staged on site, flash every penetration, and run a blower-door test.
As a homeowner: keep indoor humidity between 30-50%, use your ventilation system as designed, check for leaks after major storms, and keep gutters and roof drainage clear.
If you're earlier in the process, here are some resources to help guide you:
And for the connection details, sequencing, and common field errors behind the construction checklist above, our SIP Installation Guide covers it in full.
When OSB shows signs of distress, it's not a material failure. It's a system failure, and system failures are preventable with clear standards, good training, and attention to detail.
SIPs remain one of the highest-performing building enclosure systems available today. They deliver strong energy performance, real structural capacity, and faster construction timelines. Like any high-performance system, they reward precision. That's not a burden, it's simply the standard that comes with building something better than average.
Get the details right, and a SIP structure will deliver decades of quiet, comfortable, durable performance, without the fear or confusion that too often surrounds moisture and mold conversations.
SIPs themselves don't rot. The OSB skin can deteriorate if liquid water or moisture-laden air reaches it and stays long enough that it can't dry out. With good moisture management, this is preventable.
Three things, alone or combined: bulk water intrusion, air leakage, or vapor drive from high indoor humidity. These are system issues, not material defects. Proper sealing, flashing, ventilation, and humidity control remove the conditions that lead to rot.
Not on its own. Mold is a surface-level response to elevated moisture, and it's cleanable. It doesn't mean the panel has lost structural strength. Rot is different: it's structural decay and requires replacement.
Mold looks like surface discoloration or spotting. Rot shows up as softened OSB, flaking fibers, loss of adhesion between the OSB and foam, or thickness swelling that doesn't go away after drying. A moisture assessment can confirm which one you're dealing with.
SIP roofs are tightly built, high-performance assemblies without a hidden, vented cavity behind the insulation. Problems show up sooner rather than staying hidden for years. That's useful early feedback, not a sign of a weaker system.
Yes, if the wetting was brief and the assembly has a way to dry. Repeated wetting or long periods of saturation can cause permanent swelling or damage the bond between the OSB and foam, so early detection matters.
The same places any roof or wall is vulnerable: ridge beams and peaks, eaves and fascia transitions, windows and doors, mechanical penetrations, and areas with poorly managed indoor humidity. All are predictable, and all are preventable with correct detailing.
Focus on four controls: liquid water, air, vapor, and temperature. Get these four right and OSB rot becomes a non-issue.
Surface mold can be cleaned, and localized wetting can often be dried out if caught early. Bondline failure or structural rot can be repaired in place depending on the severity of damage. PGS provides diagnosis and repair planning; field labor is handled by your contractor.
Not special, just consistent. Keep indoor humidity between 30-50%, use your ventilation system as designed, and check for leaks after major storms. Built and maintained correctly, SIPs perform exceptionally well over the long term.
PGS Consulting LLC provides independent diagnosis, moisture assessments, and repair planning for SIP buildings, backed by 40+ years of engineering, manufacturing, and forensic experience.
Talk to Joe Pasma, PE
A forensic case study of SIP ridge rot caused by incomplete air sealing at the ridge joint -- not exterior water intrusion. Investigated and documented by Joe Pasma, PE.
Investigated and Authored By Joe Pasma, PE | PGS Consulting LLC, Licensed Professional Engineer | 40+ Years in SIP Engineering, Manufacturing, and Forensic Analysis | Published June 23, 2026

Structural Insulated Panels, SIPs, are an excellent building system. When they are designed and installed correctly, they perform exactly as intended -- delivering superior energy efficiency, structural strength, and a tight building envelope that outperforms conventional framing. This case study is not an indictment of SIPs. It is a documentation of what happens when specific installation details are not executed correctly.
This case involves exterior OSB deterioration on a residential SIP roof. The homeowner reported staining on the structural ridge beam, a musty odor, and missing ridge-cap shingles. Early suspicion focused on the roofing system -- specifically those missing shingles. The forensic investigation told a different story entirely.
The roofing was intact. The underlayment had not failed. There was no exterior water pathway of any kind. The source of the damage was a single installation failure: the ridge joint was not completely air sealed. Warm, moist interior air was leaking through gaps in the ridge joint, condensing on the underside of the roofing underlayment, and being absorbed -- season after season -- by the exterior OSB of the SIP roof panel. This is a preventable, correctable installation issue. It is not a flaw in the SIP system itself.
This failure was caused by incomplete installation, not by a defect in the SIP system. When ridge joints are properly sealed and verified, this failure mode does not occur.
SIP ridge rot, in cold climates, is typically caused by air leakage at the ridge joint, not exterior rain or defective shingles.
Warm, moist interior air rises to the ridge, works its way through unsealed areas, condenses on the underside of the roofing underlayment, and is absorbed by the exterior OSB of the SIP roof panel.
Unsealed electrical chases near the ridge acted as direct air pathways and significantly accelerated the damage.
Missing ridge-cap shingles were a symptom of deteriorated OSB, not the cause of the failure.
A blower-door test at SIP installation completion would have identified the air leakage before any OSB damage occurred.
Repairs required removing the roofing at the ridge, drying the OSB, reconstructing the air seal completely, and verifying airtightness with a blower-door test before re-roofing.
Continuous ERV/HRV operation and indoor humidity monitoring are essential in cold climates to reduce moisture load on the building envelope.
SIP ridge rot is the deterioration of the exterior OSB (oriented strand board) facing on a SIP roof panel, concentrated at the ridge line and the upper portions of the spline joints where panels meet the ridge. It shows up as darkening, softening, and eventually fiber separation in the OSB. Left alone long enough, the OSB loses structural integrity, and sections the panels loose structural integrity.
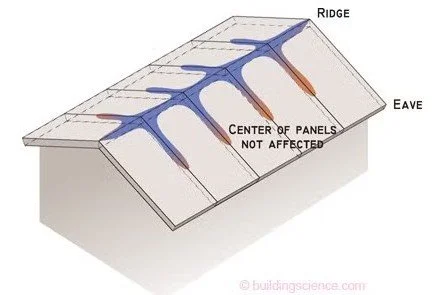
SIP Ridge Rot - Distinctive pattern of moisture damage at roof ridge and at upper panel joint locations.
The term "rot" implies biological decay driven by exterior moisture -- like a wood beam sitting in standing water. That is not what this is. SIP ridge rot is driven by condensation on the interior side of the roofing underlayment. The source of that moisture is not rain. It is the air inside the building. Understanding that distinction is the foundation of every forensic investigation into this failure mode.
The exterior OSB on a SIP roof panel is part of the structural sandwich. It is not decorative. When it deteriorates, the panel loses load-carrying capacity. In roof systems this is a structural concern, not just a cosmetic one.
Before documenting the field findings, it is worth establishing the failure mechanism -- because it is the mechanism that explains every observation made during the investigation.
Warm, moist air rises inside the building. In winter, interior air carries significant moisture. Because warm air rises, that moisture-laden air moves upward toward the ridge -- which is the highest point of the roof assembly.
Air finds gaps in the ridge joint. The ridge joint in a SIP roof is typically a plumb cut where the panels meet at the peak. If the sealant is incomplete, the SIP tape over the ridge beam was not installed properly or at all, or electrical chases near the ridge were left open, warm, moist air may escape into that joint.
The air hits the cold underside of the roofing underlayment. The underlayment sits between the OSB and the shingles. In winter, that surface is cold. When warm, moist interior air makes contact with it, the moisture condenses -- the same way a cold glass sweats on a humid day.
The exterior OSB absorbs the condensation. That condensed moisture has nowhere to go except into the OSB directly beneath it. This creates a repeated wetting cycle every winter. Over time, if the OSB is not allowed to dry, the OSB swells, the fibers separate, and the OSB begins to deteriorate.
The damage radiates outward. OSB deterioration is worst at the ridge peak, then tapers downward along the spline joints on both sides of the ridge. In severe cases, it can extend 18 to 24 inches down from the ridge before the moisture levels drop off enough to stop the damage.
Stack effect -- the natural pressure difference that pushes warm air toward the top of a building in cold weather -- amplifies every step of this process. A well-sealed ridge in a well-ventilated home may never develop ridge rot. An incompletely sealed ridge in a home with high indoor humidity and an intermittent ERV operation is at significant risk.
The project was a steep-slope, 8/12 roof pitch, SIP roof built on a structural ridge beam. The panels were 10 1/4 inches thick. The roofing system included asphalt shingles over underlayment, with a ridge cap at the peak. The specifications called for continuous sealant and SIP tape at the ridge -- but those details were not confirmed as installed.
The homeowner first noticed staining on the structural ridge beam and a musty smell. A few ridge-cap shingles were also missing. Those missing shingles became the focus of early concern, but they turned out to be a distraction.
A full forensic investigation included moisture mapping, blower-door testing, thermal imaging, borescope inspection at the ridge, core sampling of the roof panel, and inspection of electrical chase terminations. Here is what it found:
Swipe to scroll →
The roofing was intact. The underlayment had not failed. There was no exterior water pathway. Every indicator pointed to the same conclusion: this was a purely air-driven moisture failure that originated inside the building.
The missing ridge-cap shingles were caused by the deteriorated OSB not being able to hold the roofing nails. Once that is understood, it becomes clear why replacing the shingles alone accomplishes nothing. You have not addressed the source of the deterioration.
This investigation identified a cluster of contributing factors that amplified the damage. Each factor alone may not have produced visible failure, but together they created conditions where the ridge joint had almost no defense against the failure mechanism.
Swipe to scroll →
In this case, visible damage at the ridge was already significant by the time a forensic investigation was initiated. The indicators below were all present -- and several of them appeared well before the OSB deterioration became visible. They are documented here as a reference for others evaluating similar conditions on SIP roofs:
Musty smell near the ridge. This is often the first sign. It appears at various times and is strongest when the wind blows hard, making it easy to dismiss.
Staining on the structural ridge beam. If the ridge beam is visible from inside, dark staining along it can indicate moisture migration from the ridge joint.
Missing or lifting ridge-cap shingles with no obvious wind explanation. If multiple shingles are displaced and the roofing below them appears intact, deteriorating OSB may not be able to hold roofing nails.
Elevated moisture readings at the ridge during moisture mapping. A moisture meter applied to the OSB at the ridge shows significantly higher readings than panels lower on the roof slope. Moisture levels greater than 16% are considered elevated. Moisture levels greater than 19% can support fungal growth.
Thermal imaging showing warm air pathways at the ridge. In cold weather, thermal imaging along with blower-door testing can reveal air moving from interior to exterior at the ridge joint -- before any OSB damage is visible.
If you are seeing any of these in a SIP roof, the next step is a structured investigation, not a roofing repair.
For a broader overview of how and why SIP roofs fail, see our resource page on SIP Problems and Failure Modes.
Ridge rot repairs are not complicated, but they are not simple either. The key is doing them in the right order. Replacing shingles without addressing the air leakage just resets the clock on the same failure.
Before any structural repairs, the indoor humidity situation has to be addressed. If the ERV is not running continuously, start there. Get a humidity monitor and understand what indoor RH levels look like in winter. The target in cold climates is generally below 35 to 40 percent relative humidity during heating season.
Roofing and ridge cap at the deteriorated area need to come off so the OSB can be assessed and dried. Temporary dehumidification may be needed to bring the OSB to below 15 percent moisture content before repairs proceed.
This is the most critical step. Replace deteriorated OSB as needed, then rebuild the ridge joint and air seal properly:
Backer rod and pliable SIP sealant at the lower depth of the plumb cut
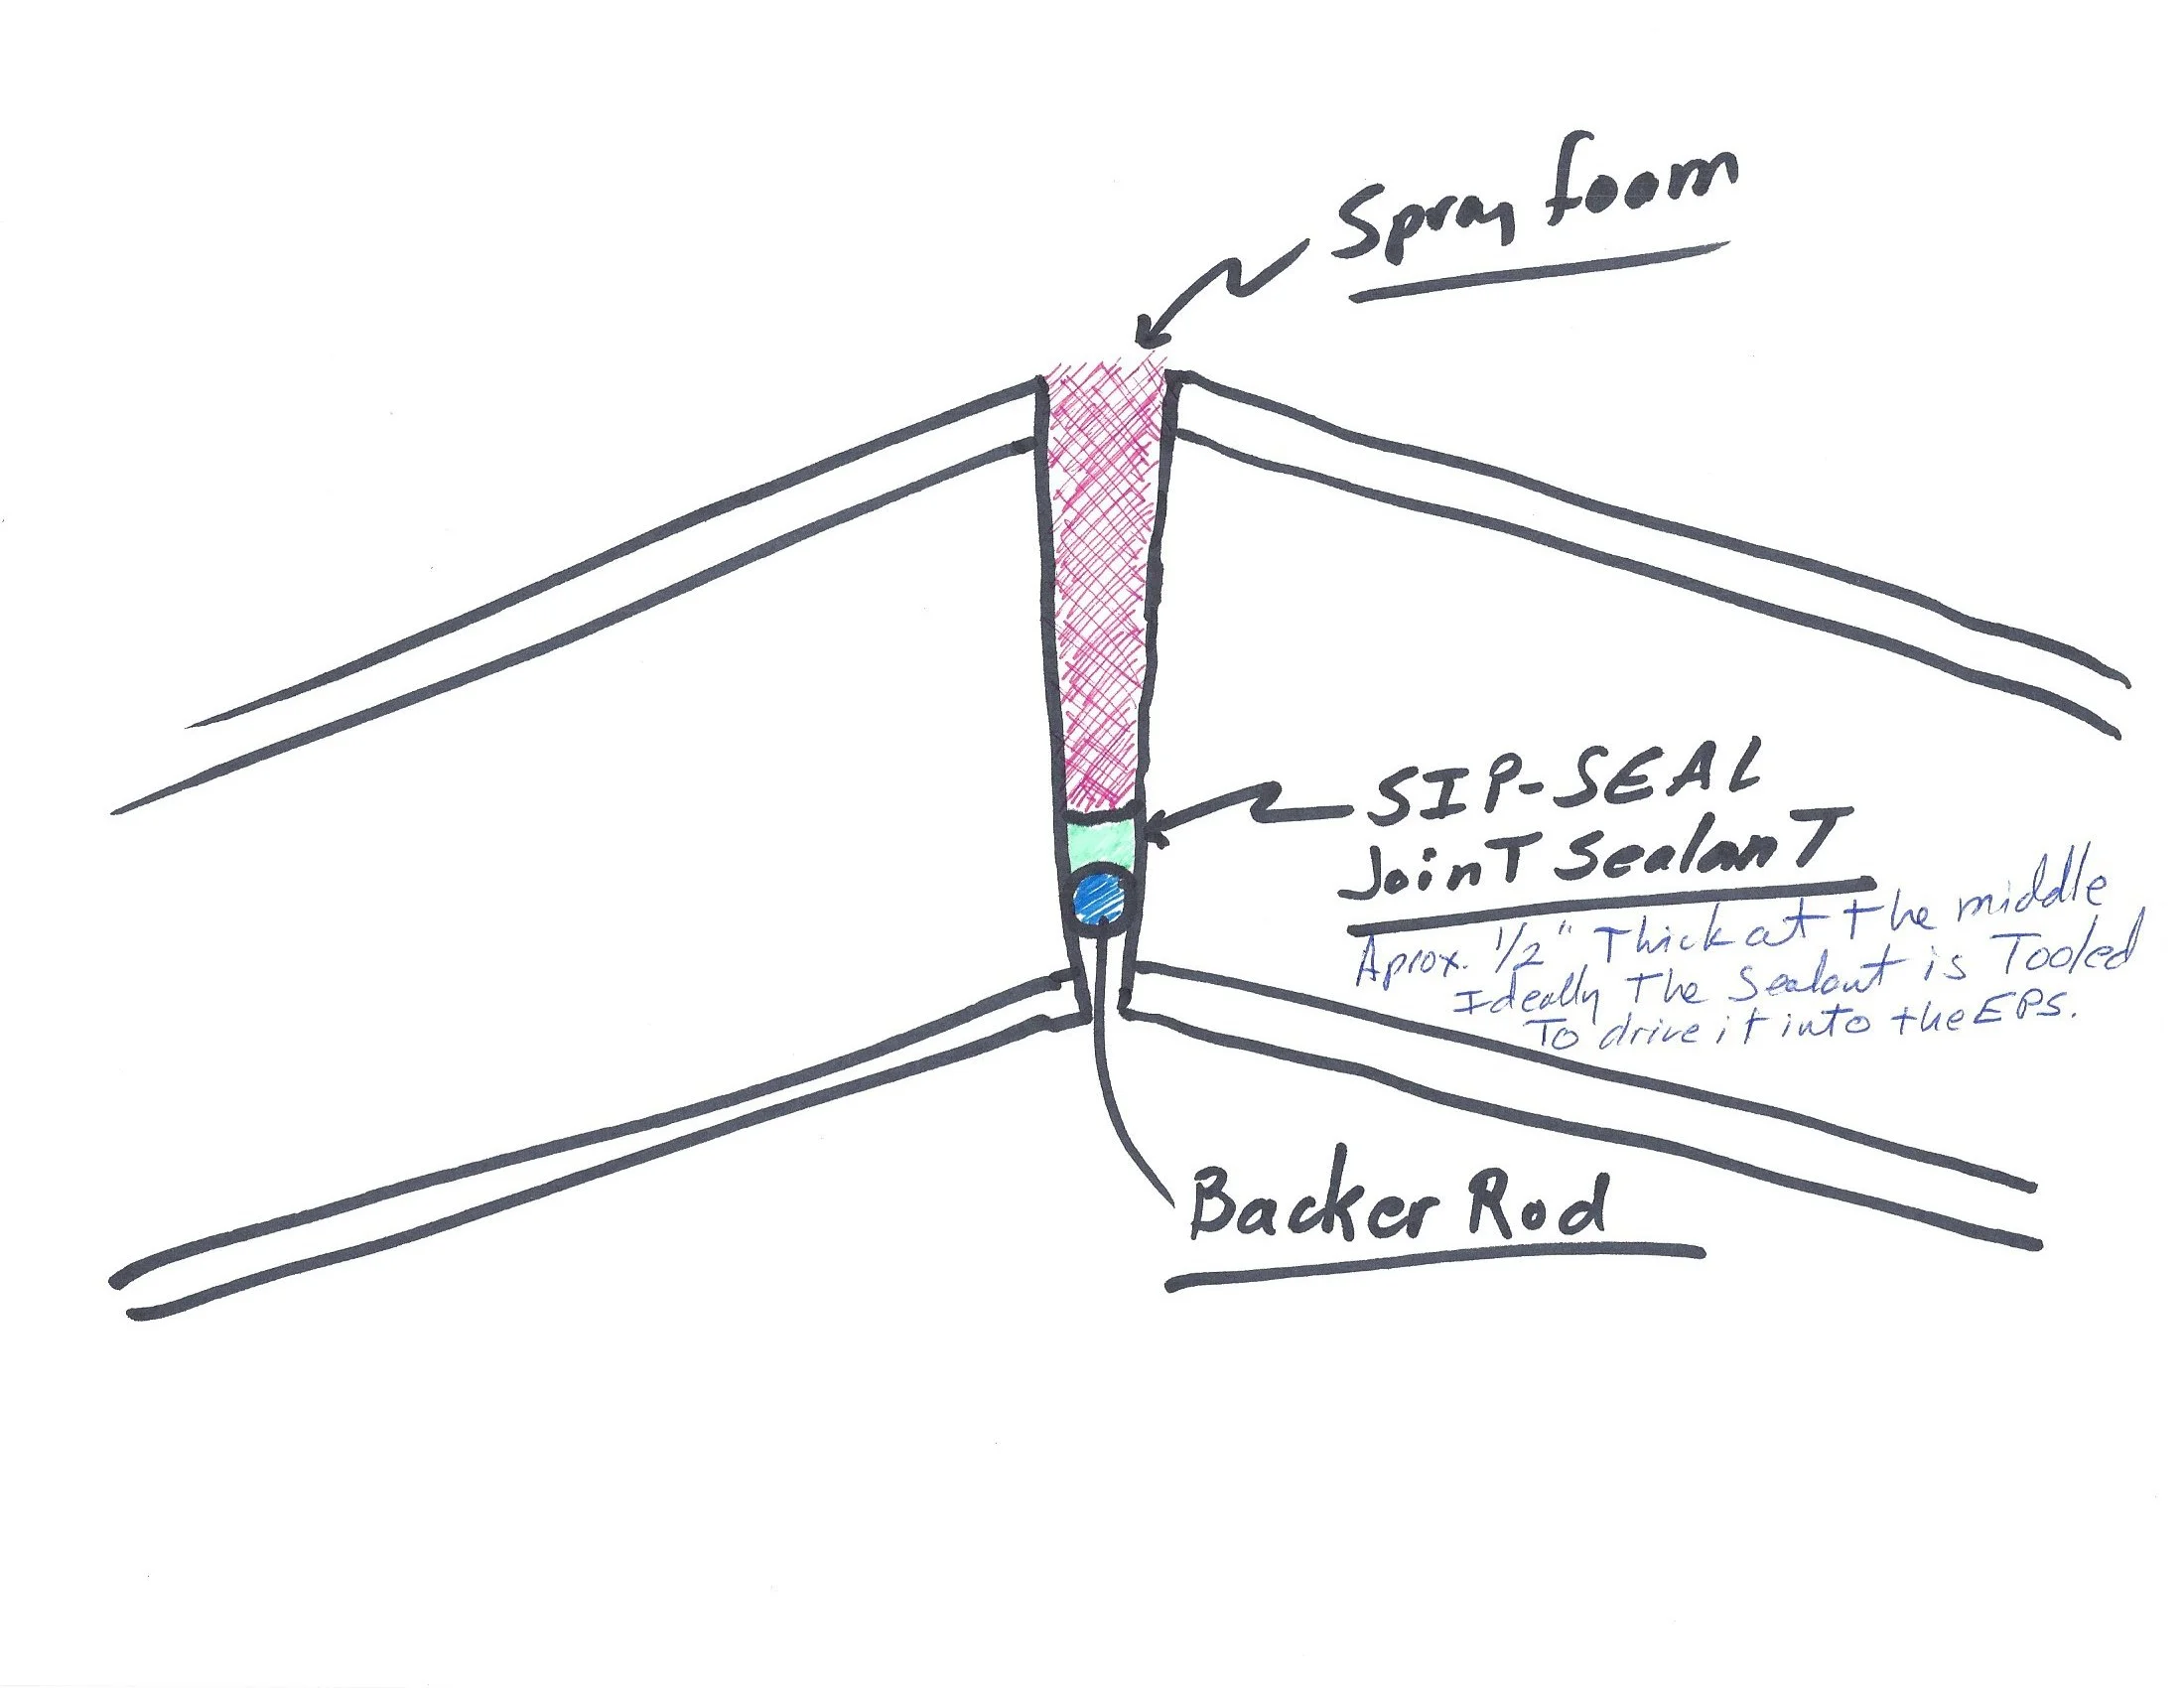
Plumb Cut Ridge Panels
SIP - Seal Joint sealant is a flexible sealant that will not harden with time.
The backer rod is critical to the detail so is tooling the sealant.
Expanding foam applied for the remaining depth of the ridge joint
SIP tape applied continuously over the ridge beam (this may not be possible)
All electrical chase terminations sealed completely
Before any roofing goes back on, a blower-door test should confirm that the ridge joint is now airtight. If air leakage is still detectable, find it and seal it before proceeding.
Reinstall roofing over a high-permeability underlayment to allow any residual moisture in the OSB to dry outward over time. A vented ridge cap is also beneficial here -- not because it fixes the air leakage problem, but because roofing ventilation helps manage any residual moisture in the roofing system.
For more on how SIP roof assemblies should be sealed and detailed at installation, see the SIP Installation Guide in the Resource Hub.
A vented ridge cap ventilates the roofing system. It does not ventilate the SIP core. Do not confuse the two. Adding a vented ridge cap without sealing the ridge joint will not prevent ridge rot. The air pathway has to be closed first.
This failure was preventable. Every element that contributed to it was addressable at the time of installation, or shortly after, with standard SIP best practices. The following are the specific failures this investigation identified -- documented here as a resource for builders, designers, and SIP owners evaluating similar assemblies:
The ridge joint must be continuously sealed -- and that sealing must be verified by the installer. That means sealant at the full depth of the plumb cut, SIP tape over the ridge beam, and documented confirmation it was completed. Specifications on paper are not the same as verified installation. This is the installer's responsibility and the single most critical detail in a SIP roof assembly.
Electrical chases must be sealed by the installer after wiring is complete. Open chases near the ridge are warm-air delivery channels directly into the most vulnerable part of the roof. This step is straightforward and inexpensive. Skipping it is a significant installation error.
A blower-door test should be required at SIP installation completion. There is no substitute for measured verification. A properly executed blower-door test would have identified the air leakage in this case before a single heating season passed -- and before any OSB damage occurred.
ERV/HRV systems must run continuously in cold climates during the winter. An intermittently operated ventilation system may not be controlling indoor humidity. In a tight SIP home in a cold climate, continuous mechanical ventilation is not optional -- it is part of how the building is designed to function.
Indoor humidity should be monitored by the homeowner. A basic humidity monitor costs almost nothing compared to a ridge rot remediation. Maintaining indoor RH below 35 to 40 percent during heating season is the simplest ongoing step a homeowner can take to protect a SIP roof assembly.
For a deeper look at how moisture behaves in SIP assemblies and what it does to OSB over time, learn more on SIP Energy Performance and Moisture Management.
SIP ridge rot is caused by warm, moist interior air leaking through an incompletely sealed ridge joint, condensing on the underside of the roofing underlayment, and being absorbed by the exterior OSB of the SIP roof panel. The result is a repeated wetting cycle every heating season that progressively deteriorates the OSB at the ridge line and along adjacent spline joints. It is an air-driven, installation-driven failure -- not a flaw in the SIP system and not caused by exterior water intrusion.
No. SIP ridge rot is caused by incomplete installation -- specifically, failure to fully air seal the ridge joint during construction. When the ridge joint is properly sealed with continuous sealant, SIP tape over the ridge beam, and verified with a blower-door test, this failure mode does not occur. The SIP panels in this case were not defective. The installation detail was not completed correctly.
No. Missing ridge-cap shingles are a symptom of OSB deterioration, not its cause. When the OSB beneath the ridge cap swells and loses integrity from repeated moisture cycling, it cannot hold roofing nails. The shingles should be replaced, but replacing them alone does nothing to address the underlying installation deficiency driving the rot.
No. A vented ridge cap ventilates the roofing system between the underlayment and the shingles. It does not ventilate the SIP core and does not prevent air-driven condensation at the ridge joint. Preventing ridge rot requires the installer to seal the ridge joint completely -- a vented ridge cap above an unsealed joint accomplishes nothing in terms of preventing this failure.
Higher indoor humidity means the air leaking through an unsealed ridge joint carries more moisture. More moisture reaching the cold underside of the underlayment means more condensation and more water absorbed by the OSB each winter. In cold climates, indoor relative humidity during heating season should be kept below 35 to 40 percent. Continuous ERV/HRV operation and a humidity monitor are the most practical ways to manage this.
Repairs require removing roofing at the affected ridge area, drying the OSB to below 15 percent moisture content, replacing deteriorated OSB as needed, and completely reconstructing the ridge joint air seal with continuous sealant, expanding foam, and SIP tape. All electrical chase terminations near the ridge must be sealed. A blower-door test confirms airtightness before roofing goes back on. High-permeability underlayment is recommended to allow residual drying.
Yes, and in most cases it does. SIP ridge rot is driven by air leakage from inside the building, not by rain or exterior water entry. The roof in this case was completely watertight -- intact shingles, sound underlayment, tight flashing -- and significant OSB deterioration still developed. The unsealed ridge joint was the only entry point that mattered.
Early warning signs include a musty smell near the ridge during cold weather, staining on the structural ridge beam, and unexplained displacement of ridge-cap shingles. A blower-door test, thermal imaging in cold weather, and moisture mapping of the ridge OSB can identify air leakage and elevated moisture before visible structural damage develops. If you are seeing any of these signs, the appropriate next step is a forensic inspection -- not a roofing patch.
If you are seeing signs of ridge damage, moisture staining, or unexplained shingle displacement on a SIP roof, a forensic inspection can identify whether air leakage is involved -- before the OSB is compromised beyond repair.
Talk to a SIP Forensic EngineerSIP Problems and Failure Modes -- An overview of the most common ways SIP assemblies fail and how to recognize them
SIP Installation Guide -- How SIP roofs should be sealed, taped, and detailed to prevent air leakage
SIP Energy Performance and Moisture Management -- How moisture behaves in SIP assemblies and what it does to OSB over time
SIP Building Codes and Compliance -- Code requirements relevant to SIP roof assemblies and ventilation
How SIP Forensic Analysis Works -- A full explanation of the forensic investigation process for SIP failures

SIP panel failures rarely have a single cause. Learn what SIP forensic analysis is, when to use it, and what a real investigation looks like -- from a licensed PE with 40+ years of SIP experience.
By Joe Pasma, PE | PGS Consulting LLC, Licensed Professional Engineer | 40+ Years in SIP Engineering, Manufacturing, and Forensic Analysis | Published June 12, 2026

Something went wrong with your SIP building or you think something maybe wrong. Maybe it's a smell. Maybe it's a stain. Maybe it's a dispute between the builder and the manufacturer, and nobody agrees on what actually happened.
You don't need someone to guess. You need answers.
SIP forensic analysis is the structured process of figuring out exactly why a SIP system failed, what contributed to it, and what to do next. It replaces assumptions -- and the expensive decisions that come with them -- with documented, defensible findings.
Here's what it involves, when it makes sense to use it, and what you can expect from the process.
SIP forensic analysis is an evidence-based investigation of why a SIP assembly failed -- not an attempt to assign blame.
Most SIP failures involve more than one contributing factor -- detailing, installation, moisture management, or design mismatches working against each other.
A forensic investigation follows a clear, predictable process: document review, field investigation, failure analysis, root cause determination, and corrective action recommendations.
The end product is a defensible written report that can be used by builders, designers, insurers, attorneys, and owners.
If there is uncertainty, disagreement, or legal exposure involved, forensic analysis is the most efficient path to resolution.
SIP forensic analysis is a structured, evidence-based engineering investigation that identifies why a structural insulated panel assembly failed, determines the root cause and contributing factors, and produces a defensible written report for use in repairs, disputes, insurance claims, or legal proceedings.
It might be triggered by leaks, odors, rot, panel movement, delamination, or performance issues that don't have an obvious explanation. The investigation looks at what happened, why it happened, and what conditions allowed it to happen.
It is not about assigning blame. It is about understanding the chain of events that led to the issue or failure -- so the right corrective action can be taken, and the same problem doesn't repeat.
A complete forensic analysis covers:
Document review -- plans, shop drawings, engineering calculations, installation photos, and warranties
Field investigation -- moisture readings, blower door testing, thermal imaging, borescope inspection, core sampling, and physical cut-outs
Failure mode identification -- the specific mechanism that failed, whether that's moisture intrusion, air leakage, thermal bypass, or an installation error
Root cause analysis -- the underlying reason the failure occurred, not just the visible symptom
Contributing factor analysis -- sequencing errors, maintenance gaps, design details that didn't translate to the field
Corrective action recommendations -- what to fix, how to fix it, and how to prevent it from happening again
The goal is clarity.
Most people call when they notice symptoms. But symptoms are rarely the whole story.
Common triggers include:
Moisture staining or active leaks
Musty odors or indoor air quality problems
OSB that has softened or started to rot
Roof panel sagging or unexpected deflection
Shingles missing from the roof without high wind activity
Delamination concerns in the panel assembly
Electrical chases or plumbing cutouts that were never properly sealed
Disputes between a builder, designer, or manufacturer about what went wrong
Insurance claims or legal proceedings that require an independent technical opinion
If a situation involves uncertainty, disagreement, or financial or legal risk, forensic analysis is the cleanest path to resolution. It gives every party a common set of facts to work from.
For a grounding in common SIP failure patterns before deciding on next steps, see SIP Problems and Failures.
The process follows a clear, transparent workflow. There are no surprises about what happens or why.
The investigation starts with gathering everything that describes the building as it was supposed to be built.
This includes plans, engineering documents, shop drawings, installation photos, weather history during construction, and any maintenance records. This establishes the intended system -- the baseline against which field conditions are compared.
This is where the actual story starts to emerge.
Depending on what the document review reveals (Step 1), a field investigation might include moisture mapping across the assembly, blower door testing, thermal imaging to identify air leakage or thermal bridging, borescope inspection to look inside panel cavities without destructive removal, core sampling to assess OSB condition and bonding of SIP components, strategic cut-outs at locations most likely to show failure, and air leakage diagnostics.
The field investigation is matched to the specific problem. Not every investigation requires every technique.
Most SIP failures fall into a predictable set of categories:
Moisture Intrusion and OSB Deterioration
Air leakage at splines, connections, or unsealed gaps
Roof Ridge and Beam Interface Failures
Incorrect Structural Design or Load Path
HVAC and Mechanical Integration Failures
Poor Installation Practices
Manufacturer Quality Control and Fabrication Errors
Identifying the failure mode answers the question: what failed?
This is the core of the work.
Root cause analysis answers the harder questions: why did it fail, what conditions allowed it to fail, and could it have been prevented? It looks past the symptom to the underlying mechanism.
This is the part of the investigation that makes the findings defensible -- and that tells you whether a repair will actually solve the problem, or just cover it up.
Recommendations are technically grounded, risk-based, and cost-aware. They take into account manufacturer requirements and the realistic scope of repair options available to the building owner.
Depending on findings, recommendations might include localized repairs, panel section replacement, joint reconstruction, improved moisture management details, or a monitoring plan to track conditions going forward.
The goal is to match the corrective action to the actual cause -- not to over-repair or under-repair based on assumptions.
A forensic report is a complete, defensible document -- one that can hold up in a construction dispute, an insurance claim, or a legal proceeding.
It is written to be understood by builders, designers, manufacturers, insurers, attorneys, and building owners -- not just engineers.
A complete report includes:
Executive summary with key findings and recommendations
Chronology of construction events
Document review findings
Field investigation results with photos, measurements, and diagrams
Failure mode analysis
Root cause determination
Contributing factors
Corrective action recommendations
Appendices with supporting documentation
This is the document that turns uncertainty into clarity -- and that gives every party involved a shared, factual foundation for moving forward.
SIP failures are almost never caused by a single factor.
They are typically the result of multiple system factors working against each other -- detailing decisions, installation sequencing, moisture management choices, field modifications, environmental exposure combining in ways that no single party anticipated.
That's exactly why forensic analysis matters. It identifies not just what failed, but the full chain of events that led to the failure. Without that understanding, repairs address symptoms without fixing causes, and disputes drag on without resolution.
Understanding how a SIP assembly is supposed to be designed and detailed in the first place is foundational context for any forensic investigation. The SIP Installation Guide and SIP Building Codes and Compliance pages in the resource hub cover the standards and practices that provide the basis of SIP forensic evaluation.
A thorough forensic analysis:
Reduces uncertainty for everyone involved
Clarifies where responsibility lies
Prevents the same failure from recurring
Protects the building owner's investment
Protects the builder from unfounded claims
Protects the manufacturer's position
Gives insurers and attorneys the documentation they need
It is the most efficient way to move from confusion to resolution.
If you are dealing with a SIP problem and need an independent, experienced opinion, Joe Pasma, PE is available for forensic consulting engagements. Contact Joe to discuss your situation.
SIP forensic analysis is a structured investigation into why a structural insulated panel assembly failed. It reviews documents, conducts field testing, identifies the failure mode, determines the root cause, and produces corrective action recommendations. The result is a defensible written report that can be used in repairs, disputes, insurance claims, or legal proceedings.
Common triggers include moisture staining, musty odors, OSB deterioration or softening, panel deflection or sagging, delamination, disputes between builders, designers, or manufacturers. Legal and insurance reviews are also common reasons to commission a SIP forensic analysis.
An inspection is a visual or instrument-based assessment of current conditions. A forensic analysis goes further -- it identifies issues, possible failure modes, traces the root cause, assesses contributing factors, and produces a documented, defensible report. A forensic analysis is appropriate when the stakes involve disputes, legal exposure, or significant corrective action decisions.
SIP forensic reports are used by building owners, builders, designers, manufacturers, insurance adjusters, and attorneys. The report provides a common factual foundation that all parties can reference, which typically shortens disputes and clarifies repair decisions.
The timeline depends on the complexity of the building, the extent of the suspected issues or failure, and document availability. Simple investigations can be completed in a few days or weeks. Complex multi-system failures or situations involving significant documentation may take longer. A clear scope and timeline can be established at intake.
Yes. A well-documented forensic report that identifies the failure mode, root cause, and contributing factors gives insurance adjusters the technical basis they need to evaluate a claim. It also protects building owners from having claims denied due to unclear or undocumented causes.
Look for a licensed professional engineer with direct SIP experience that spans design, manufacturing, installation, and failure investigation. General construction knowledge is not sufficient -- SIP systems have specific characteristics that require hands-on familiarity with how they are engineered, manufactured, and built.
Joe Pasma, PE is a licensed professional engineer and the founder of PGS Consulting LLC in White Bear Lake, Minnesota. He has spent more than 40 years working directly in SIP engineering, manufacturing operations, installation oversight, and forensic analysis. Joe has worked with SIP manufacturers, builders, designers, and legal teams across the country -- including cases involving fire performance, building failures, and code compliance disputes.
He is one of a small number of engineers in the United States with deep, hands-on experience across the full SIP lifecycle. Learn more about Joe Pasma, PE.

Are SIPs combustible? Yes -- but that doesn't mean unsafe. Learn how OSB and EPS behave in fire, what the building code requires, and why properly installed SIP assemblies perform predictably and safely.
By Joe Pasma, PE | PGS Consulting LLC, Licensed Professional Engineer | 40+ Years in SIP Engineering, Manufacturing, and Forensic Analysis | Published June 11, 2026, Updated September 13, 2026
It's one of the first questions I hear from people seriously considering SIP construction: "Wait -- isn't that foam? Doesn’t it burn?"
Yes. SIPs contain combustible materials. Both the OSB skins and the foam core will burn. I'm not going to sugarcoat that.
But here's the part that most articles skip over: combustible does not mean unpredictable. It does not mean unsafe. And it does not mean SIPs perform worse in a fire than traditional stick framing.
Fire safety in construction is never about a single material. It's about the whole assembly -- how the pieces work together, what barriers are in place, and whether everything was installed correctly. SIP assemblies are among the most thoroughly tested, tightly regulated, and predictable systems in residential construction today.
This article walks through what "combustible" actually means, how the materials in SIPs behave when exposed to fire, what the building code requires, and what real-world fire performance looks like.
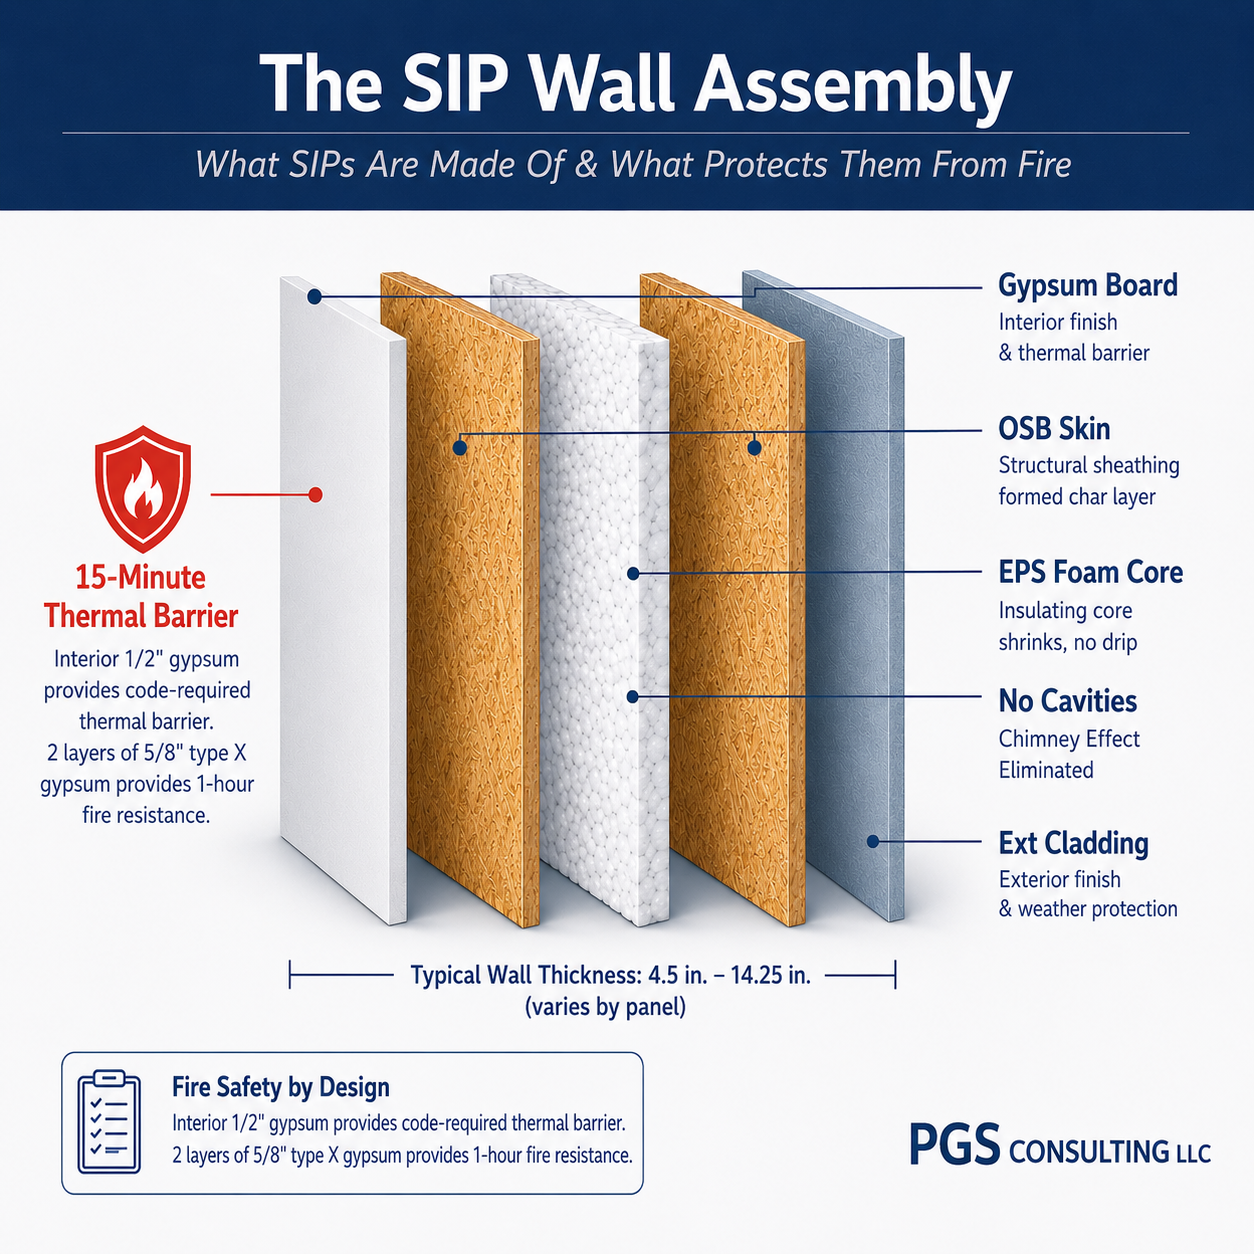
SIPs are combustible -- both the OSB skins and the foam core will burn when exposed to sufficient heat.
Combustible does not mean unsafe. Fire safety is determined at the assembly level, not the material level.
Building codes require a thermal barrier -- typically 1/2-inch gypsum board -- to protect the foam core and delay heat transfer for a minimum of 15 minutes.
SIPs eliminate the stud-cavity chimney effect found in stick framing, which is a meaningful advantage in a fire.
SIP assemblies are tested to ASTM standards and manufacturers must provide third-party compliance reports like an ICC-ES evaluation report documenting code compliance.
Proper installation is non-negotiable. A correctly installed SIP system with continuous gypsum performs predictably. Shortcuts during installation eliminate that protection.
The building code sorts materials into two buckets: combustible and non-combustible.
Foam plastics -- like EPS, GPS, and polyurethane (PUR/PIR) -- are considered combustible. OSB is combustible. So is dimensional lumber. So is virtually every structural material used in standard residential construction.
Here's the thing most people don't realize: the code allows combustible materials in residential buildings all the time. What the code cares about is whether the assembly -- the combination of materials, barriers, and installation details -- meets fire performance requirements.
A combustible material inside a properly protected assembly is not a fire hazard. It's just construction.
OSB is a wood-based panel, and like all wood, it will ignite and burn. But it doesn't just disappear.
When OSB is exposed to fire, it forms a protective char layer on the surface. That char slows heat transfer into the material behind it. This is the same behavior that makes mass timber construction code-approved, and it's the same reason wood-framed homes have been built safely for over a century.
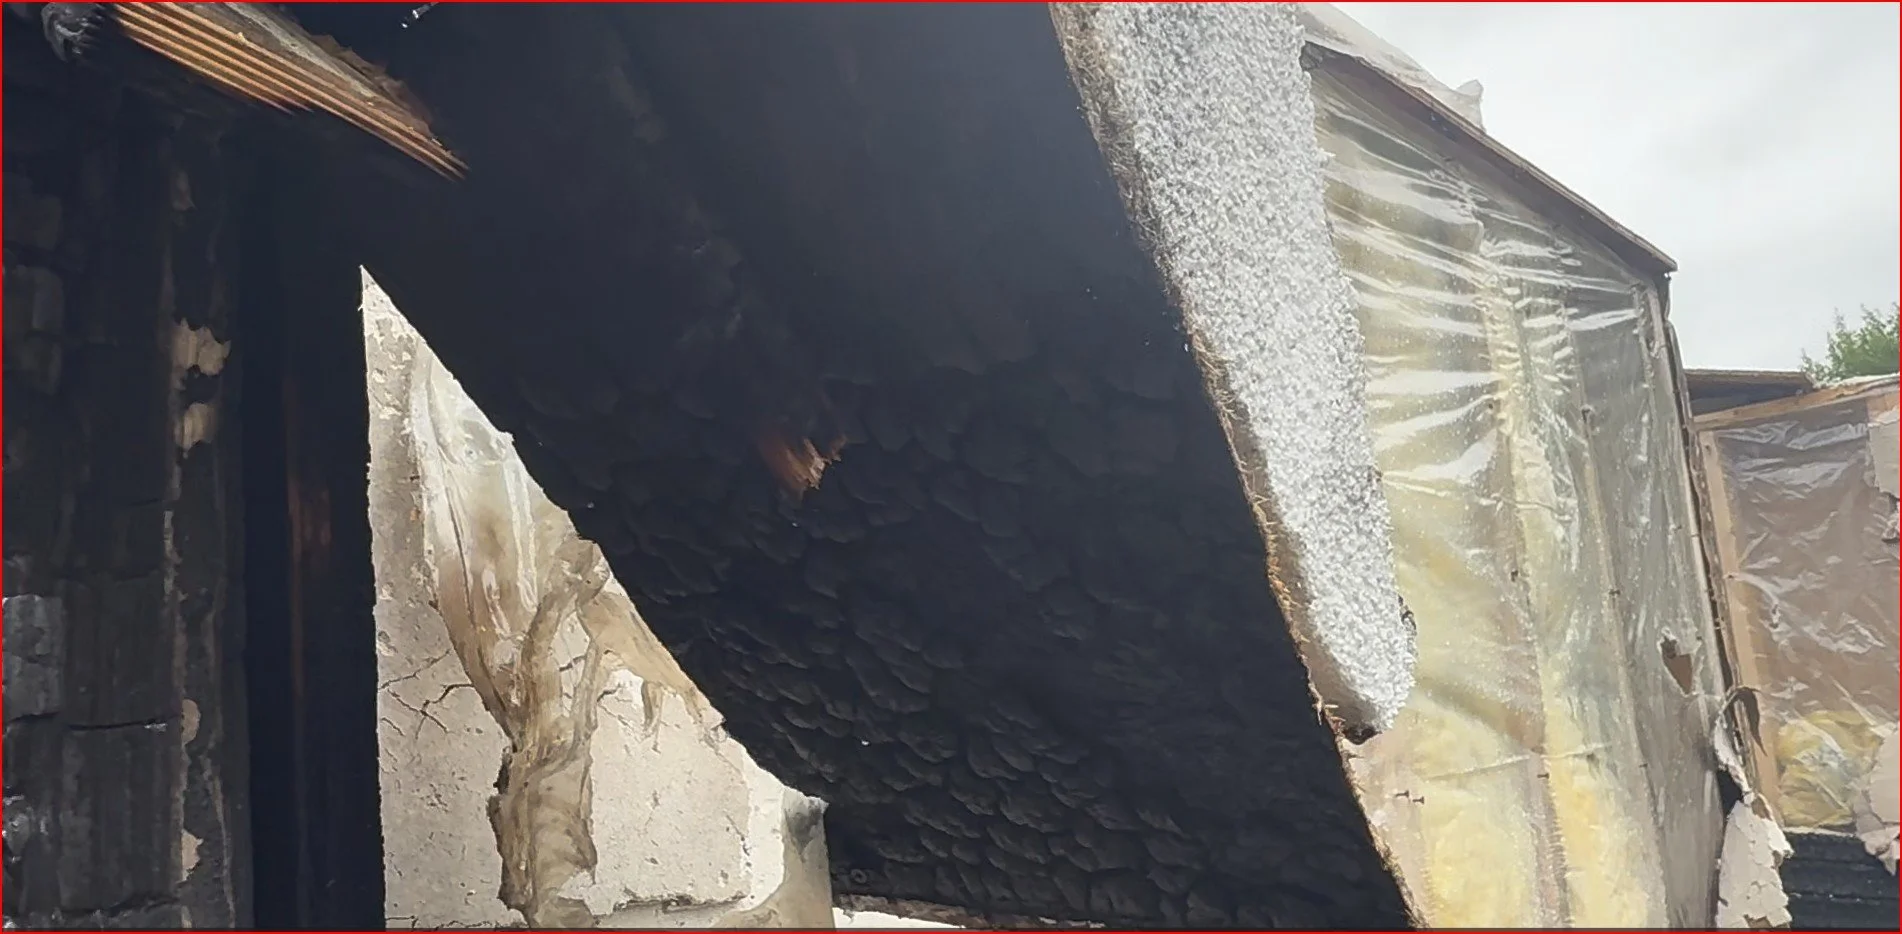
Charred OSB Facer
What OSB does not do:
It does not melt
It does not drip burning material
It does not collapse instantly
OSB's fire behavior is well understood by fire engineers. It's a known, modeled, engineered-for property -- not a wild card.
The takeaway: OSB is combustible, but it burns in a predictable, controlled way that engineers account for in assembly design.
EPS foam behaves differently than OSB, and it's worth being precise about this.
EPS will ignite when exposed to sufficient heat. Unlike OSB, it does not form a char layer -- it shrinks away from the heat source instead. Construction-grade EPS is treated with a flame retardant, which means it will not sustain an open flame without a continuous external ignition source.
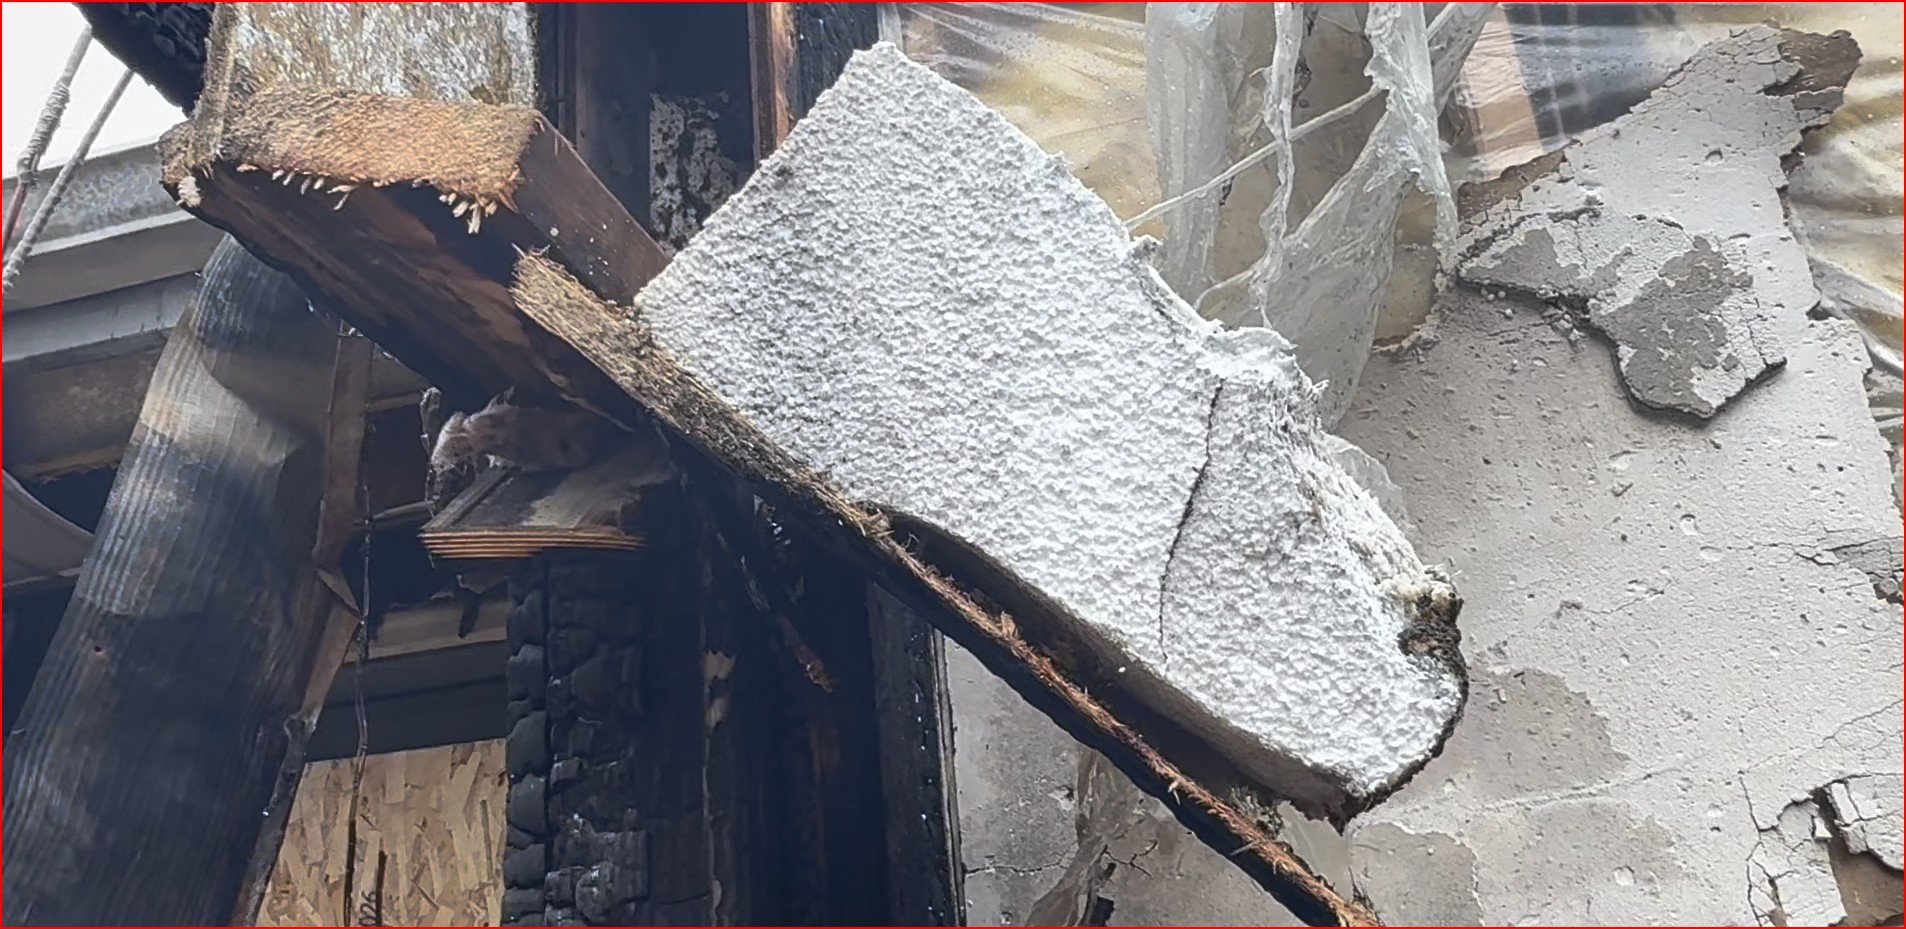
EPS Melt Back
What this means practically: if the gypsum thermal barrier on the interior of a SIP wall is intact and properly installed, the foam core is effectively shielded from heat long enough for occupants to exit and for fire suppression to respond. The foam never has a chance to become the problem.
This is exactly why the building code requires a thermal barrier. It's not a workaround or a patch -- it's the engineered solution.
The takeaway: EPS combustibility is managed through assembly design. The gypsum or an approved thermal barrier is not optional.
Foam plastics are only permitted in residential construction when protected by a thermal barrier. For SIP walls, that almost always means:
1/2-inch gypsum board on the interior face
Installed continuously, with no gaps
Providing a minimum 15-minute fire-resistance rating
SIP manufacturers test their assemblies to two primary ASTM standards:
ASTM E119 -- tests the fire resistance of building assemblies as a whole
ASTM E84 -- tests surface burning characteristics of individual materials
Both tests produce the data that goes into a third-party authored compliance report like an ICC-ES evaluation report. Those reports are publicly available and document exactly what a manufacturer's panels are approved for, under what conditions, and with what installation requirements.
Enercept, for example, publishes their ICC-ES evaluation report (ESR-4693) on their website. Any SIP manufacturer worth working with has an equivalent document. The SIPA SIP Manufacturing members all have a third-party listing report.
The takeaway: Code compliance for SIPs is not a gray area. The requirements are specific, the testing is standardized, and the documentation is publicly accessible.
Most people know the rule -- SIP walls require gypsum on the interior face. Fewer people know why gypsum specifically, and why that matters.
It's not just about thickness. Gypsum does something most building materials can't: it fights fire with chemistry.
Gypsum board contains water that is chemically bound inside its molecular structure -- not liquid water you can see or feel, but water locked into the material itself at a molecular level. When gypsum is exposed to heat, it releases that bound water as steam. That process absorbs an enormous amount of heat energy acting like a built-in air conditioner that delays heat transfer and keeps the surface behind the gypsum significantly cooler for an extended period of time.
That's what creates the 15-minute thermal barrier rating. It's not just a physical shield sitting between the fire and the foam. It's an active chemical process that consumes heat before that heat can reach the EPS core.
Even after complete calcination, when all the water has been released, the gypsum board continues to act as a heat-insulating barrier. Essentially, the board sacrifices itself to prevent the passage of heat and flame and does so in a sequential manner working back from the heat source. At that point, the material has done its job -- it has bought time. This is exactly why installation quality is non-negotiable. Gaps in the gypsum, missing sections at corners, or improperly taped joints all reduce the total water available to absorb heat. A compromised gypsum installation doesn't just look wrong -- it physically shortens the time the assembly can hold.
This is also why the code specifies continuous installation. Every inch of gypsum on that wall is contributing to the thermal delay. Treat it like the structural component it is.
This is one of the most important fire performance differences between SIPs and stick framing, and it's often overlooked.
In conventional wood-frame construction, walls and floor assemblies contain open cavities between studs and joists. When a fire starts, those cavities act like chimneys -- they channel air and allow flames to travel vertically through a wall much faster than the surface materials alone would burn.
SIPs eliminate this pathway entirely.
There are no open cavities. The foam core is continuous from one face to the other. The assembly is airtight. There is nowhere for fire to race through.
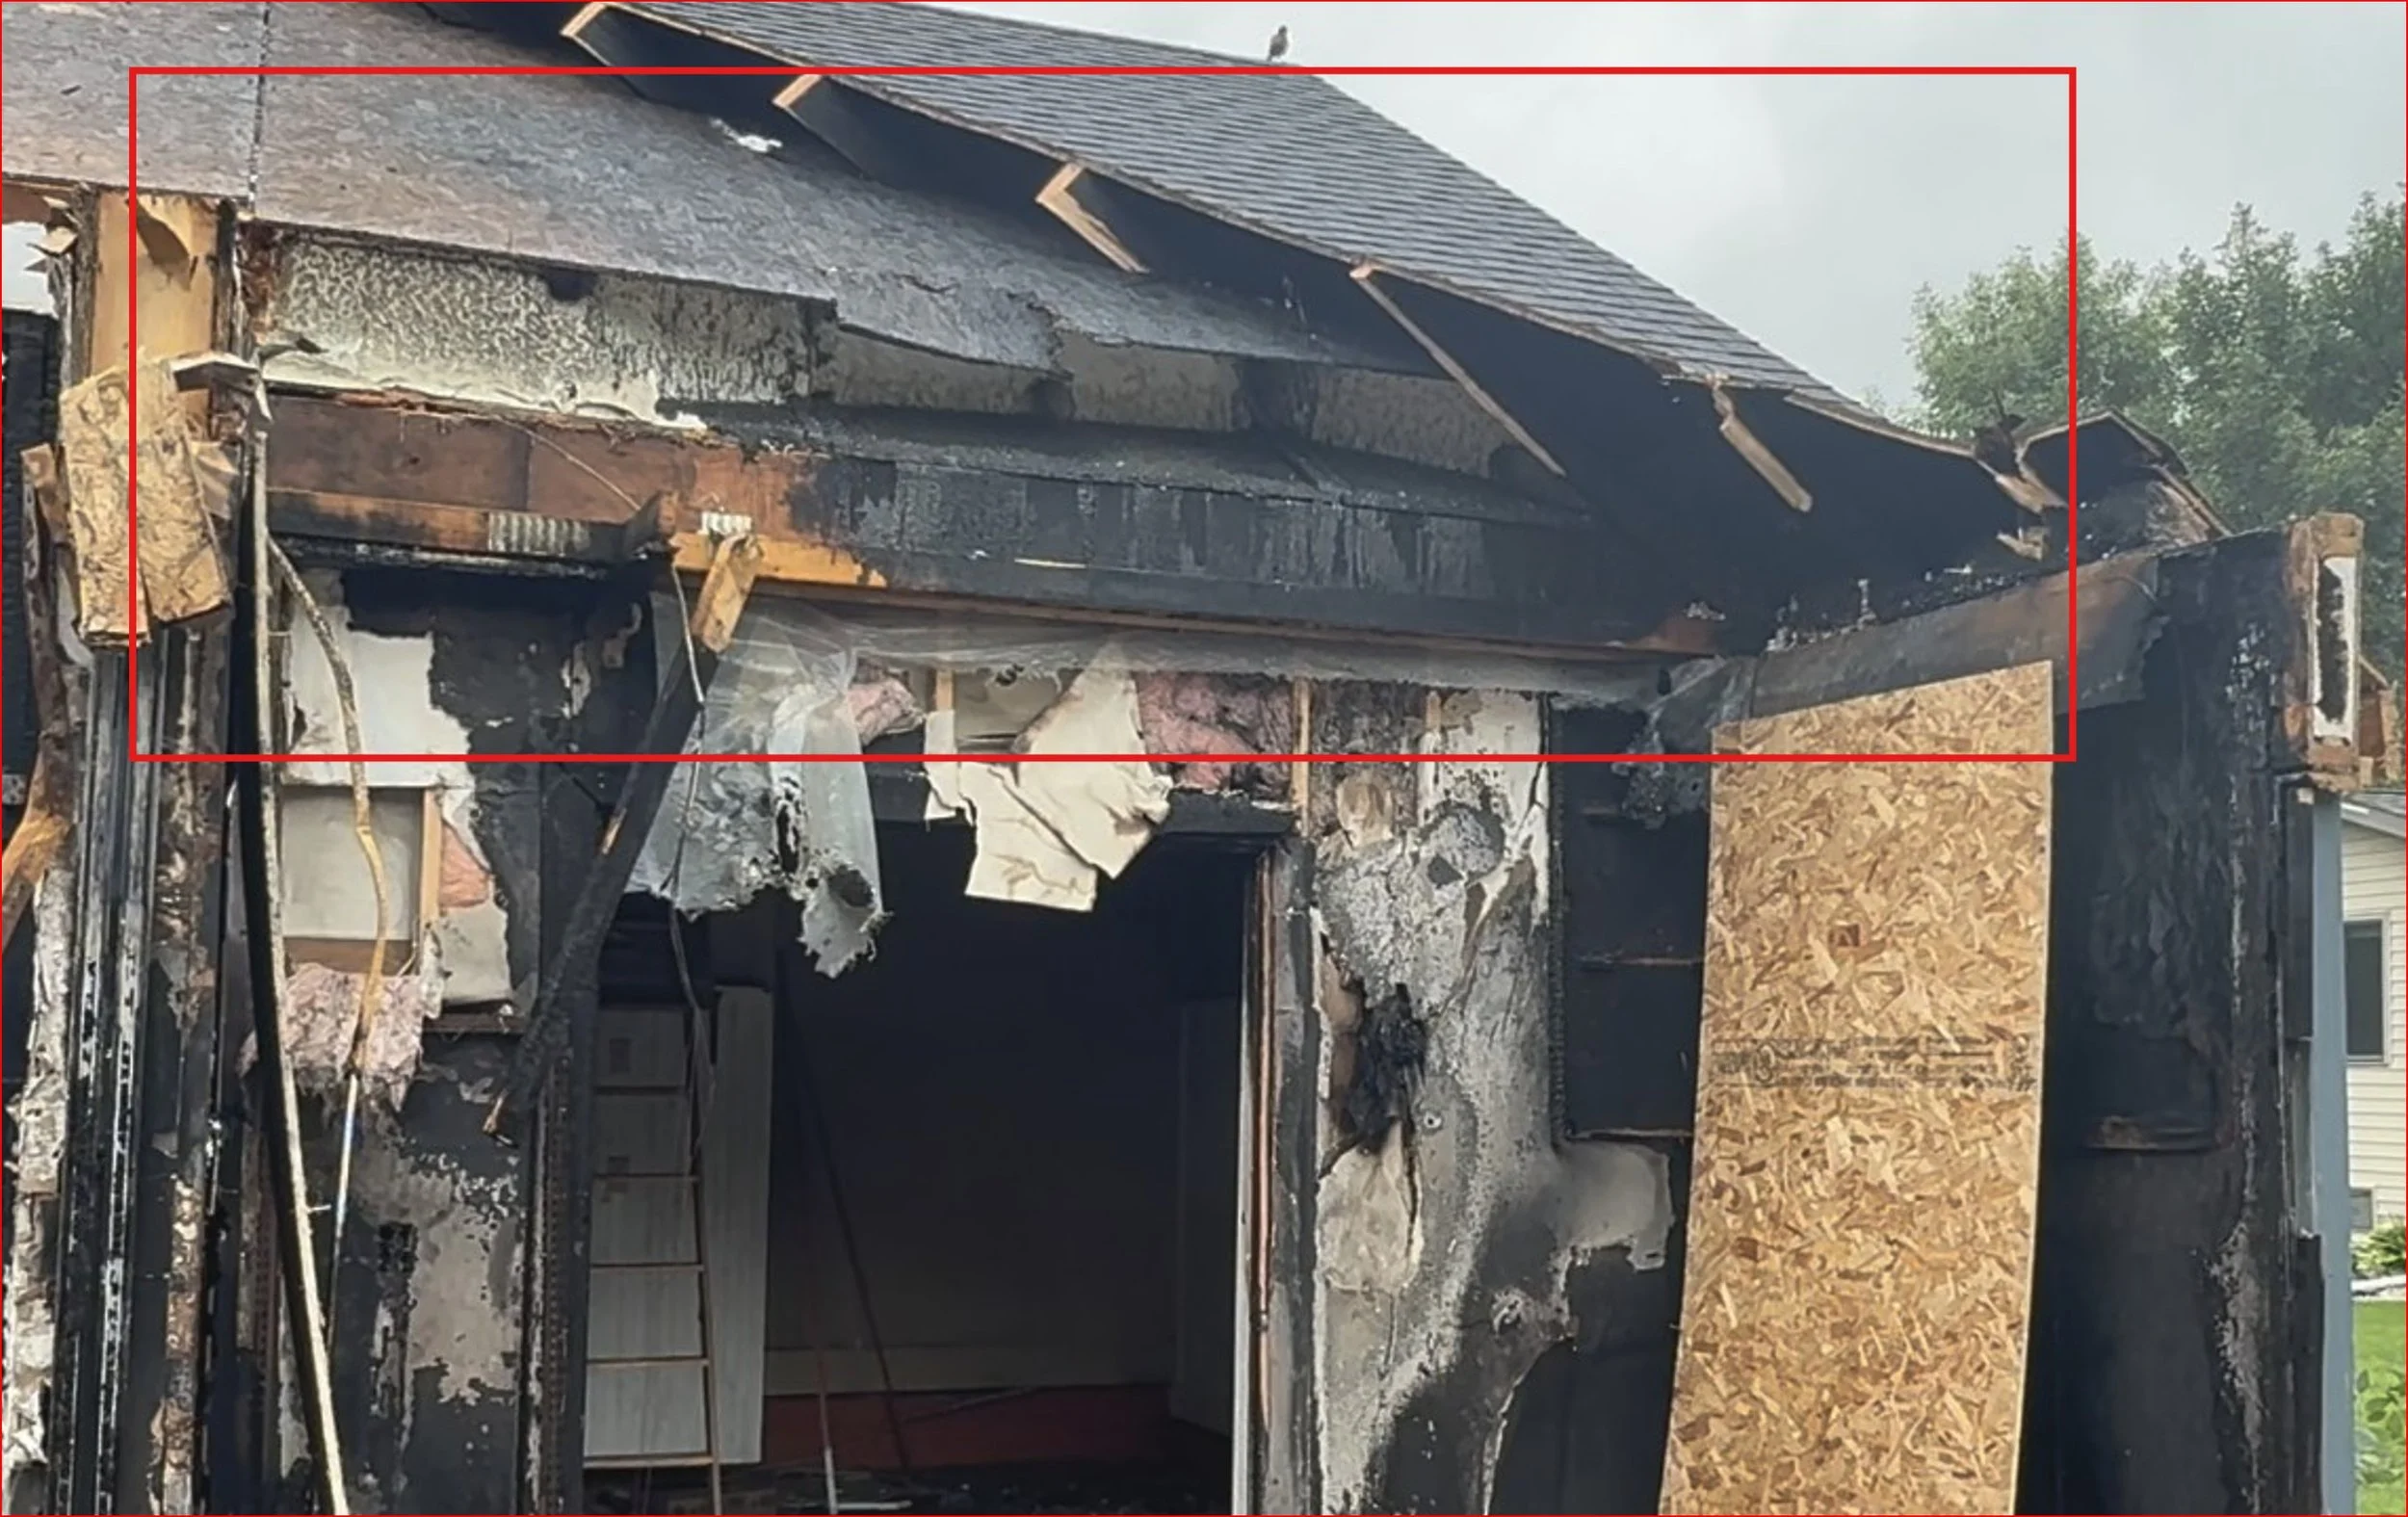
SIP roof panels with melted EPS core and no chase for the fire to travel in (chimney effect).
Real-world evidence backs this up. Enercept documented a residential fire in which the stick-framed roof section collapsed while the SIP walls remained standing. Their explanation aligns with the physics: without stud-bay air channels, vertical fire spread slows dramatically.
The takeaway: The same feature that makes SIPs energy-efficient -- the continuous, airtight core -- also reduces one of the most dangerous fire behaviors in traditional framing.
Fire performance: SIPs vs. stick framing
← Swipe to view full table
| Fire performance factor | SIPs | Stick framing |
|---|---|---|
| Open stud cavities | None Continuous foam core, no air channels |
Present Cavities between every stud bay |
| Chimney effect risk | Eliminated No pathway for vertical fire spread |
Present Stud bays channel heat and flame upward |
| Thermal barrier required | Yes -- gypsum ½ in. gypsum board, interior face |
Yes -- gypsum Same requirement, same material |
| Structural facing behavior | OSB forms a protective char layer; slows heat transfer | Dimensional lumber also chars; similar behavior |
| Core / insulation behavior | EPS shrinks from heat; treated with flame retardant; does not drip | Batt insulation (fiberglass or mineral wool) is typically non-combustible |
| Airtightness advantage | Yes Continuous assembly limits oxygen supply to fire |
No Drafty framing cavities feed combustion |
| Assembly fire-resistance testing | ASTM E119 and ASTM E84; ICC-ES evaluation report required | ASTM E119; code prescriptive compliance path |
| Real-world documented performance | SIP walls have remained standing after adjacent stick-framed sections collapsed (Enercept case study) | Standard residential fire performance; well-documented over decades |
Let's put it together in plain terms.
In a fire scenario where a properly installed SIP home is involved:
The fire encounters the interior gypsum surface first
The gypsum delays heat transfer for at least 15 minutes -- enough time for evacuation
The foam core, protected by the gypsum, does not ignite immediately
Even as heat increases, the EPS shrinks rather than spreading flame
The continuous, airtight wall and roof assembly slows vertical fire spread
The OSB skins eventually char, but that char layer slows further heat penetration
This is predictable, engineered behavior. It's not luck. It's the result of code-tested, ASTM-verified assembly design.
Where things go wrong is when installation is cut short. Gypsum that isn't continuous, panels that aren't properly sealed, or electrical penetrations that aren't correctly detailed can compromise the entire thermal barrier. That's why correct installation isn't just about structural performance -- it directly affects fire safety.
SIPs are combustible. So is almost every other material in a wood-framed home.
What makes a building safe in a fire is not whether its materials are combustible -- it's whether the assembly is properly designed, properly tested, and properly installed. On all three of those measures, SIPs hold up well.
The code requirements are clear. The testing standards are established. The performance data exists. When a SIP system is installed correctly, with the required thermal barriers and proper detailing, it behaves predictably in fire -- and in some important ways, better than stick framing.
Fire performance questions, code compliance concerns, or structural details that don't quite add up -- these are exactly the situations where an independent engineering review pays for itself. Joe Pasma, PE has 40+ years working directly in SIP engineering, manufacturing, and forensic analysis, including cases where fire performance was the central issue.
Contact Joe Pasma, PE to talk through what your project needs →
Yes. Both the OSB skins and the foam core are combustible materials. Fire safety is achieved at the assembly level, primarily through continuous gypsum thermal barriers and airtight construction.
Yes -- when installed correctly. SIP assemblies are tested to ASTM standards and must meet specific building code requirements for fire resistance. Proper installation of the required thermal barrier is essential.
Yes, OSB is a wood product and will burn. But it forms a protective char layer when exposed to fire, which slows heat transfer and contributes to predictable, engineered fire performance.
EPS is combustible, but construction-grade EPS is treated with a flame retardant and will not sustain an open flame without a continuous external ignition source. A continuous gypsum thermal barrier is required to protect the foam core in any SIP assembly.
A continuously installed 1/2-inch gypsum board on the interior face of the wall. This thermal barrier delays heat transfer for at least 15 minutes, which meets the code-required standard. The foam behind it is also treated with a flame retardant.
No -- and in some ways they burn more slowly. SIPs eliminate the open stud cavities found in stick framing, which removes the chimney effect that allows fire to spread rapidly through a conventional wall. Documented fire incidents show SIP walls remaining intact after adjacent stick-framed sections have failed.
Yes. SIP manufacturers are required to have their assemblies tested to ASTM standards and must publish third-party compliance reports like an ICC-ES evaluation report documenting compliance with thermal barrier, ignition barrier, and fire-resistance requirements. These reports are publicly available. The SIPA SIP Manufacturing members all have a third-party listing report.
The thermal barrier is the primary fire safety mechanism for foam-core SIP panels. Gaps, missing sections, or improper installation of the gypsum can compromise the entire fire-resistance rating of the wall assembly. Correct installation is not optional -- it is a code requirement.
Joe Pasma, PE is a licensed professional engineer and the founder of PGS Consulting LLC in White Bear Lake, Minnesota. He has spent more than 40 years working directly in SIP engineering, manufacturing operations, installation oversight, and forensic analysis. Joe has worked with SIP manufacturers, builders, designers, and legal teams across the country -- including cases involving fire performance, building failures, and code compliance disputes.
He is one of a small number of engineers in the United States with deep, hands-on experience across the full SIP lifecycle. Learn more about Joe Pasma, PE.