

Are SIPs Hard to Wire or Plumb? What Electricians and Plumbers Need to Know
Electricians and plumbers hear "SIPs" and assume complicated. The reality is simpler than most expect. This guide breaks down exactly how wiring and plumbing work in SIP construction -- including how electrical chases eliminate foam drilling, why plumbing belongs on interior walls, and what a prepared GC does before the first crew shows up.
By Joe Pasma, PE | PGS Consulting LLC | SIP Engineering & Consulting | Published June 24, 2026
Key Takeaways
SIPs are not hard to wire or plumb. They require a different workflow, not a harder one.
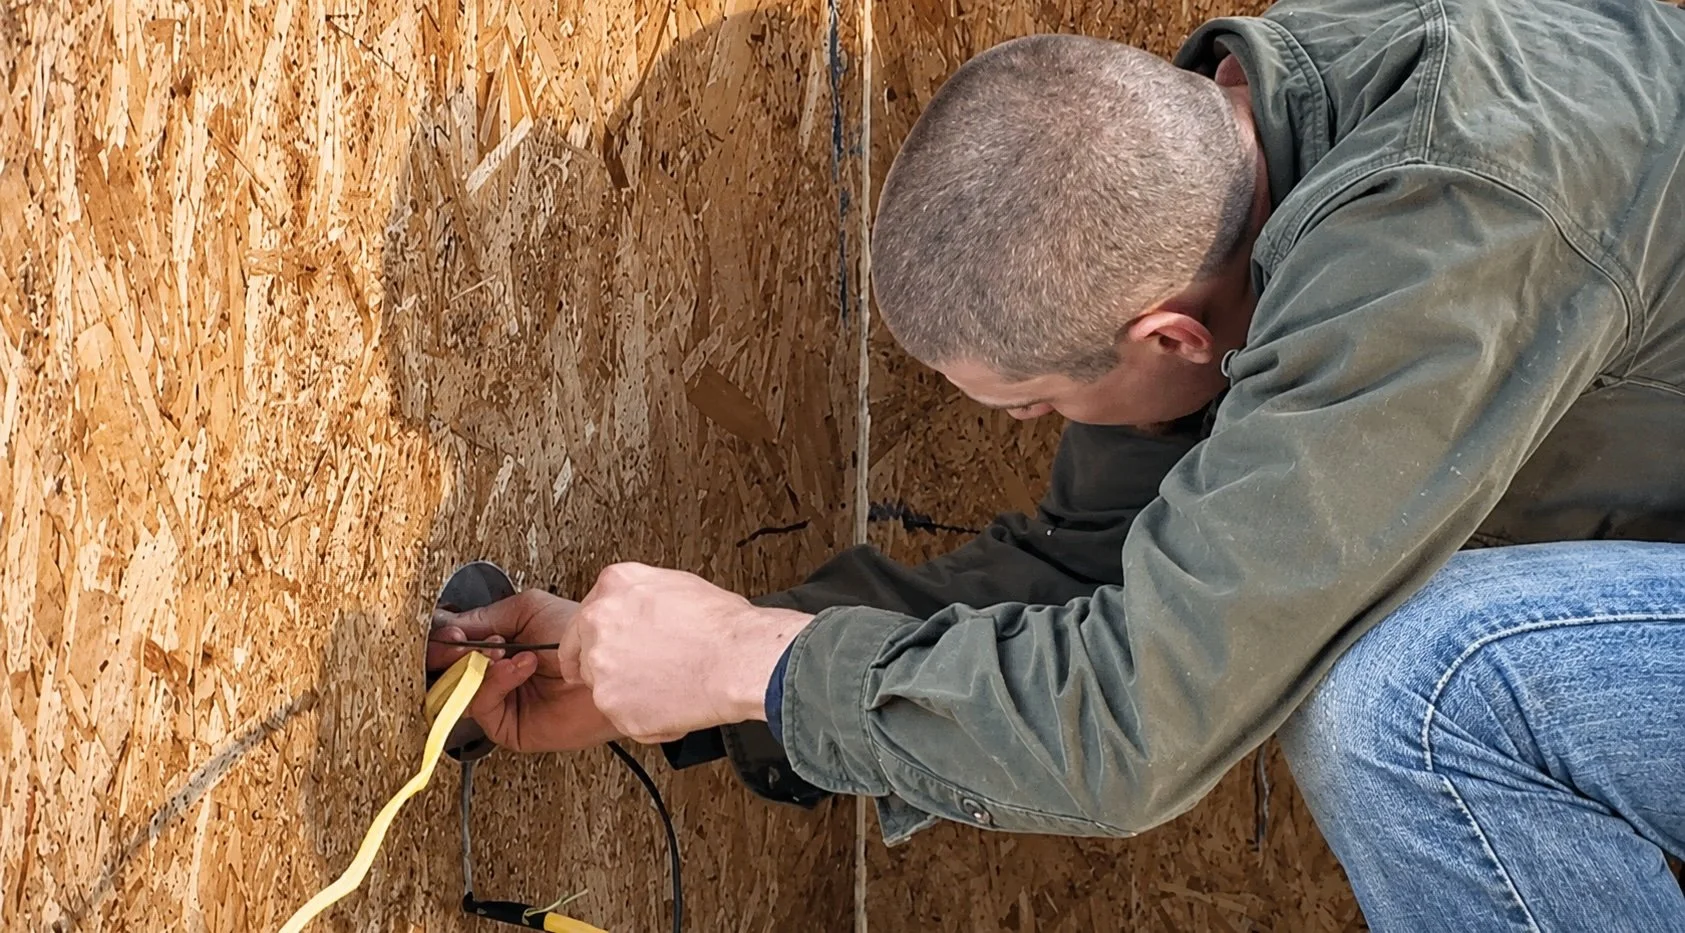
Electricians push Romex through pre-cut chases -- no foam drilling, no special tools, no new certifications required.
Plumbing belongs on interior walls in SIP construction. This is best practice in any high-performance building, not a SIP-specific limitation.
Upfront planning replaces on-the-fly improvisation. That shift makes the job faster and more predictable, not harder.
After one SIP project, most electricians and plumbers say the same thing: "That was easier than I expected."
One of the most common objections we hear from builders, electricians, and plumbers considering Structural Insulated Panel (SIP) construction comes down to a single question… "Aren't SIPs hard to wire or plumb?"
It is a fair question. Electricians and plumbers have spent years working in open stud bays -- drilling wherever they need to, improvising on the fly, and working from decades of muscle memory. SIPs look different. And different feels hard until you understand how the system works.
Here is the short answer: SIPs are not hard to wire or plumb. They are just different. Once you see how the workflow actually runs, the concern usually disappears fast.
This article breaks down exactly how wiring and plumbing work in SIP construction, what trades actually need to do their job well, and why most electricians and plumbers prefer SIPs after their first project.
How Wiring Works in SIPs
SIP panels come from the factory with electrical chases already built in. These are pre-cut channels running horizontally and vertically, typically 4’ on center, through the foam core, positioned at standard heights, typically switch and outlet heights (approximately 14” and 44” above the floor), and mapped on the shop drawings. Electricians do not fish wires through foam. They push Romex through the chases that are already there.
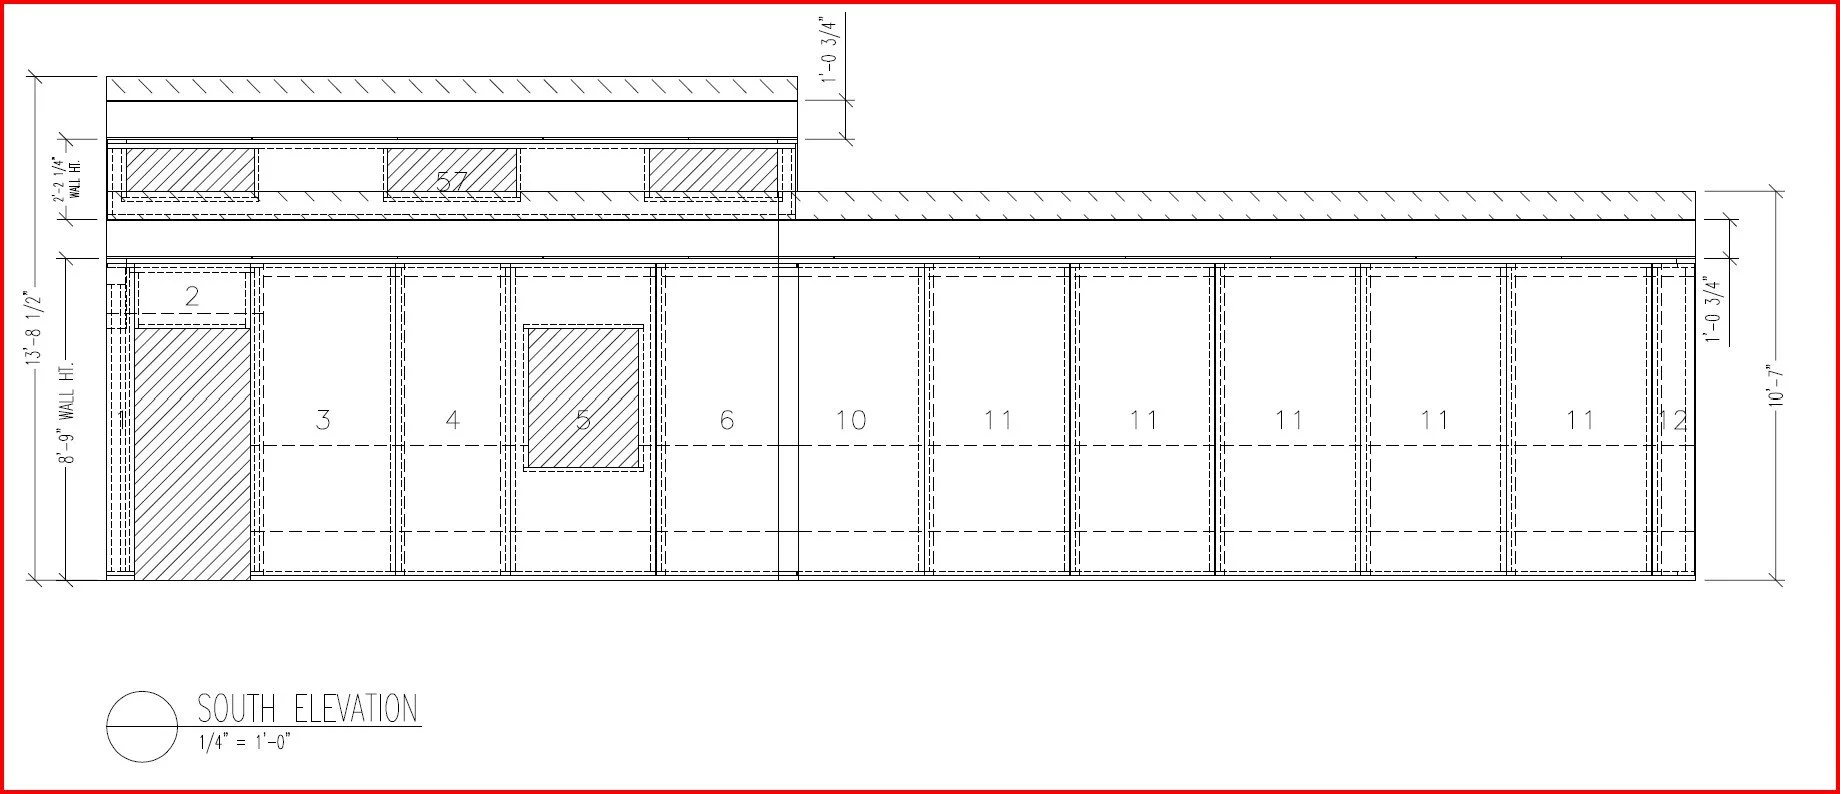
Longer dashed lines represent horizontal and vertical electrical chases. Short dashed lines are recessed edges for lumber and splines.
Here is what the actual electrical workflow looks like on a SIP project:
Review the chase map on the shop drawings -- chase locations are already marked
Drill the sill plate at vertical chase locations - (SIP installation contractor does this)
Drill the top plate at vertical chase locations - (SIP installation contractor does this)
Cut in switch and outlet boxes
Push Romex through the pre-cut chases
Install electrical boxes at required locations - remodeler boxes work well
Pull circuits as usual
Seal the boxes and any unused chases -- this is required to maintain the air barrier and meet fire safety requirements
That is the whole workflow. No special tools. No foam drilling. No exotic techniques. No guessing about where wires can go.
The main shift for electricians is that routing decisions are made upfront, on the drawings, rather than on the fly in the field. For most trades, that shift feels like less work -- not more.
Electricians who have done one SIP project almost always say the same thing: "This is easier than drilling studs all day." The work moves from improvisation to execution. Once you have a clean chase map, the job runs predictably.
Why SIP Wiring Is Faster Than Stick Framing
Electricians working in stick-framed walls deal with a long list of tasks beyond just pulling wire: drilling through 50 or more studs, fire-stopping, fighting back blown insulation, air-sealing after the fact, and managing thermal bypasses at penetrations.
SIPs eliminate most of that list.
On a SIP project, there are no studs to drill through, no fire-stopping after wiring, no insulation blocking access, and no air-sealing required after the fact. The envelope is already airtight by design. The only requirements are sealing the electrical boxes and any unused chases -- steps that take minutes, not hours.
The result is a cleaner, faster electrical scope once the workflow is understood. After one project, most electricians are faster on SIPs than on comparable stick-frame builds. For a broader look at how SIPs differ structurally from stick framing and why trade coordination matters, the SIPs vs. stick framing guide covers the full comparison.
How Plumbing Works in SIPs
This is the part that creates the most confusion -- and the most unnecessary concern.
You should not run plumbing in exterior SIP walls.
But here is the thing: you should not run plumbing in exterior stick-framed walls either. Not if you care about freeze protection, condensation control, air sealing, or long-term durability. Running supply lines or drain stacks through an exterior wall is a problem in any high-performance building system. SIPs just make the rule more obvious.
Plumbing in SIP construction is straightforward:
Run all supply and drain lines on interior walls
Use soffits, chases, or dropped ceilings for vertical stacks
Coordinate penetration locations before the job starts -- not during rough-in
If plumbing must be located on exterior walls, furring out a stick framed wall works well
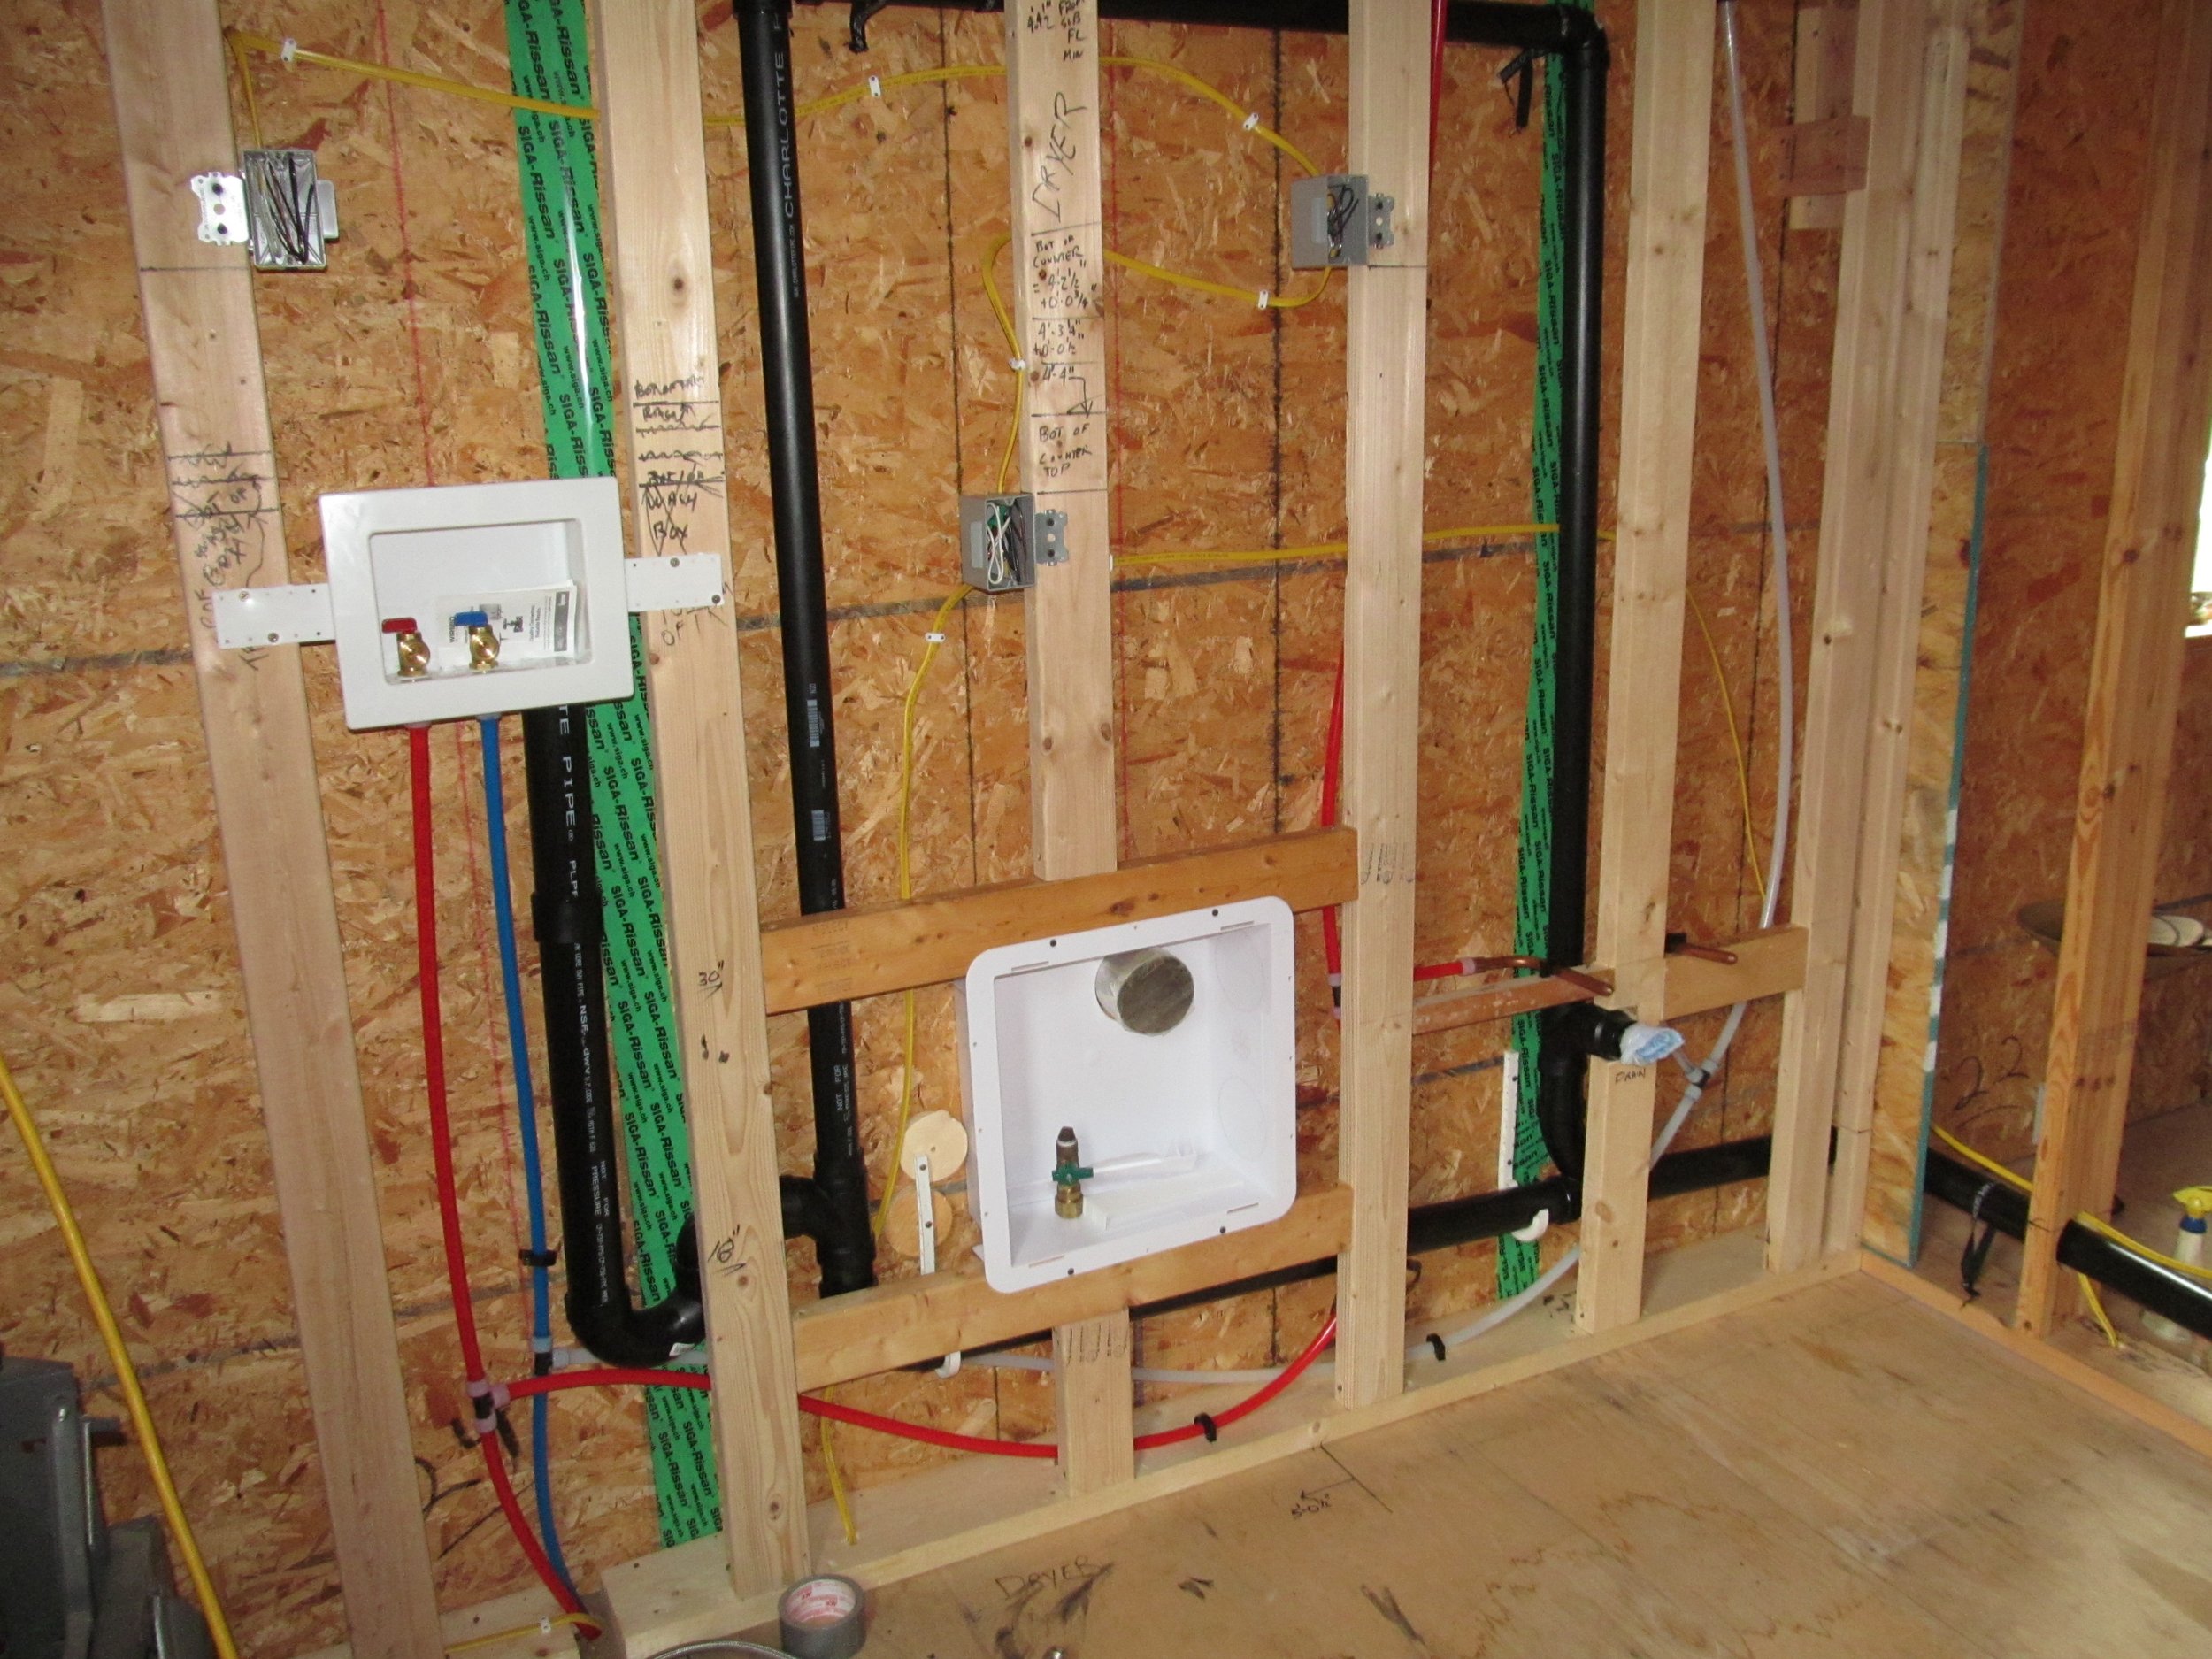
Furred out stick framed plumbing wall next to exterior SIP wall.
When the coordination happens upfront, plumbers work exactly as they would on any other project. The scope does not change. The tools do not change. The only difference is that the planning happens on paper before the first pipe goes in, rather than on the fly in the field.
This approach also produces a better building. Interior plumbing means less risk of freezing, less condensation risk in the wall assembly, and a cleaner, more durable envelope long-term.
Wiring and Plumbing Comparison: SIPs vs. Stick Framing
The table below shows where the actual workflow differences land for each trade.
← Swipe to view full table →
| Category | Stick Framing | SIP Construction |
|---|---|---|
| Wiring Pathways | Drill anywhere through studs | Use pre-cut chases -- locations mapped on drawings |
| Wire Routing | Drill studs, fire-stop, insulate | Push Romex through chases |
| Electrical Boxes | Standard install | Standard install, then seal the box |
| Air Sealing | Done after wiring, as a separate step | Built into the panel -- seal boxes and unused chases only |
| Plumbing Location | Often runs in exterior walls | Interior walls only or furred out exterior walls |
| Planning Required | Minimal -- improvise in the field | Required upfront -- saves time and rework later |
| Labor Time | Higher -- more drilling, more sealing steps | Lower after the first project |
| Risk Profile | More penetrations, more potential for leakage | Fewer penetrations, more predictable performance |
| Trade Training Needed | None -- familiar system | One project, or 1-2 hours of SIP basics |
SIPs compress the work. They do not add to it.
What Reduces Risk in SIP Construction
When wiring and plumbing are done correctly in SIPs, the building performs with fewer long-term problems than most comparable stick-frame structures. That is not a marketing claim -- it is the result of fewer penetrations, less air leakage, and a more controlled building envelope.
Correctly executed SIP construction reduces:
Envelope penetrations (fewer holes in the thermal boundary)
Air leakage at wiring and plumbing locations
Condensation risk in wall and roof assemblies
Mold potential from moisture accumulation
Thermal bridging at framing locations
Long-term maintenance from callbacks and repairs
None of that is "no risk." Construction always involves risk. But the risk profile on a well-coordinated SIP project is more predictable and more manageable than most builders expect going in. For a detailed breakdown of where SIP problems actually come from -- and why execution, not the material, is almost always the root cause -- the SIP problems and failures guide is worth reading before the job starts.
Training Resources for Electricians Working with SIPs
The Structural Insulated Panel Association (SIPA) and various SIP manufacturers have produced practical training videos specifically for electricians and other trades working on SIP projects. These are short, field-focused, and cover the core workflow clearly. The videos can be found on the manufacturers websites and YouTube channels.
DIY’ers have found SIPs easy to wire and have published videos on YouTube showing some of their work.
SIPA & DIY’er Electrician How To Videos
Rough-In Electrical Wiring on a SIP Home
SIP Electrical Chase Demo
Technical Reference Documents
SIPA Builder Best Practices documents BP-9 (Electrical) and BP-10 (Mechanical) cover chase use, box installation, penetration sealing, sill and top plate drilling, and manufacturer coordination in detail.
These resources eliminate the majority of trade uncertainty before anyone arrives on site. A prepared GC shares them during the pre-construction coordination meeting -- not the morning of rough-in.
Why Trades Think SIPs Are Hard (And Why They're Usually Wrong)
Electricians and plumbers are not resistant to SIPs. They are resistant to risk -- and unfamiliar systems feel risky until the workflow is clear.
Stick framing offers open cavities, unlimited drilling access, and decades of familiar muscle memory. SIPs offer pre-cut chases, sealing requirements, and a workflow that is front-loaded with coordination instead of back-loaded with improvisation.
Different feels hard. Until you do it once.
The friction that shows up on SIP jobs -- hesitation from trades, questions mid-project, occasional missteps -- almost always comes from one source: missing information before the job started. When the chase map is clear, the sequencing is defined, the "do not cut" zones are marked, and there is someone to call if something looks off, the job runs.
The SIP installation guide covers coordination and sequencing in detail. The SIP FAQ addresses the most common jobsite questions across all trades.
In 40+ years of SIP work, I have never seen a trade fail because SIPs were too hard. What I have seen -- more times than I can count -- is a trade get put in an impossible position because the coordination was not done ahead of time. When the prep work is there, the job moves. When it is not, everyone on the site pays for it.
-- Joe Pasma, PEThe Bottom Line
SIPs are not hard to wire or plumb. They require a different workflow -- one that is front-loaded with planning instead of improvisation. That shift is an adjustment. It is not a barrier.
Electricians who understand the chase system work faster on SIPs than on stick frame. Plumbers who coordinate penetrations upfront work exactly as they do on any interior-wall scope. Both trades walk off their first SIP project more confident than when they walked on.
The concern about wiring and plumbing in SIPs is understandable. But after 40 years of SIP engineering, manufacturing, and field oversight, the pattern is clear: when the coordination happens before the job starts, the trades do not struggle. They execute.
If you are planning a SIP project and want support setting up the coordination and documentation that makes every trade's job straightforward from day one, PGS Consulting LLC can help.
Related Resources
Frequently Asked Questions: Wiring and Plumbing SIPs
Do electricians need special tools to wire SIPs?
No. Standard tools work. The only difference from stick framing is drilling the sill plate and top plate at the chase locations marked on the shop drawings. This is typically taken care of by the SIP installers. No new equipment, no certifications, no manufacturer training required.
Do electricians need to fish wires through foam?
No. SIPs come from the factory with pre-cut electrical chases. Electricians push Romex through the existing chases -- no foam drilling required. The routing is already mapped on the shop drawings before the crew arrives.
Do electrical boxes need to be sealed in SIPs?
Yes. Electrical boxes and any unused chases must be sealed to maintain the air barrier and meet fire safety code requirements. This is a short step, not a complicated one -- but it is not optional.
Can plumbing go in exterior SIP walls?
No -- and it should not go in exterior stick-framed walls either. Plumbing belongs on interior walls in any high-performance building system. SIPs make that best practice a firm requirement. Coordinate penetration locations early and the plumbing scope runs exactly as it would on any other project.
Is SIP wiring faster than stick framing?
Usually yes. No stud drilling, no fire-stopping, no insulation blocking access. Once the workflow is understood, most electricians work faster on SIPs than on comparable stick-frame projects. The learning curve is short -- one project is typically enough.
Do SIPs require special trade training?
Only basic orientation to the workflow -- not certifications, not manufacturer training. The SIP manufacturer’s and SIPA's training videos and best practice documents cover everything most electricians and plumbers need before their first SIP project. A short pre-construction meeting with a prepared GC handles the rest.
What happens if a sub cuts in the wrong place?
SIPs can be repaired, but prevention is far better than repair. Clear "do not cut" zones, a labeled chase map, and a defined escalation path -- someone to call before cutting anything that looks wrong -- prevent the vast majority of field errors. See the SIP problems and failures guide for what the most common missteps look like and how they are avoided.
Who coordinates plumbing and electrical on a SIP project?
The GC sets expectations and manages trade sequencing. The SIP manufacturer provides the chase map and shop drawings. PGS Consulting LLC provides project-specific coordination documentation, trade-ready workflows, and field-ready checklists when additional support is needed. Learn more on the PGS Consulting services.
Have Questions About SIP Wiring, Plumbing, or Trade Coordination?
PGS Consulting LLC helps builders and GCs set up SIP jobs for clean execution -- with project-specific documentation and trade coordination support before the first crew arrives.
Talk to Joe Pasma, PE
Forensic Case Study: Exterior OSB Deterioration at the SIP Ridge Joint
A forensic case study of SIP ridge rot caused by incomplete air sealing at the ridge joint -- not exterior water intrusion. Investigated and documented by Joe Pasma, PE.
Investigated and Authored By Joe Pasma, PE | PGS Consulting LLC, Licensed Professional Engineer | 40+ Years in SIP Engineering, Manufacturing, and Forensic Analysis | Published June 23, 2026

Structural Insulated Panels, SIPs, are an excellent building system. When they are designed and installed correctly, they perform exactly as intended -- delivering superior energy efficiency, structural strength, and a tight building envelope that outperforms conventional framing. This case study is not an indictment of SIPs. It is a documentation of what happens when specific installation details are not executed correctly.
This case involves exterior OSB deterioration on a residential SIP roof. The homeowner reported staining on the structural ridge beam, a musty odor, and missing ridge-cap shingles. Early suspicion focused on the roofing system -- specifically those missing shingles. The forensic investigation told a different story entirely.
The roofing was intact. The underlayment had not failed. There was no exterior water pathway of any kind. The source of the damage was a single installation failure: the ridge joint was not completely air sealed. Warm, moist interior air was leaking through gaps in the ridge joint, condensing on the underside of the roofing underlayment, and being absorbed -- season after season -- by the exterior OSB of the SIP roof panel. This is a preventable, correctable installation issue. It is not a flaw in the SIP system itself.
Key Takeaways
This failure was caused by incomplete installation, not by a defect in the SIP system. When ridge joints are properly sealed and verified, this failure mode does not occur.
SIP ridge rot, in cold climates, is typically caused by air leakage at the ridge joint, not exterior rain or defective shingles.
Warm, moist interior air rises to the ridge, works its way through unsealed areas, condenses on the underside of the roofing underlayment, and is absorbed by the exterior OSB of the SIP roof panel.
Unsealed electrical chases near the ridge acted as direct air pathways and significantly accelerated the damage.
Missing ridge-cap shingles were a symptom of deteriorated OSB, not the cause of the failure.
A blower-door test at SIP installation completion would have identified the air leakage before any OSB damage occurred.
Repairs required removing the roofing at the ridge, drying the OSB, reconstructing the air seal completely, and verifying airtightness with a blower-door test before re-roofing.
Continuous ERV/HRV operation and indoor humidity monitoring are essential in cold climates to reduce moisture load on the building envelope.
Background: What Is SIP Ridge Rot?
SIP ridge rot is the deterioration of the exterior OSB (oriented strand board) facing on a SIP roof panel, concentrated at the ridge line and the upper portions of the spline joints where panels meet the ridge. It shows up as darkening, softening, and eventually fiber separation in the OSB. Left alone long enough, the OSB loses structural integrity, and sections the panels loose structural integrity.
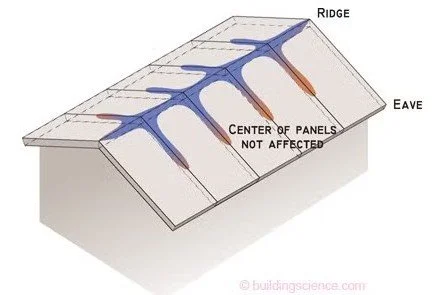
SIP Ridge Rot - Distinctive pattern of moisture damage at roof ridge and at upper panel joint locations.
The term "rot" implies biological decay driven by exterior moisture -- like a wood beam sitting in standing water. That is not what this is. SIP ridge rot is driven by condensation on the interior side of the roofing underlayment. The source of that moisture is not rain. It is the air inside the building. Understanding that distinction is the foundation of every forensic investigation into this failure mode.
The exterior OSB on a SIP roof panel is part of the structural sandwich. It is not decorative. When it deteriorates, the panel loses load-carrying capacity. In roof systems this is a structural concern, not just a cosmetic one.
The Failure Mechanism: How Ridge Rot Develops
Before documenting the field findings, it is worth establishing the failure mechanism -- because it is the mechanism that explains every observation made during the investigation.
Warm, moist air rises inside the building. In winter, interior air carries significant moisture. Because warm air rises, that moisture-laden air moves upward toward the ridge -- which is the highest point of the roof assembly.
Air finds gaps in the ridge joint. The ridge joint in a SIP roof is typically a plumb cut where the panels meet at the peak. If the sealant is incomplete, the SIP tape over the ridge beam was not installed properly or at all, or electrical chases near the ridge were left open, warm, moist air may escape into that joint.
The air hits the cold underside of the roofing underlayment. The underlayment sits between the OSB and the shingles. In winter, that surface is cold. When warm, moist interior air makes contact with it, the moisture condenses -- the same way a cold glass sweats on a humid day.
The exterior OSB absorbs the condensation. That condensed moisture has nowhere to go except into the OSB directly beneath it. This creates a repeated wetting cycle every winter. Over time, if the OSB is not allowed to dry, the OSB swells, the fibers separate, and the OSB begins to deteriorate.
The damage radiates outward. OSB deterioration is worst at the ridge peak, then tapers downward along the spline joints on both sides of the ridge. In severe cases, it can extend 18 to 24 inches down from the ridge before the moisture levels drop off enough to stop the damage.
Stack effect -- the natural pressure difference that pushes warm air toward the top of a building in cold weather -- amplifies every step of this process. A well-sealed ridge in a well-ventilated home may never develop ridge rot. An incompletely sealed ridge in a home with high indoor humidity and an intermittent ERV operation is at significant risk.
A Real Case: What the Investigation Found
The project was a steep-slope, 8/12 roof pitch, SIP roof built on a structural ridge beam. The panels were 10 1/4 inches thick. The roofing system included asphalt shingles over underlayment, with a ridge cap at the peak. The specifications called for continuous sealant and SIP tape at the ridge -- but those details were not confirmed as installed.
The homeowner first noticed staining on the structural ridge beam and a musty smell. A few ridge-cap shingles were also missing. Those missing shingles became the focus of early concern, but they turned out to be a distraction.
What the Field Investigation Showed
A full forensic investigation included moisture mapping, blower-door testing, thermal imaging, borescope inspection at the ridge, core sampling of the roof panel, and inspection of electrical chase terminations. Here is what it found:
Swipe to scroll →
The roofing was intact. The underlayment had not failed. There was no exterior water pathway. Every indicator pointed to the same conclusion: this was a purely air-driven moisture failure that originated inside the building.
The missing ridge-cap shingles were caused by the deteriorated OSB not being able to hold the roofing nails. Once that is understood, it becomes clear why replacing the shingles alone accomplishes nothing. You have not addressed the source of the deterioration.
What Made This Failure Worse
This investigation identified a cluster of contributing factors that amplified the damage. Each factor alone may not have produced visible failure, but together they created conditions where the ridge joint had almost no defense against the failure mechanism.
Swipe to scroll →
Recognizing Ridge Rot: Warning Signs From This Investigation
In this case, visible damage at the ridge was already significant by the time a forensic investigation was initiated. The indicators below were all present -- and several of them appeared well before the OSB deterioration became visible. They are documented here as a reference for others evaluating similar conditions on SIP roofs:
Musty smell near the ridge. This is often the first sign. It appears at various times and is strongest when the wind blows hard, making it easy to dismiss.
Staining on the structural ridge beam. If the ridge beam is visible from inside, dark staining along it can indicate moisture migration from the ridge joint.
Missing or lifting ridge-cap shingles with no obvious wind explanation. If multiple shingles are displaced and the roofing below them appears intact, deteriorating OSB may not be able to hold roofing nails.
Elevated moisture readings at the ridge during moisture mapping. A moisture meter applied to the OSB at the ridge shows significantly higher readings than panels lower on the roof slope. Moisture levels greater than 16% are considered elevated. Moisture levels greater than 19% can support fungal growth.
Thermal imaging showing warm air pathways at the ridge. In cold weather, thermal imaging along with blower-door testing can reveal air moving from interior to exterior at the ridge joint -- before any OSB damage is visible.
If you are seeing any of these in a SIP roof, the next step is a structured investigation, not a roofing repair.
For a broader overview of how and why SIP roofs fail, see our resource page on SIP Problems and Failure Modes.
How This Is Repaired
Ridge rot repairs are not complicated, but they are not simple either. The key is doing them in the right order. Replacing shingles without addressing the air leakage just resets the clock on the same failure.
Step 1: Stop the Moisture Problem First
Before any structural repairs, the indoor humidity situation has to be addressed. If the ERV is not running continuously, start there. Get a humidity monitor and understand what indoor RH levels look like in winter. The target in cold climates is generally below 35 to 40 percent relative humidity during heating season.
Step 2: Remove Roofing at the Affected Ridge
Roofing and ridge cap at the deteriorated area need to come off so the OSB can be assessed and dried. Temporary dehumidification may be needed to bring the OSB to below 15 percent moisture content before repairs proceed.
Step 3: Reconstruct the Ridge Joint
This is the most critical step. Replace deteriorated OSB as needed, then rebuild the ridge joint and air seal properly:
Backer rod and pliable SIP sealant at the lower depth of the plumb cut
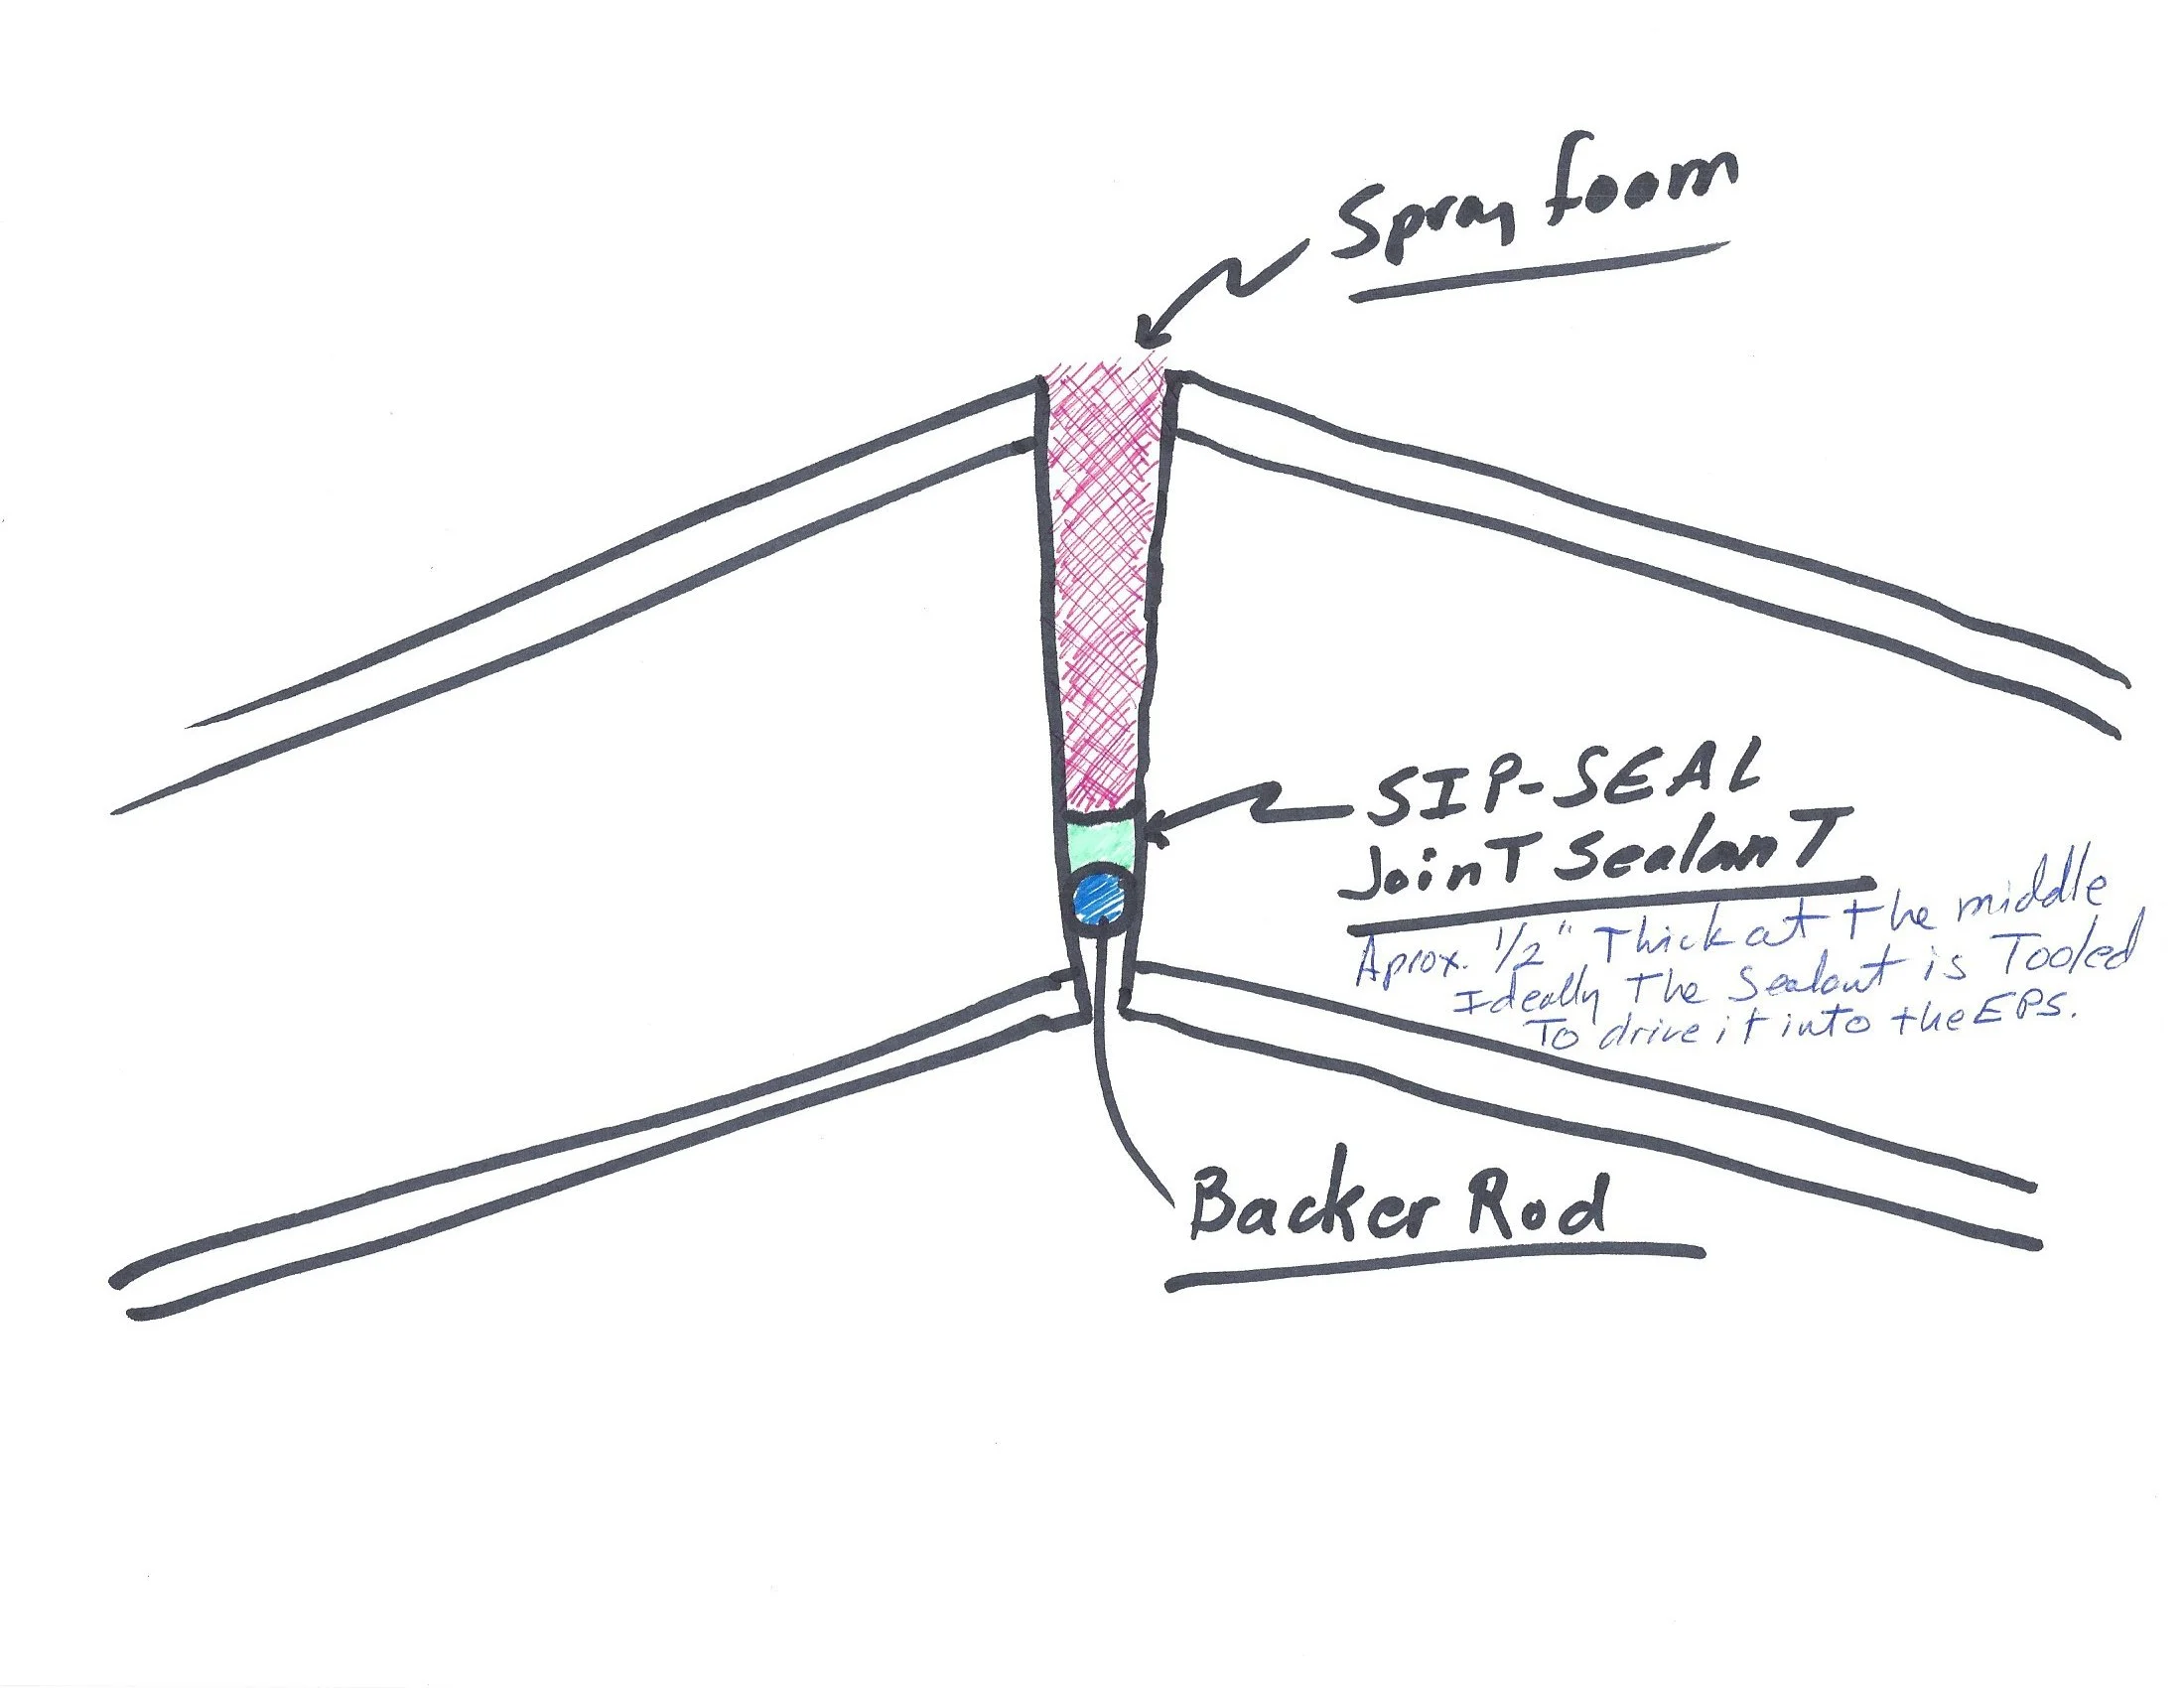
Plumb Cut Ridge Panels
SIP - Seal Joint sealant is a flexible sealant that will not harden with time.
The backer rod is critical to the detail so is tooling the sealant.
Expanding foam applied for the remaining depth of the ridge joint
SIP tape applied continuously over the ridge beam (this may not be possible)
All electrical chase terminations sealed completely
Step 4: Verify With a Blower-Door Test
Before any roofing goes back on, a blower-door test should confirm that the ridge joint is now airtight. If air leakage is still detectable, find it and seal it before proceeding.
Step 5: Reinstall Roofing With High-Perm Underlayment
Reinstall roofing over a high-permeability underlayment to allow any residual moisture in the OSB to dry outward over time. A vented ridge cap is also beneficial here -- not because it fixes the air leakage problem, but because roofing ventilation helps manage any residual moisture in the roofing system.
For more on how SIP roof assemblies should be sealed and detailed at installation, see the SIP Installation Guide in the Resource Hub.
A vented ridge cap ventilates the roofing system. It does not ventilate the SIP core. Do not confuse the two. Adding a vented ridge cap without sealing the ridge joint will not prevent ridge rot. The air pathway has to be closed first.
Lessons From This Case: What Should Have Been Done Differently
This failure was preventable. Every element that contributed to it was addressable at the time of installation, or shortly after, with standard SIP best practices. The following are the specific failures this investigation identified -- documented here as a resource for builders, designers, and SIP owners evaluating similar assemblies:
The ridge joint must be continuously sealed -- and that sealing must be verified by the installer. That means sealant at the full depth of the plumb cut, SIP tape over the ridge beam, and documented confirmation it was completed. Specifications on paper are not the same as verified installation. This is the installer's responsibility and the single most critical detail in a SIP roof assembly.
Electrical chases must be sealed by the installer after wiring is complete. Open chases near the ridge are warm-air delivery channels directly into the most vulnerable part of the roof. This step is straightforward and inexpensive. Skipping it is a significant installation error.
A blower-door test should be required at SIP installation completion. There is no substitute for measured verification. A properly executed blower-door test would have identified the air leakage in this case before a single heating season passed -- and before any OSB damage occurred.
ERV/HRV systems must run continuously in cold climates during the winter. An intermittently operated ventilation system may not be controlling indoor humidity. In a tight SIP home in a cold climate, continuous mechanical ventilation is not optional -- it is part of how the building is designed to function.
Indoor humidity should be monitored by the homeowner. A basic humidity monitor costs almost nothing compared to a ridge rot remediation. Maintaining indoor RH below 35 to 40 percent during heating season is the simplest ongoing step a homeowner can take to protect a SIP roof assembly.
For a deeper look at how moisture behaves in SIP assemblies and what it does to OSB over time, learn more on SIP Energy Performance and Moisture Management.
Frequently Asked Questions
What causes SIP ridge rot?
SIP ridge rot is caused by warm, moist interior air leaking through an incompletely sealed ridge joint, condensing on the underside of the roofing underlayment, and being absorbed by the exterior OSB of the SIP roof panel. The result is a repeated wetting cycle every heating season that progressively deteriorates the OSB at the ridge line and along adjacent spline joints. It is an air-driven, installation-driven failure -- not a flaw in the SIP system and not caused by exterior water intrusion.
Is SIP ridge rot a problem with the SIP panels themselves?
No. SIP ridge rot is caused by incomplete installation -- specifically, failure to fully air seal the ridge joint during construction. When the ridge joint is properly sealed with continuous sealant, SIP tape over the ridge beam, and verified with a blower-door test, this failure mode does not occur. The SIP panels in this case were not defective. The installation detail was not completed correctly.
Do missing ridge-cap shingles cause SIP ridge rot?
No. Missing ridge-cap shingles are a symptom of OSB deterioration, not its cause. When the OSB beneath the ridge cap swells and loses integrity from repeated moisture cycling, it cannot hold roofing nails. The shingles should be replaced, but replacing them alone does nothing to address the underlying installation deficiency driving the rot.
Does a vented ridge cap prevent SIP ridge rot?
No. A vented ridge cap ventilates the roofing system between the underlayment and the shingles. It does not ventilate the SIP core and does not prevent air-driven condensation at the ridge joint. Preventing ridge rot requires the installer to seal the ridge joint completely -- a vented ridge cap above an unsealed joint accomplishes nothing in terms of preventing this failure.
How does indoor humidity contribute to SIP ridge rot?
Higher indoor humidity means the air leaking through an unsealed ridge joint carries more moisture. More moisture reaching the cold underside of the underlayment means more condensation and more water absorbed by the OSB each winter. In cold climates, indoor relative humidity during heating season should be kept below 35 to 40 percent. Continuous ERV/HRV operation and a humidity monitor are the most practical ways to manage this.
How is SIP ridge rot repaired?
Repairs require removing roofing at the affected ridge area, drying the OSB to below 15 percent moisture content, replacing deteriorated OSB as needed, and completely reconstructing the ridge joint air seal with continuous sealant, expanding foam, and SIP tape. All electrical chase terminations near the ridge must be sealed. A blower-door test confirms airtightness before roofing goes back on. High-permeability underlayment is recommended to allow residual drying.
Can SIP ridge rot happen even if the roof does not leak?
Yes, and in most cases it does. SIP ridge rot is driven by air leakage from inside the building, not by rain or exterior water entry. The roof in this case was completely watertight -- intact shingles, sound underlayment, tight flashing -- and significant OSB deterioration still developed. The unsealed ridge joint was the only entry point that mattered.
How do I know if my SIP roof has ridge rot developing?
Early warning signs include a musty smell near the ridge during cold weather, staining on the structural ridge beam, and unexplained displacement of ridge-cap shingles. A blower-door test, thermal imaging in cold weather, and moisture mapping of the ridge OSB can identify air leakage and elevated moisture before visible structural damage develops. If you are seeing any of these signs, the appropriate next step is a forensic inspection -- not a roofing patch.
Concerned About Your SIP Roof?
If you are seeing signs of ridge damage, moisture staining, or unexplained shingle displacement on a SIP roof, a forensic inspection can identify whether air leakage is involved -- before the OSB is compromised beyond repair.
Talk to a SIP Forensic EngineerRelated Resources:
SIP Problems and Failure Modes -- An overview of the most common ways SIP assemblies fail and how to recognize them
SIP Installation Guide -- How SIP roofs should be sealed, taped, and detailed to prevent air leakage
SIP Energy Performance and Moisture Management -- How moisture behaves in SIP assemblies and what it does to OSB over time
SIP Building Codes and Compliance -- Code requirements relevant to SIP roof assemblies and ventilation
How SIP Forensic Analysis Works -- A full explanation of the forensic investigation process for SIP failures